Cookies, Desserts, Recipes

Flourless Peanut-Chocolate Cookies

So, I used to post once a month on a blog called Today’s Housewife. In fall 2012, the group decided together to stop posting due the busyness of life and families and such. Though sad, I enjoyed being part of the group. As of early January 2013, the blog was officially taken down. But I don’t want to lose my recipes, so periodically I will be reposting them on here. Enjoy!

~

from June 9, 2011… I wish I had a plate of these cookies now 🙂

So you know those days when you need dessert? Not in a a couple hours, but a couple hours ago? Yeah, me too. Doesn’t that always seem to happen when you reach into your pantry and discover that you’re out of flour [or in your fridge and lament the lack of butter]? Been there, done that. Don’t want to do it again. It’s not too much fun, friends. But thankfully… next time that happens, you have a solution!

That solution is… Flourless Peanut-Chocolate Cookies!

Flourless Peanut-Chocolate Cookies | thepajamachef.com

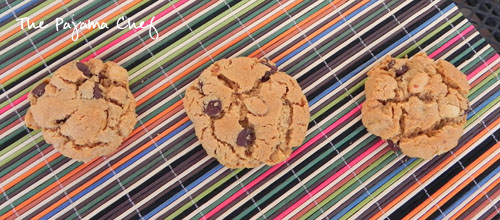
Six ingredients and 30 minutes later, you can have a plate of delicious cookies chock-full of peanut butter and chocolate delight-fullness. What could be better?

The only problem is that these cookies are dangerously addictive, and you just might find yourself “accidentally” out of flour or butter more often. 🙂 At least, that’s what I may or may not have found true in my life…

one year ago: {Healthy} Mexican Hot Chocolate Breakfast Bars
two years ago: Lime Chicken Rice Bake
three years ago: Crispy Honey Ginger Chicken

Flourless Peanut-Chocolate Cookies [from Martha Stewart’s Everyday Food]
click to print

Ingredients:

  • 1 cup creamy peanut butter [I use regular, not natural]
  • 3/4 cup sugar
  • 1 large egg, lightly beaten
  • 1/2 teaspoon baking soda
  • 3/4 cup semi-sweet chocolate chips
  • 1/2 cup roasted salted peanuts

Directions:

Preheat oven to 350 degrees. In a large bowl, stir together peanut butter, sugar, egg, and baking soda. Then gently fold in chips and peanuts and mix until just combined. Scoop dough onto ungreased cookie sheets in 1 tablespoon increments, shaping into balls with moistened hands. Place two inches apart on baking sheets, then bake until cookies are golden and puffy, about 12-14 minutes. Cool on cookie sheets for five minutes, then remove to cooling racks to cool completely…if they last that long! Enjoy!

Time: 30 minutes.

Yield: 2 dozen cookies.

Desserts, Pies, Recipes

Oreo Ice Cream Pie

This beauty is alllll because of Ben. [Who just started a blog, p.s.] Apparently, in his high school cafeteria, Oreo Ice Cream Pie was all the rage. Along with weenie winks [hot dogs wrapped in American cheese and white bread, then baked]. Look at this photo at your own risk, I’m not quite sure how anyone would find that appealing. But apparently some do. I can guarantee that pretty much everyone will find this pie appealing. And delicious. Certainly, delicious.

Oreo Ice Cream Pie | thepajamachef.com

I don’t think I ever ate anything this good in my high school cafeteria, partially because we had open campus so I often went home or out to eat. But I digress. Who cares about high school food? That was so last decade! Instead of lamenting about the old caf, you can make an easy no-bake dessert at home that you can enjoy for days [if it lasts that long!!].

Oreo Ice Cream Pie | thepajamachef.com

This pie couldn’t be simpler: an Oreo crust, Cookies and Cream ice cream, Cool Whip, and some cookie crumbs. Piece of cake. Cookie? Pie? Regardless, this pie is AWEsome. I made my own Oreo crust with butter and Oreo crumbs, but you can buy one if you’re pressed for time. My time concession was to use Cookies and Cream Ice Cream instead of mixing Oreos into vanilla ice cream. Whatever ingredients you choose are sure to be delicious! I think sometime I’d like to try it out with mint Oreos and Mint Chocolate Chip ice cream. Mmmm! But this time, I wanted to make the original for Ben to take him back to his days as a Lake High School Flyer! Happy Friday! 🙂

Oreo Ice Cream Pie | thepajamachef.com

two years ago: Spaghetti and “Meat” Balls
three years ago: Caramelized Onion Dip

Oreo Ice Cream Pie

  • Servings: 10
  • Print

Ingredients:

  • 1 small package Oreos [15.25 ounces]
  • 4 tablespoons butter, melted
  • 1.5-1.75 quart Cookies and Cream ice cream, softened on the counter for 20 minutes
  • 8 ounce package Cool Whip, softened on the counter for 20 minutes

Directions:

Crush 24 Oreos in a ziploc bag or food processor until you have fine crumbs. Transfer to a large bowl, then pour melted butter over cookie crumbs, stirring well to combine. Press mixture onto the bottom and sides of a 9 inch deep dish pie pan to form the crust.

Spoon ice cream over crust, then cover completely with Cool Whip. Crush 2-3 remaining Oreos and sprinkle over Cool Whip. Cover tightly with aluminum foil and return to freezer for at least 2 hours before serving.

Alternatively, you can stick the pie in the freezer uncovered for about 20 minutes, then remove it and stick a few toothpicks in the Cool Whip and then cover it with foil, using the toothpicks to hold up the foil so it doesn’t stick. Then return to freezer for at least 2 hours before serving.

Notes: I used the full 1.75 quart container of ice cream in a 9 inch deep dish pie pan. It was nearly overflowing. If you use a regular pie pan, use less ice cream. I’m sure you can find a use for what’s left! 🙂

Linked up with: Weekend Potluck, Foodie Friday.

Cookies, Desserts, Recipes

Cranberry-Pistachio Citrus Butter Cookies

Cranberry-Pistachio Citrus Butter Cookies. A mouthful of words, a mouthful of deliciousness. Seriously you guys… there is SO MUCH DELICIOUSNESS in these lil cookies. Dried cranberries. Pistachios. Lemon. Orange. Butter. Yum yum yum.

Cranberry-Pistachio Citrus Butter Cookies | thepajamachef.com

I made these cookies for the 2013 Great Food Blogger Cookie Swap, and sent them to Alicia at Balancing Motherhood [who I found out is a fellow KD sister! AOT!], Renata at First Time Foods, and Emily at Pink Tiger in the Kitchen. I hope y’all liked them! I know we certainly did. They are buttery and nutty, full of holiday cheer.

The Great Food Blogger Cookie Swap 2013

I’m usually wary of baking with nuts and dried fruit, even though I love both on their own. I guess I associate nuts and dried fruit in sweets with old people cooking, or something weird like that [no idea why]. I’ve been trying to think of an exception for a good five minutes, but no can do. WAIT! THESE cookies are the exception. The nuts and dried fruit are totally necessary for adding the right amount of crunch to the chewy citrus butter cookies. If you don’t like cranberries and pistachio, feel free to swap out your favorite alternatives. Cherry-pecan? Blueberry-walnut? Whatever your little heart dreams up is what you should make. Unless you like directions. Then stick with cranberry-pistachio. 🙂

Cranberry-Pistachio Citrus Butter Cookies | thepajamachef.com

In addition to sending out cookies, participating in the cookie swap means you get some in the mail too! I was fortunate to receive Double Coconut Macaroons [top] from Mary Beth at A Carrot and A Cupcake, and Cranberry Pistachio Pudding Cookies [bottom] from Starr at Chicago Foodie Girl. Both were sooo good and I’m anxiously awaiting the recipes! Hopefully I’ll be getting my third batch soon!

cookies

Hope you enjoy!

one year ago: Cranberry Orange Pancakes with Cranberry Maple Syrup
two years ago: Cranberry Pineapple Sauce

Cranberry-Pistachio Citrus Butter Cookies [from Vanderbilt Wife]
click to print

Ingredients:

  • 1/2 cup butter, softened
  • 1 cup sugar
  • 3/4 cup brown sugar, packed
  • 1/4 cup milk
  • 2 tablespoons lemon juice
  • zest of 1 orange
  • 1 egg
  • 3 cups all-purpose flour
  • 1 teaspoon baking powder
  • 1/4 teaspoon baking soda
  • 1 cup pistachios, roughly chopped
  • 1 cup dried cranberries

Directions:

Heat oven to 375 degrees. Line cookie sheets with parchment paper or silpats.

Place butter and sugars in a bowl and cream with an electric mixer until fluffy. Add milk, lemon juice, orange zest, and egg, then mix on low to combine.

Add flour, baking powder, and baking soda, then mix on low until combined. Fold in pistachios and cranberries with a wooden spoon.

Spoon onto cookie sheets by tablespoons. Bake for 10-12 minutes, or until edges are brown. Centers may look a little soft. Let rest on cookie sheets for 3-4 minutes before moving to cooling rack. Store in airtight container.

Time: 30 minutes.
Yield: 3 dozen cookies.

Notes: Dough can get pretty soft, so just pop in the refrigerator between batches. These cookies freeze and ship well, too!

Linked up with: Foodie Friday, Weekend Potluck.

Bars, Desserts, Recipes

SRC: Dark Chocolate Ginger Squares

Hello! Be sure to introduce yourself to your new favorite Christmas treat! Usually, you have to choose between chocolate and spice… but not this time!

Dark Chocolate Ginger Squares | thepajamachef.com

I made these Dark Chocolate Ginger Squares for December Secret Recipe Club, thanks to the lovely Mellissa of A Fit and Spicy Life. I was assigned her blog for the December reveal and I’m so happy about that! Mellissa lives in Minneapolis, so she’s a fellow Midwesterner… although I am now a Midwestern transplant living in the South, where they call rain storms things like ‘gully washers’ or ‘frog stranglers.’ Bizarre. But anyways, back to Mellissa. She loves trying new recipes, sharing her favorite wines, and traveling. In fact… she just got back from Greece!! How cool is that?!? Definitely head over to her blog to check out her pictures from that trip–it looks incredible! Speaking of incredible, take a look at these Dark Chocolate Ginger Squares.

Dark Chocolate Ginger Squares | thepajamachef.com

Mellissa originally made these as cookies, dubbing them Chocolate Ginger Drops. They had cherry flavored dried cranberries and dark chocolate chips, and were cute little cookies. I was so excited to make them! But I was feeling a little bit lazy. So I mixed up the dough [using extra dark chocolate chips, some crystallized ginger, and no dried cranberries], pressed it in a pan, and hoped for the best!

Dark Chocolate Ginger Squares | thepajamachef.com

And let me tell you… these Dark Chocolate Ginger Squares ARE the best. They have a chewy texture and spicy flavor from the typical ginger cookie ingredients like brown sugar, molasses, and spices. But these ginger squares are kicked up a notch because I added some minced crystallized ginger AND those dark chocolate chips! If you feel so inclined, check out Mellissa’s original recipe for instructions on making these as drop cookies, but I think the bars are equally chewy, spicy, chocolately, and delicious! Enjoy! 🙂

one year ago: Caramel Apple Dip
two years ago: Honey Yeast Dinner Rolls
three years ago: Sweet Potato Soup

Dark Chocolate Ginger Squares

  • Servings: 20
  • Print

[slightly adapted from A Fit and Spicy Life]

click to print

Ingredients:

  • 1/2 cup butter, softened
  • 3/4 cup light brown sugar, packed
  • 1 teaspoon baking soda
  • 1 teaspoon dried ginger
  • 1 teaspoon allspice
  • 1 egg
  • 1/4 cup molasses
  • 2 cups all-purpose flour
  • 3/4 cup dark chocolate chips
  • 1/2 tablespoon crystallized ginger, minced

Directions:

Preheat oven to 375 degrees. Grease an 8×8 pan with cooking spray.

In the bowl of an electric mixer, beat butter for 30 seconds. Then add brown sugar, baking soda, ginger, and allspice. Mix to combine, then add egg and molasses and mix again.

Add flour by 1/4 cup increments, mixing in between additions. Finish by stirring in dark chocolate chips and crystallized ginger with a wooden spoon.

Press dough in prepared pan, then bake for 20-25 minutes, or until a toothpick inserted in the center comes out clean. Cover with aluminum foil after 15 minutes so the top doesn’t get too brown.

Cool for 30 minutes before cutting into squares. Store in an air-tight container.

Be sure to check out other recipes from this week’s Secret Recipe Club reveal here: 🙂

Also linked up with: Tuesday Talent Show.

Desserts, Other, Recipes

Harvest Pear Crisp with Crystallized Ginger

Let’s conclude our week of Thanksgiving recipes with the best part of all… dessert! Since I’ve made so many pies this fall, we just weren’t in the mood for pie for our fun meal. So crisp it was! What’s more fall than a crisp? But not the classic apple or cherry, but another fall fruit–pears!

Harvest Pear Crisp | thepajamachef.com

I think sometimes pears fall by the wayside, overshadowed by apples. Even though I am pretty much addicted to having at least one sliced apple a day, pears are another love of mine! They’re sweet and pair [ha ha ha] so well with cinnamon and ginger. Two things make this crisp sing–the crumbly, buttery topping with tangy pieces of crystallized ginger, and the simple spice of cinnamon. Some fall recipes use a bunch of warm spices. That’s all well and good, but keeping it easy and basic just celebrates the pear, cinnamon, and ginger. Yum! Exactly what we needed to polish off a delicious Thanksgiving dinner. The photos do NOT do this dish justice. It was getting dark… boo.

Harvest Pear Crisp | thepajamachef.com

Oh well, I still hope you’ve enjoyed this week of Thanksgiving recipes! 🙂

Thanksgiving Meal | thepajamachef.com

two years ago: Whipped Sweet Potatoes
three years ago: Spinach Mushroom Cream Sauce with Spaghetti

Harvest Pear Crisp with Crystallized Ginger [from Bon Appetite, November 2009]
click to print

Ingredients:

filling

  • 4 pounds ripe pears [6-7 large pears] – peeled, cored, cubed
  • 1/2 cup sugar
  • 2 tablespoons cornstarch
  • 1/2 teaspoon cinnamon
  • 1/2 teaspoon vanilla

topping

  • 1/2 cup flour
  • 1/2 cup brown sugar
  • 1/2 teaspoon cinnamon
  • 1/4 cup unsalted butter, cold and cubed
  • 1 cup old-fashioned oats
  • 1/4 cup crystallized ginger, minced

Directions:

Preheat oven to 350 degrees. Spray a 9×13 baking dish with cooking spray.

Place pears in prepared baking dish, then add sugar, cornstarch, cinnamon, and vanilla. Toss together gently with a fork.

In a medium bowl, prepare topping. Stir together flour, brown sugar, and cinnamon. Cut in butter with pastry blender, then add oats and ginger. Toss with a fork, then spread evenly over pears.

Bake for 45-50 minutes, until topping is golden brown and juices are bubbling. Serve warm.

Time: 60 minutes.
Yield: 8-10 servings.

Linked up with: Foodie Friday, Weekend Potluck.