Cupcakes, Desserts, Recipes

Maize and Blue Cupcakes

My dad’s birthday was last weekend, and to celebrate, my parents and sister came down to Bloomington for the weekend. We hung out at home and went to the Indiana/Michigan football game. My dad is a huge Michigan fan [born in Ann Arbor; it’s in his blood!] so when I asked him what kind of cake he wanted, he said, maize and blue, kind of as a joke, I think.

Maize & Blue Cupcakes... perfect for the diehard U of M fan!
Cupcake tower!

My initial thought with that request was something lemon and blueberry. However, I quickly nixed that idea because my dad isn’t the biggest fruit lover you’ll ever meet, so I thought I should find a recipe that he would love. It was for his birthday after all. After spending some time researching recipes and scouring cake supply stores, I finally found something that would work: food coloring.

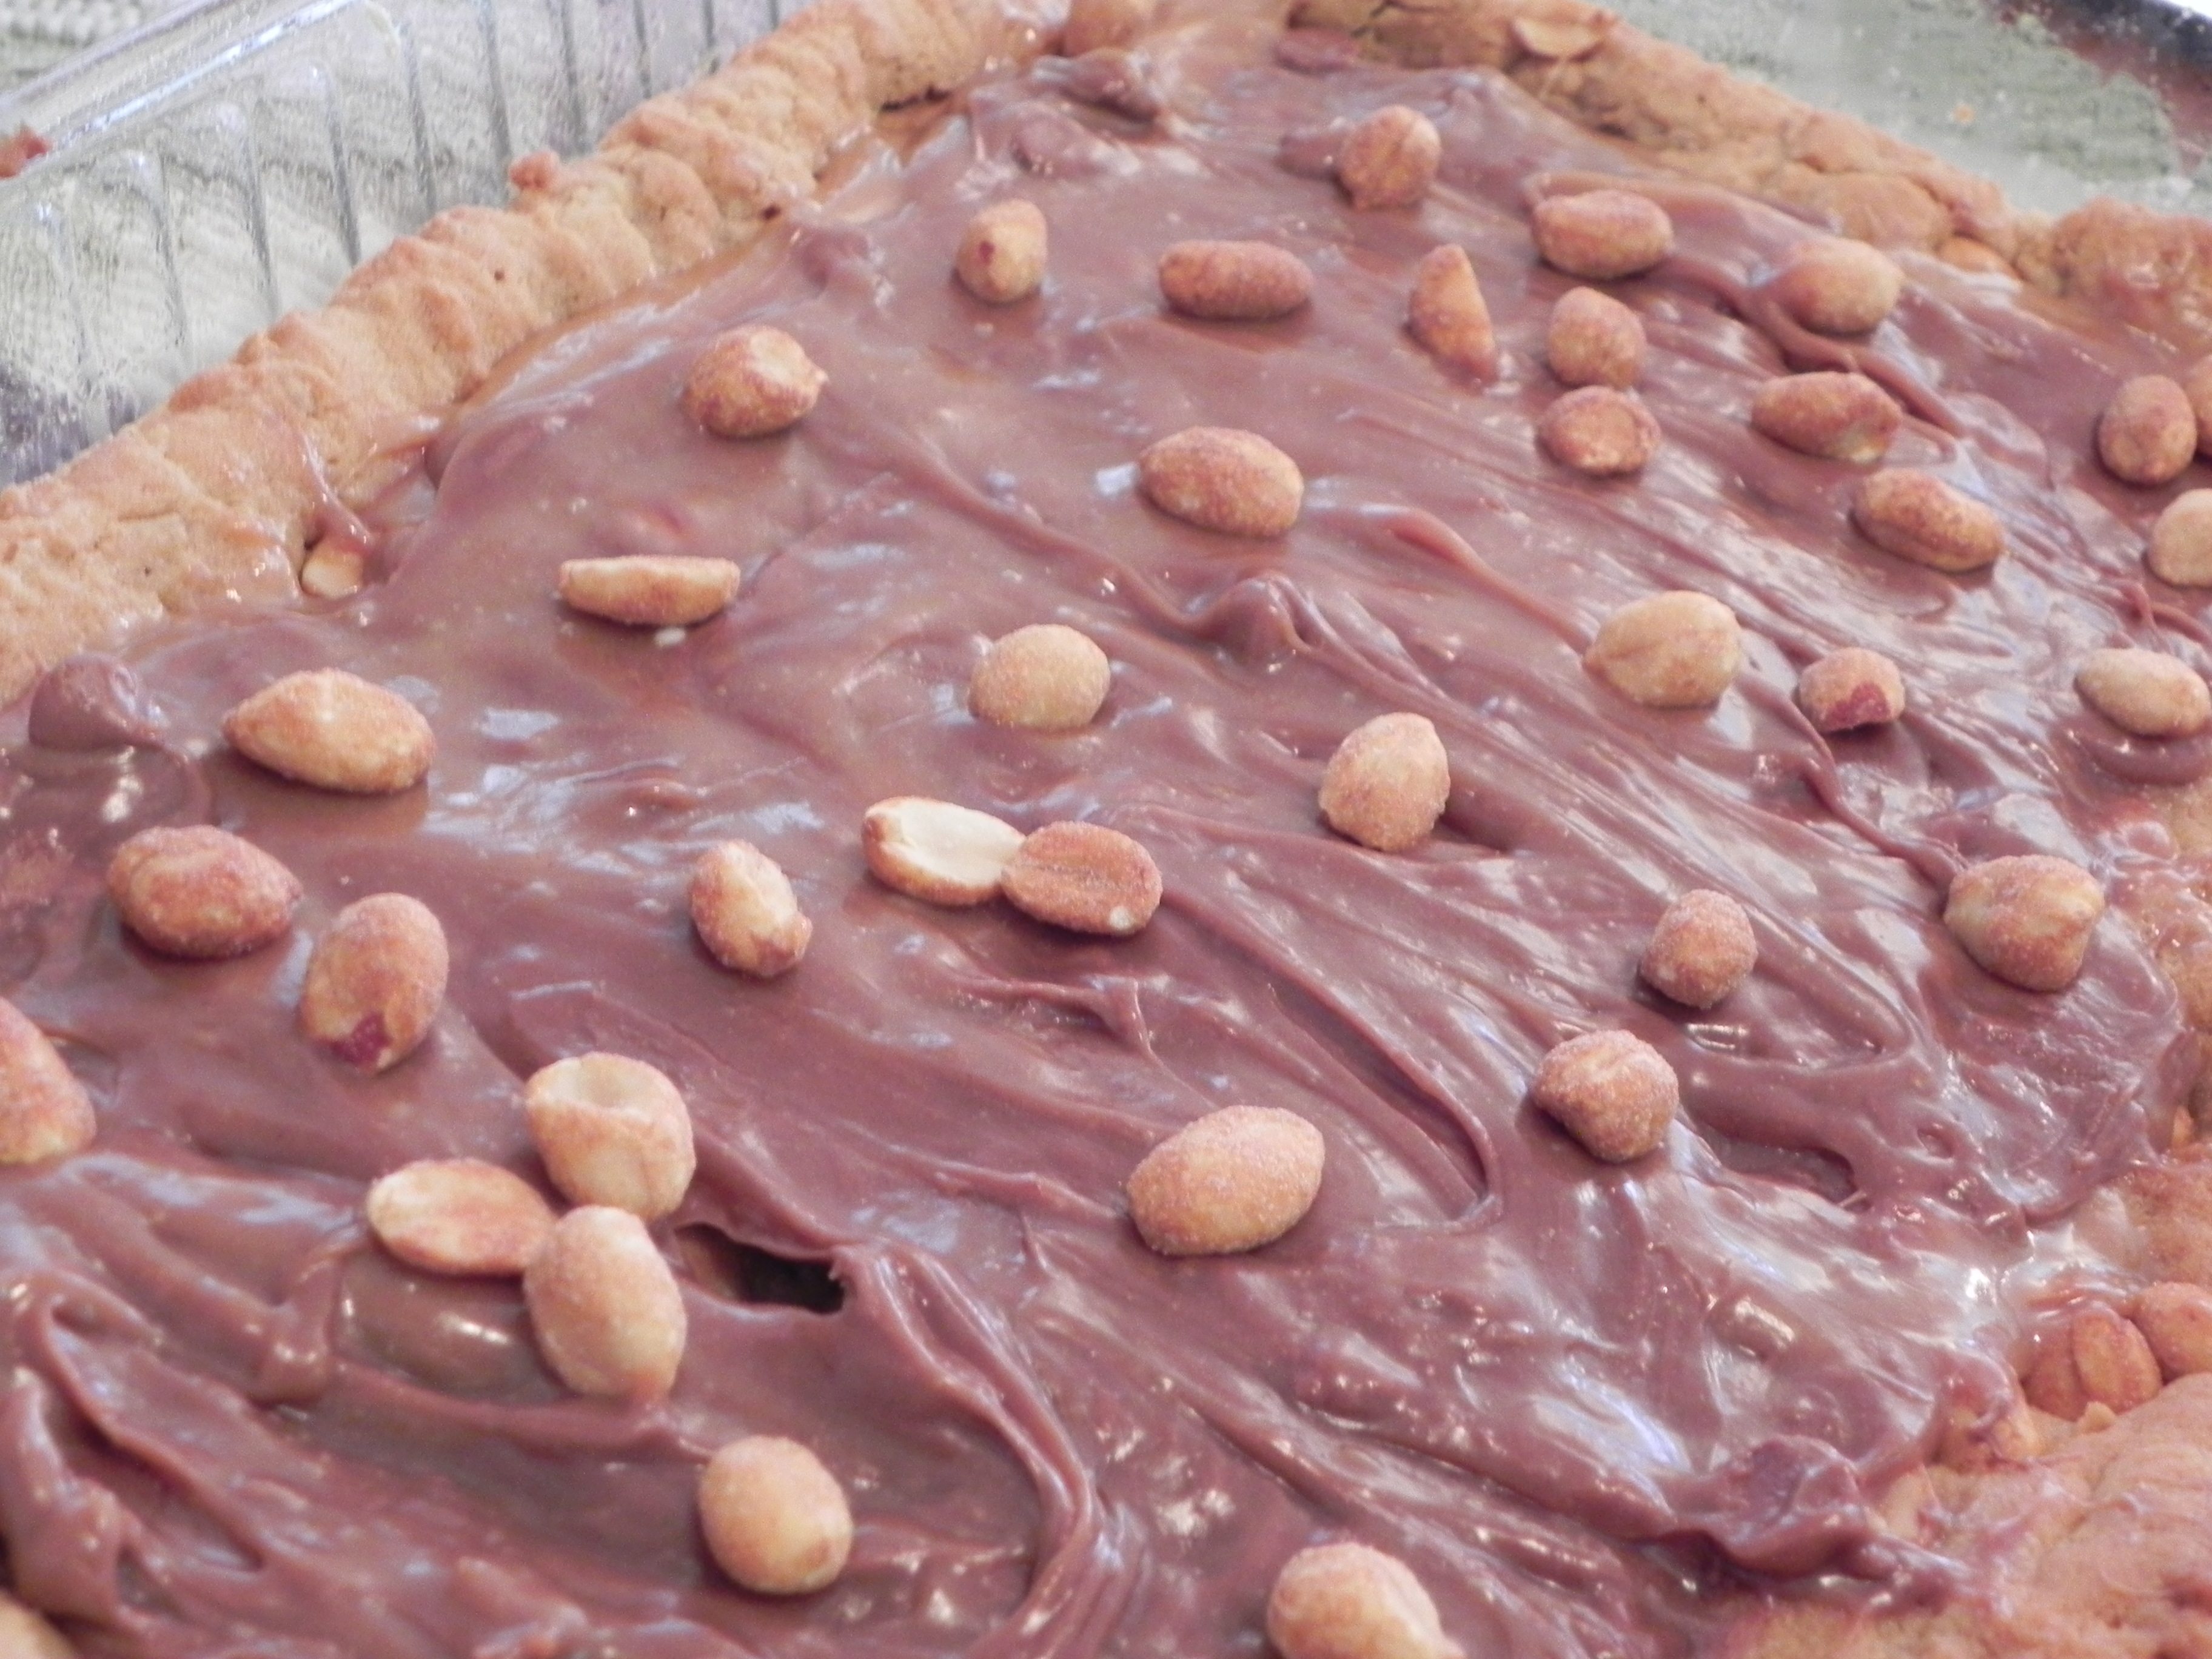
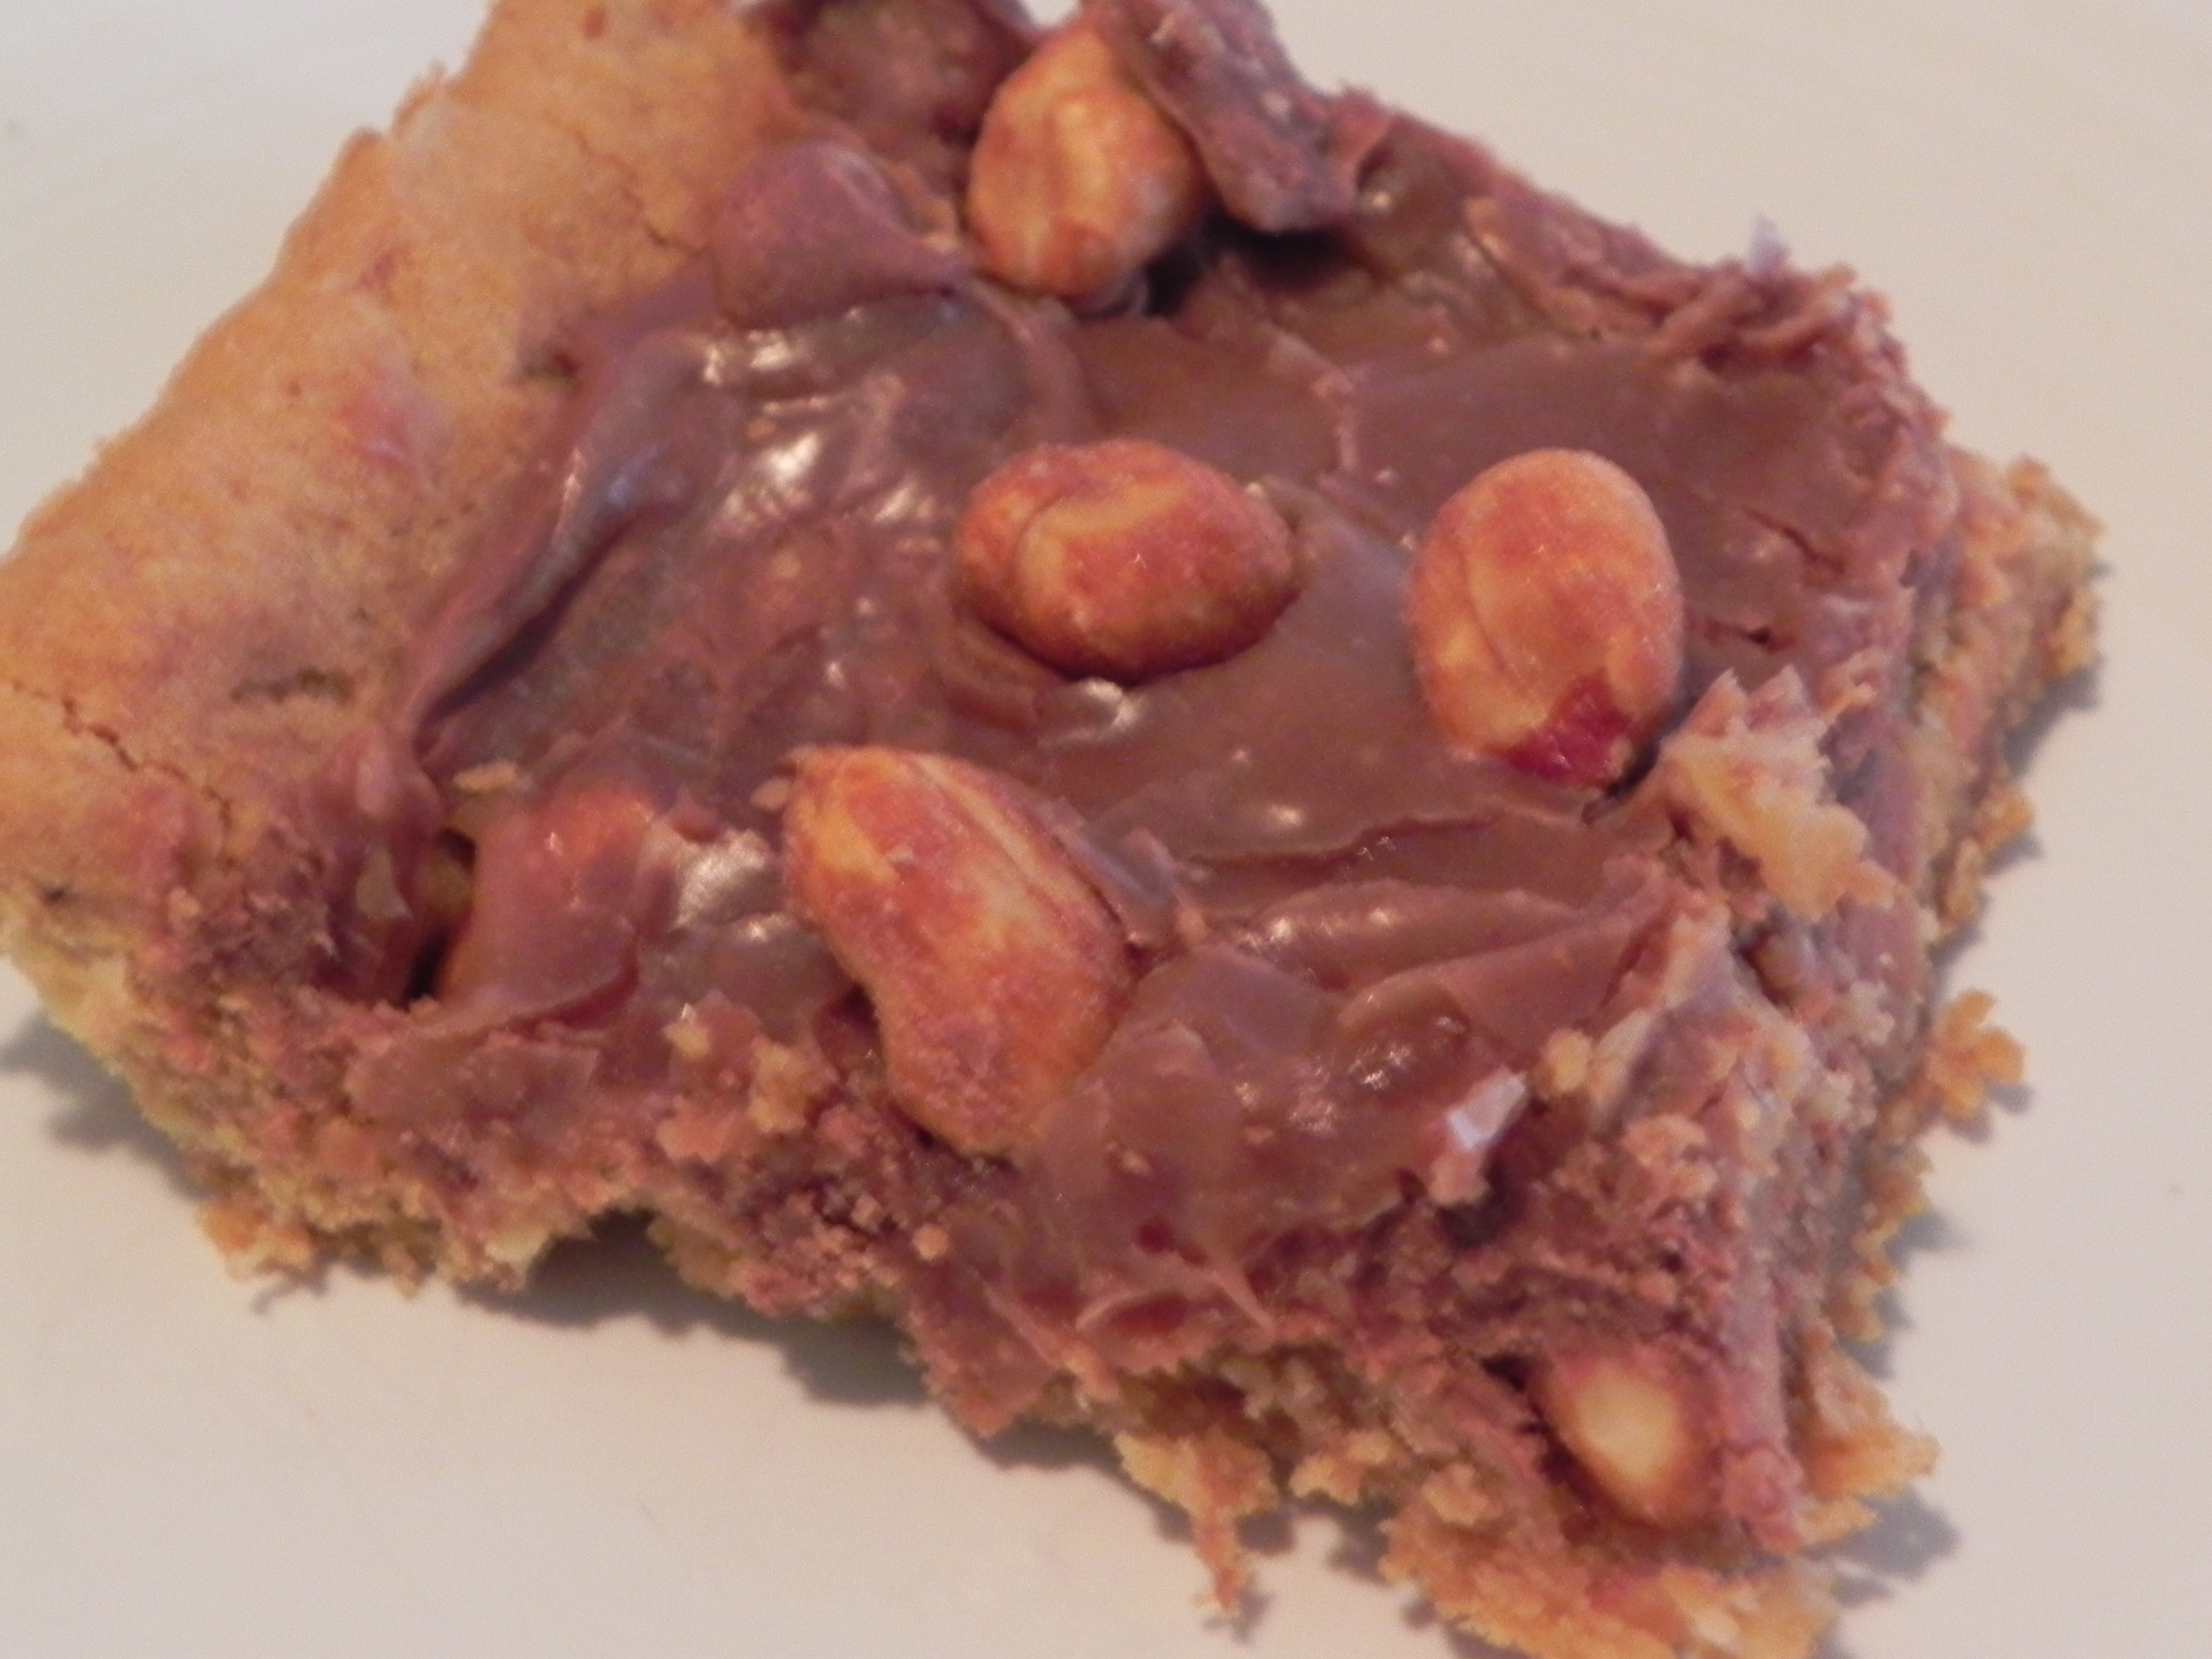
I chose to make cupcakes out of a simple white cake and buttercream frosting, and use gel food coloring to dye the cupcakes and frosting. I dyed half the cupcakes and half the frosting maize, and the other half of each blue. Frost the maize cupcakes with blue frosting and frost the blue cupcakes with maize frosting… and you have a true Michigan cupcake dream! Next time I’ll have to be more adventurous with the decorating. I can’t say I am an expert cupcake decorator but these did turn out pretty cute if I do say so myself… and they were tasty too!

The cupcakes were moist and rich, even a week later as I was finishing up the leftovers. The frosting was sweet but not overly sweet, which is a welcome change from the frostings that leave you in a sugar coma. Paired with vanilla bean ice cream, this is the perfect birthday dessert.

Dad
The Birthday Boy!

Maize and Blue Cupcakes & Buttercream Frosting

cake from The Taste of Home Cookbook and frosting from Good (Cheap) Eats

Ingredients:

Cupcakes:

  • 1/2 cup butter, softened
  • 1 1/2 cups sugar
  • 4 egg whites
  • 2 teaspoons vanilla extract
  • 2 cups all-purpose flour
  • 1 teaspoon baking powder
  • 1/2 teaspoon baking soda
  • 1 1/3 cups half and half [this recipe called for buttermilk, but I used what I had…]

Frosting:

  • 1 cup butter, softened
  • 3 cups powdered sugar
  • 1 tablespoon half and half
  • 1 teaspoon vanilla

Directions:

For the cake:

Preheat oven to 350 degrees. Prepare muffin pans with paper liners or grease well with cooking spray. This recipe should make 24 cupcakes.

In the bowl of a stand mixer, cream butter and sugar until light and fluffy. Add egg whites, one by one, mixing in between each addition. Mix in vanilla. In a small bowl, whisk together flour, baking powder, and baking soda. Add to butter/sugar/egg mixture gradually, alternating with half and  half; beating well to combine after each addition.

If desired, divide batter in  half and add food coloring to desired shade. I used gel food colorings, which provide more intense color. 🙂

Fill individual tins 2/3 of the way full, then bake for 15-20 minutes. Mine took about 17 minutes to bake. They are done when they spring back when lightly touched in the center. Remove from tins and let cool on cooling rack, frost, and enjoy!

For the frosting:

In the bowl of a stand mixer, beat butter until light and fluffy. Add sugar, half and half, and vanilla. Mix on low until all ingredients are fully incorporated. Adjust with additional sugar or milk, depending on your desired consistency.

Frost when cupcakes are cool… otherwise you’ll have melty frosting! And no one likes melty frosting…

Here are some more photos of game day! 🙂

Ben
My husband shares his name with the IU quarterback. Ben is such a good name! Interestingly enough, my Ben is a huge OSU fan. Needless to say, he was rooting for IU… just like the IU Ben. However, Michigan won–a present for Dad!
Ben and Sarah
Ben thought my hat was gross. It did clash with my sweatshirt…
Indiana Marching Band
IU Marching Band before the game.
mom and daughters
With my mom and sister, freezing and getting wet in the rain at the game!
Maize & Blue Cupcakes... perfect for the diehard U of M fan!
A cupcake enjoyed with ice cream after the game!

Are you a sports fan? I’m not, except for running… but going to the game was more fun than watching football on TV! How about you?

Cookies, Desserts, Recipes

Crispy Crunchy Chocolate Chip Cookies

So, I realize this is cookie recipe #2 for the week. Uh huh… no excuse really, I just like cookies. So I choose to share these recipes with you [you can thank me later] because they are just so good.

Crispy Crunchy Chocolate Chip Cookies... these cookies taste great fresh or are a treat right out of the freezer too!As you can tell by the name of the recipe, these are not your ordinary chocolate chip cookies. They are crisp and they crunch. Majorly. They have a definite old fashioned taste to them, which is so refreshing and different from your average chocolate chip cookie, I do believe. I’ve duplicated this recipe almost entirely from Life as Mom, but did add some honey roasted peanuts to the mix for a little salty/sweet combo that is absolutely divine.

Crispy Crunchy Chocolate Chip Cookies

[from Life as Mom]

  • 1 cup white sugar
  • 1 cup brown sugar
  • 1/2 cup canola oil
  • 1/2 cup butter, softened
  • 2 eggs
  • 2 teaspoons vanilla
  • 4 cups flour
  • 2 teaspoons baking soda
  • 1 teaspoon cream of tartar
  • 12 ounces chocolate chips
  • 3/4 cup honey roasted peanuts

Preheat oven to 350 degrees. In the bowl of a stand mixers, combine sugar, oil, and butter. Add eggs one at a time, then vanilla, mixing in between each item.  In a separate bowl, stir together flour, baking soda, and cream of tartar. Gradually mix into wet ingredients. Fold in chocolate chips and peanuts. Drop dough by rounded tablespoons [use a metal spoon, this dough is too heavy for plastic] onto ungreased cookie sheets at least 2 inches apart. Bake for about 7-9 minutes or until set.

How do you like your cookies?

Personally, I love them warm out of the oven [who doesn’t?!], but for this recipe, I think they are best frozen–straight out of the freezer. YUM!

Bars, Cookies, Desserts, Recipes

You Get the Best of Both Worlds: Pillow Cookies!

The eternal question: brownies or cookies? Both are delicious in their own ways. I love the fudgy, chewy, richness of a good brownie. However… I also am completely addicted to the scent of cookies baking in the oven and that crisp, first bite into a perfectly baked cookie. Sometimes, it’s really hard to choose between the two, like at a party or something. You can either be that person who goes for them both or you can pick just one and be somewhat miserable because you’re still thinking about that poor, abandoned sweet just sitting on the dessert table. It’s a sad place to be, I know. If you share the same conundrum as me, then this recipe is for you.

Picture a cookie the size of your hand. Chocolate chip. Crispy, yet soft.

You take the first bite… tasty, yet pretty standard for a chocolate chip cookie.

Another bite. Wait, what is that? Is that what I think it is? A brownie? No, it can’t be. This is a cookie! What’s going on here?!?!

That, my friends, is a pillow cookie.

A luscious, soft brownie enveloped by a crunchy cookie.

Pillow Cookies... so you don't have to choose between cookies and brownies! #genius
look at that!

Believe you me, this recipe is just as amazing as it sounds… and it’s quite easy too. What better way to start a Monday morning than with a cookie recipe like this? Before I get to the good stuff though, I must ask, on an unrelated note…

Is it bad that when I hear the phrase “the best of both worlds,” I now immediately think of Miley Cyrus and Hannah Montana? Help me, please.

Pillow Cookies

from Bakerella

Ingredients:

  • 1 package brownie mix
  • 1 cup butter, softened
  • 1 1/2 cups packed light brown sugar
  • 2 large eggs, plus 1 egg yolk
  • 1 tablespoon vanilla
  • 2 1/2 cups all purpose flour
  • 2 teaspoons baking powder
  • 1/2 teaspoon baking soda
  • 12 oz. chocolate chunks

Directions:

Make brownies according to package directions. I use Betty Crocker Hershey’s Triple Chunk brownie mix, though any brownies will do. [Bonus points if you make ’em homemade! I love these though.]

brownie mix in a box
my favorite brownie mix ever!

Let cool, then cut into 10 1-inch squares. What you do with the rest of those brownies is none of my business, but I’m sure you’ll find  a good use for them… 🙂

Meanwhile, start making that cookie dough! Yum!

Beat butter in the bowl of stand mixer until light and creamy. Add in brown sugar and mix until smooth. Then, add egg, yolk, and vanilla and mix that up too.

In a separate bowl, whisk together flour, baking soda, and baking powder. Add to mixing bowl in gradual 1/3 cup increments, beating to combine along the way. Fold in chocolate chunks, then cover and chill in the refrigerator for at least one hour.

Waiting is hard, I know, but this will be worth it! This is important because it’s easier to shape the cookies if the dough is cold.

After an hour or so… preheat the oven to 350 degrees and line a large baking sheet with parchment paper.

Then, using a measuring cup, spoon out 1/2 cup of cookie dough and shape into a ball. Yes, you read that right. 1/2 cup dough=1 cookie. Make a well in the middle of the ball like so…

make a well in the dough
Step 1

Then press a brownie in that indentation.

press in a brownie
Step 2

And finally, fold the rest of the dough around the brownie.

fold dough around brownie
Step 3

me!
Here I go!

I found it easiest to prepare 5 cookies at a time on a large baking sheet [15 by 20 inches], and to return the dough to the refrigerator while the first batch baked. Bake for about 15-20 minutes, or until cookies reach desired done-ness. Repeat until all the dough is gone–this should make about 10 large cookies.

Cool cookies on baking pan for about 10 minutes, then transfer to a wire rack.

Eat ASAP.

Pillow Cookies... so you don't have to choose between cookies and brownies! #genius

OH YUM.

Pillow Cookies... so you don't have to choose between cookies and brownies! #genius

Do you prefer cookies or brownies? What’s your favorite recipe?

Bars, Desserts, Recipes

The Last Chapter of Dessert Week

Finally.

The moment you have all been waiting for…. [drumroll, please!]

The exciting conclusion to dessert week 2K10!!!!

Sheba the kitty
Woohoo! Sheba is so excited, she’s even playing with her new toy. Take it down, Sheebs!

[I just had to throw that in. Isn’t she so cute? This is the only time I think she’s played with that new toy we got her recently. She has a toy that looks like that, but is falling apart and absolute d-i-s-g-u-s-t-i-n-g. It used to have feathers, and was attached to her scratcher. Now she has ripped it off the scratcher, destroyed the feathers that were once attached to it, and bats it around all the time. She also loses it everywhere. We thought we’d get her something new but it isn’t working. This new toy just doesn’t have the charm of the old one. 😦 My husband and I have dubbed the old toy the “dead animal,” because that’s what it looks like.  You can decide for yourselves, though!]

Sheba the kitty's favorite toy
What do you think? I think it’s UGLY!

On to something more pleasant. Such as the fact that this probably won’t be the last dessert week of the year because it’s still August [not for long though!] and even though school is starting on Monday [year 2 of 3 of my grad program], I will still love baking and will do it for my own sanity. Hahaha! Take that, classes! 🙂 As a refresher, last week I made an amazing Chocolate Cake and Creamy Lemon Squares. I decided to make these Peanut Butter Fingers as a last-minute replacement for the tasty-but-falling-apart Creamy Lemon Squares for two reasons.

1) You can’t go wrong with peanut butter and chocolate.
2) One fun blog I read is called Peanut Butter Fingers. You should check it out… it’s hilarious! 🙂

Scratch that–3 reasons.

Peanut Butter Fingers | thepajamachef.com
How delicious does this look?
Peanut Butter Fingers | thepajamachef.com
Or this?

Mmmm… maybe 4 or 5 reasons.

Peanut Butter Fingers | thepajamachef.com
Or that? YUM.

Okay, well, any way you view it… these are delicious and are highly recommended. They aren’t the best thing ever for you but they are oh so good.

Peanut Butter Fingers

  • Servings: 24
  • Print

from Jenn Cooks

Ingredients:

  • 1/2 cup margarine
  • 1/2 cup sugar
  • 1/2 cup brown sugar
  • 1 egg
  • 1/3 cup + 1/4 cup creamy peanut butter, divided [I did not use natural peanut butter… but you’re welcome to experiment with that if you’d like! I used regular PB like Jiff or Skippy or the Kroger store brand!]
  • 1/2 teaspoon baking soda
  • 1/2 teaspoon vanilla
  • 1 cup old-fashioned rolled oats
  • 1 cup all-purpose flour
  • 6 ounces chocolate chips
  • 1/2 cup powdered sugar
  • 2-4 tablespoons skim milk
  • 1/4 cup honey-roasted peanuts
  • cooking spray

Directions:

Preheat oven to 350 degrees. Use cooking spray to grease a 9×13″ pan.

In the bowl of an electric mixer, cream margarine, sugar, and brown sugar until fluffy. Add in the egg, 1/3 cup peanut butter [hint: grease measuring cup with cooking spray first–it will come out a lot easier!], baking soda, and vanilla. Mix until combined. In a separate bowl, mix flour and oats with a wooden spoon and gradually add to the batter in the electric mixer. When combined, use rubber spatula to turn dough into the prepared pan. Use your hands [washed, of course!] to press dough into the bottom of the pan. Lick your fingers if you want, then place pan in the oven and bake for 18 minutes. Not 17 or 19; 18. This. Is. Crucial. [You can also recruit a husband or wife or friend or sister or father or anyone to put the pan in the oven so you can lick your fingers completely, but this is totally optional. Feel free to bribe them with the beater or something, if you can share. ;-)]

Meanwhile, make the glaze. In a medium bowl, whisk together powdered sugar, 1/4 cup peanut butter, and 2 tablespoons milk. Add up to 2 more tablespoons of milk, but don’t make it too runny. You want the consistency to be spreadable but not super liquidy. I added an extra 1 tablespoon milk [total of 3 altogether], and this was good for me.

After those 18 minutes of baking, if the bars are baked almost to perfection [golden brown, yet still slightly under-baked in the center], dump the chocolate chips evenly over the peanut butter base and return to oven to bake for 2-4 minutes, or until peanut butter base looks good to you [base this on your desire: underbaked, crispy, or just right cookie bars].

Then, pour the glaze over top the chocolate goodness and swirl it around with a spatula or icing knife. Top with honey-roasted peanuts for extra peanut flavor and crunch!

And so concludes dessert week 2K10. I think I should plan another soon, k?

Cakes, Desserts, Recipes

Chocolate Cake That Changes Everything

I’ve been on a dessert kick lately. I promise though, it’s not my fault. Last week I had to make desserts to take to two separate occasions. And one recipe failed in presentation [due to the lack-of-parchment-paper-incident-of-2010 so I had to make a third, which was so difficult fun!

This is dessert recipe 2 of 3 that I made last week. It is by far my favorite, and chocolate cakes aren’t really my thing.

However, they are my Grandpa’s thing, and I was in charge of making him a chocolate cake with chocolate frosting for his 89th birthday last week. It’s his favorite, and I had to oblige.

Grandpa
Grandpa sporting new oven mitts!

This cake changes everything in regard to my feelings about chocolate cake. It’s another Martha winner.

Chocolate Cake & Frosting | this chocolate cake changes everything! {thepajamachef.com}Moist. Rich. Tasty. Sweet, but not too sweet. With a frosting that has a slight tang to it… not sickeningly sweet and great when cold.

My mom said it was one of the best she’d ever had.

It even comes highly recommended by…

Chocolate Cake & Frosting | this chocolate cake changes everything! {thepajamachef.com}
NEGLEY!

Negley is my husband’s new pet dinosaur. He’s a velociraptor, to be precise. Anyways, he came along to the birthday celebration and he wholeheartedly enjoys this cake, so you should too.

Chocolate Cake & Frosting

  • Servings: 18
  • Print

by Martha Stewart

Ingredients:

  • 3/4 cup + 1/8 cup unsweetened cocoa powder, divided, plus more for dusting
  • 1 1/2 cups all-purpose flour
  • 1 1/2 cups sugar
  • 1 1/2 teaspoons baking soda
  • 3/4 teaspoon baking powder
  • 3/4 teaspoon salt
  • 2 large eggs
  • 3/4 cup low-fat buttermilk
  • 3/4 cup warm water
  • 3 tablespoons oil [Martha suggests safflower, I used canola]
  • 1 teaspoon vanilla extract
  • 1 1/8 cups powdered sugar
  • pinch of salt
  • 3 ounces cream cheese, softened
  • 1/4 cup unsalted butter (1/2 stick)
  • 3 ounces fat free sour cream
  • 3 ounces bittersweet chocolate, melted
  • 2 ounces milk chocolate, melted
  • cooking spray

Directions:

Preheat the oven to 350 degrees. Use cooking spray to grease pan, then dust with cocoa. I used a 9×13 baking dish because I had to transport the cake 4 hours in the car, but the original recipe calls for 2 8″ cake pans, so feel free to take your pick. 🙂 A layer cake would be much prettier!

In an electric mixer, combine 3/4 cup cocoa, flour, sugar, baking powder, baking soda, and salt. Add eggs one by one, mixing in between to fully combine. Then gradually add in buttermilk and mix to fully incorporate. Repeat with water, oil, and vanilla. Once all ingredients are added, mix on medium speed until smooth and batter is free from any lumps.

Pour batter into pan(s). Bake until a toothpick inserted in the center of the cake comes out clean, about 35 minutes. Place on cooling rack to cool. [If using round cake pans, turn cake out onto cooling racks after about 15 minutes.] Cool completely before frosting.

Meanwhile… make that frosting! [Note: if using round cake pans, just double this recipe to ensure you’ll have enough frosting.]

In a small bowl, mix powdered sugar, cocoa, and salt. In the bowl of an electric mixer, combine cream cheese and butter until smooth and fluffy. Add cocoa mixture to cream cheese concoction in 1/3 cup increments, mixing until fully incorporated. Pour in the chocolate [it helps to melt it in a glass measuring cup with a spout] while mixer is turned on low, then add sour cream and beat until combined, scraping the sides as necessary.

Frost the cake once cooled, and be sure to lick the beater! No eggs=safe indulgence! 🙂 Top with a sprinkling of mini chocolate chips and you have yourself one chocolaty treat to enjoy.

Feel free to let the cake sit overnight… if you can help it. I refrigerated it because the frosting had dairy in it, and it was ever-so-tasty the next day. Remember, Negley thought it was good and you will too! 🙂