Pretzel Rolls | The Pajama Chef
Breads, Recipes

Pretzel Rolls

So, the consensus about Blueberry Burgers from Monday seemed to be that they are totally unique but worth a shot. Yay!! That’s totally what I thought too. But surprisingly [or maybe not so surprisingly, since bread is universally popular and loved], the pretzel rolls served with those sweet ‘n savory burgers got some attention too. And rightfully so! Those pretzel rolls were pretty amazing, if I do say so myself!

Pretzel Rolls | The Pajama Chef

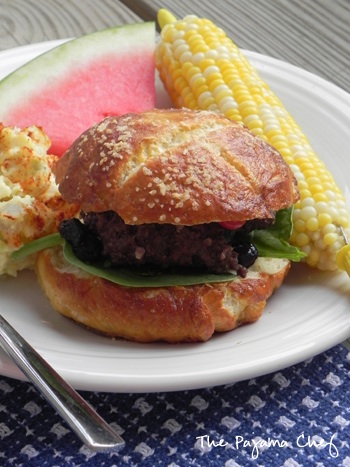
Growing up, I never was a huge soft pretzel lover, but I happened to marry a guy who could eat his weight in soft pretzel if you let him, so my taste buds have adapted a bit over the past five years. My love of pretzel rolls began the day I bought a bag at Trader Joe’s a few years ago, and the self proclaimed pretzels-are-meh girl became obsessed with sandwiches and burgers on a pretzel roll. If it was on a restaurant menu, you could bet it’d wind up on my plate! As things naturally go, one day I decided that I should just make those silly rolls already! And so I did.

Pretzel Rolls | The Pajama Chef

These pretzel rolls look like they are complex, but really, they come together pretty quickly with minimal ingredients. This is one of the first yeast recipes I ever made, and its practically foolproof. A little sugar and butter adds complexity to the basic soft pretzel taste you already know and love. I guarantee that once these babies come out of the oven, they will be gone in a flash. Aside from enjoying these rolls with your burgers, sloppy joes, or chicken sandwiches, I highly recommend saving a few for a special breakfast treat.

Pretzel Rolls | The Pajama Chef

Warm them up for a few seconds in the microwave and then add a generous smear of fig preserves or raspberry jam… the sweet and salty flavors will blow you away. I think I’m going to be making these rolls all summer, just for that breakfast–and the occasional blueberry burger, of course. 🙂 Enjoy!

  • Print

from erinraatjes via Tasty Kitchen

Ingredients:

  • 1 1/2 cups warm water (110°F)
  • 1 package active dry yeast (not quick rise yeast) [.25 ounces or 2 – 1/4 teaspoons]
  • 2 teaspoons sugar
  • 4 1/2 cups unbleached all-purpose flour
  • 2 teaspoons Kosher salt + more for sprinkling
  • 4 tablespoons unsalted butter, melted
  • 1/4 cup baking soda
  • 1 egg, lightly beaten

Directions:

In the bowl of a stand mixer, stir together warm water and yeast, then let rest for 5 minutes until foamy. Next, add sugar, flour, 2 teaspoons salt, and butter. Mix with dough hook on medium-low speed for about 4-5 minutes to fully combine. Cover with a towel or plastic wrap and let rise for 1 hour or until doubled in size.

Meanwhile, line two baking sheets with parchment paper or silpats. When dough has doubled, punch down and turn out onto a lightly floured countertop. Divide dough into 12 pieces [approximately 3 to 3.25 ounces each] to make sandwich size rolls, or 18 pieces [2 ounces each] to make dinner size rolls. [An easy way to divide the dough into 12 pieces is to divide the ball of dough in half, then divide each half into thirds, and each third in half again. If you have a food scale, it’s helpful to weigh the dough balls but not necessary.]

To shape each roll, pull the sides of the ball to the center and pinch to seal, lightly rolling the dough ball in your hands to smooth and shape. Place each roll, pinched side down, on prepared pans at least 1 inch apart. Cover with a towel and let rise in a warm place for 30 minutes or until doubled.

Then, preheat oven to 425 degrees with oven racks set in the lowest and middle position.

Bring 2 quarts of water to boil in a large saucepan. With water at a low boil, add baking soda and reduce heat to a simmer. Place rolls seam side down [2 or 3 at a time] in the water to poach for 30 seconds. Then use a slotted spoon to gently flip rolls over and poach on the other side for an additional 30 seconds. Repeat with all rolls, returning back to prepared pans with the seam side down.

Lightly glaze each roll with egg, coating sides and top completely. Sprinkle with a pinch of Kosher salt [or pretzel salt if you have it] and finish off by cutting an X on the top of each roll with a sharp straight-edged knife.

Bake for 15-20 minutes until golden brown.

Linked up with: Weekend Potluck.

Breads, Recipes

60 Minute Sandwich Buns

Over the years, I’ve tried several recipes for homemade sandwich buns. They were all okay, but I never became loyal to a single recipe. Too dry, too chewy, too time consuming, too sweet, too tough. I think that just might have changed… and here’s why:

60 Minute Sandwich Buns | The Pajama Chef

Oh my yum. These are the best sandwich buns I have ever made!! They are soft and fluffy, but substantial enough to hold drippy, savory, spicy pulled pork [watch for this recipe coming soon!] or even a store-bought chicken patty, just like you enjoyed at lunch in 5th grade [gasp! My guilty pleasure, purchased by my sweet husband as I freak out about finishing my thesis.]. For this batch, I used about 1/3 whole wheat flour, but plan to try to increase that gradually as I make them in the future for even more of a nutty, hearty sandwich bun.

60 Minute Sandwich Buns | The Pajama Chef

And you know what’s awesome about these sandwich buns? They come together so quickly that they are totally do-able on a weeknight so you don’t have to suffer through tasteless, dry, papery store-bought buns, thanks to an abundance of yeast [fyi this is NOT a packet of yeast, but 2 tablespoons]. No sireebob. You can even make these while writing a master’s thesis, they’re that easy. I’m definitely gonna be making them again soon and think you should too… even if you’re scared of yeast. Just pay attention to the measurements and the temperature of the water. And use fresh yeast… that is VIP!

60 Minute Sandwich Buns | The Pajama Chef Enjoy!

60 Minute Sandwich Buns

  • Servings: 8
  • Print

barely adapted from Taste of Home

Ingredients:

  • 2 tablespoons active dry yeast
  • 1 cup + 2 tablespoons warm water [110-115 degrees F]
  • 1/3 cup canola oil + more for brushing
  • 1/4 cup sugar
  • 1 egg
  • 1 teaspoon salt
  • 1 cup whole wheat flour
  • 2 – 2 1/2 cups bread flour
  • 1 tablespoon vital wheat gluten
  • 1 tablespoon poppy seeds

Directions:

In the bowl of a stand mixer, dissolve the yeast in warm water. Pour in 1/3 cup oil and sugar, then stir and let rest for 5 minutes.

Add egg, salt, whole wheat flour, 2 cups bread flour, and vital wheat gluten. Using the dough hook, let mixer knead the mixture on medium speed for 3-5 minutes until a soft dough is formed. Add up to 1/2 cup more flour if the dough seems too wet or sticky.

Next, immediately divide dough into 8 pieces. The best way to go about this is to divide dough in half, then divide each piece in half again [making 4 pieces total], then divide each of those pieces in half again. Roll into a ball, then place 3 inches apart on greased or lined [with parchment paper/Silpat] baking sheets. Brush with oil and sprinkle with poppy seeds.

Cover with a damp towel and let rise for 30 minutes. Meanwhile, preheat oven to 425 degrees. After dough is finished rising, bake for 8-12 minutes or until golden brown. Remove to cooling racks until cool. Store in covered container for up to a week.


Linked with: Weekend Potluck.

Pumpkin Cornmeal Muffins | The Pajama Chef
Breads, Recipes

Pumpkin Cornbread Muffins

So, Ben and I have a bad history with cornbread. Early on in our marriage, I made a 9×9 pan of cornbread and it was absolutely delicious… for days #1 and #2. But then on day #3,  things changed. I’ll spare you the details, even though it wasn’t super gross like mold or anything like that… I’m not even sure how to describe it, except to say that the cornbread just turned. Turned for the worst. It was so bad… so fast. I guess that’s how these things go  sometimes… and as a result, we’ve become suspicious about our cornbread, often fearing making it ourselves and/or eating it [even if someone else has made it!].

But THIS. THIS cornbread is nothing short of amazing.

Pumpkin Cornmeal Muffins | The Pajama Chef

Pumpkin + stone-ground blue cornmeal in muffin form=amazing. Did I just say amazing twice? Three times? Sorry, but I’m not sorry… these Pumpkin Cornbread [muffins] are simply the best!

Can we just say that pumpkin makes everything better? [Even endless election talk?] I think so! Please.

Pumpkin Cornmeal Muffins | The Pajama Chef

This cornbread is everything your typical cornbread needs to be–slightly sweet, soft, yet hearty enough to pair with a great soup or stew for dipping. Yet… this cornbread is a little different. Fall spices, pumpkin, and a hint of molasses make this cornbread incredibly flavorful and different… but not different enough for suspicious eaters [like us, the bad-experience-cornbread-eaters] to reject.

Don’t you love that?

Pumpkin Cornmeal Muffins | The Pajama Chef

Even though I initially made these for a soup night, I found myself pairing them with a good ‘ole schmear of pumpkin butter for breakfast.

Pumpkin Cornmeal Muffins | The Pajama Chef

I would never do that with regular cornbread, so I consider that a victory for sure! Enjoy. 🙂

Pumpkin Cornbread Muffins

  • Servings: 12
  • Print

from Sweet Pea’s Kitchen

Ingredients:

  • 1/2 cup all purpose flour
  • 1/2 cup whole wheat flour
  • 1 tablespoon baking powder
  • 1/2 teaspoon ground cinnamon
  • 1/4 teaspoon ground nutmeg
  • 1/2 cup light brown sugar
  • 1 cup cornmeal [I used a stone-ground blue cornmeal]
  • 2 eggs
  • 1 cup pumpkin puree
  • 1/4 cup canola oil
  • 1 tablespoon molasses

Directions:

Preheat oven to 400 degrees. Line a muffin tin with paper liners or grease well.

In a mixing bowl, stir together flours, baking powder, cinnamon, nutmeg, brown sugar,  and cornmeal. In a small bowl, whisk together eggs, pumpkin, oil, and molasses. Gently stir wet ingredients into the dry ingredients, then spoon into muffin cups.

Bake for 10-12 minutes or until toothpick inserted in the center comes clean.

Breads, Recipes

SRC: Maple Cornmeal Drop Biscuits

My Secret Recipe Club assignment this month was Katrina’s fabulous blog, Baking and Boys! As I say every month, I love being part of the SRC. It’s a fun way to try new blogs and recipes and be part of a great community. If you’ve missed my past SRC posts, the premise is this: you’re assigned a different member’s blog every month. You visit their blog, choose any recipe you want, then make it and share it on your blog… all while keeping your assignment a secret! Everyone else posts about their secret blog the same day. It’s fabulously fun to try out new blogs. If you have a blog, definitely check it out and consider joining! I highly recommend it.

Katrina is a devoted wife and mom, always involved with the lives and activities of her husband and their four[!!!!] sons. I can’t imagine how she finds time to bake and blog so many goodies all the time, but she does. I guess it’s because you always make time for what’s important to you. And feeding your family with delicious food is typically a high priority for many, including Katrina.

When I was perusing Katrina’s blog for something to serve with some potato soup I was making for a dinner with friends, I came across this story on her blog about how she made these fabulous maple cornmeal drop biscuits only to have them meet a tragic ending in her oven. You should check out the story, it’s really sad and totally something I would do. So in honor of that event, I thought I would recreate these maple cornmeal drop biscuits. The recipe technically wasn’t on Katrina’s blog since it was made as part of the Tuesdays with Dorie blog group. I thought long and hard whether this was something that I should make for a SRC post in that case, but decided the story was just too good to not share. So I hope that is alright with the SRC-powers-that-be… because these maple cornmeal drop biscuits should definitely get some attention.

They are flaky, sweet, and so easy to make. Instead of regular yellow cornmeal, I used a stoneground local blue cornmeal that I got at our farmer’s market recently. It tastes really good, but I suspect that’s why my biscuits don’t look quite so pretty–browned blue turns a bit of a funny color. Maybe it’s my oven. Anyone have any tips for baking with blue cornmeal? Regardless of their appearance, these maple cornmeal drop biscuits will definitely be added to my rotation of quick breads to serve with soup. We ate them plain, dipped in soup [butternut squash apple and potato], and think they would have been great with pumpkin butter, but I forgot that at home so it wasn’t an option. Sad day.

Thankfully, these biscuits are a snap to make, so I can taste test them with pumpkin butter very, very soon. Hope you enjoy them as much as we did! And Katrina… thanks for the recipe. Hope you make them again soon!

Maple Cornmeal Drop Biscuits

  • Servings: 12
  • Print

from Baking with Boys! via A Little Something…..Sweet!

Ingredients:

  • 1 cup all-purpose flour
  • 1 cup yellow cornmeal, preferably stone-ground [I used blue]
  • 1 tablespoon baking powder
  • 1/4 teaspoon baking soda
  • 6 tablespoons cold, unsalted butter, cut into 12 pieces
  • 1/2 cup milk [I used skim]
  • 1/4 cup pure maple syrup

Directions:

Preheat oven to 425 degrees. Prepare a large baking sheet with parchment paper or a silpat.

In a large bowl, stir together flour, cornmeal, baking powder, and baking soda. Add butter and toss to coat using your fingers or a pastry blender until butter is mixed in well in pieces no bigger than a pea. Pour in milk and maple syrup and stir together gently until a very soft dough forms.

Spoon dough into 12 mounds on prepared baking sheet about 2 inches apart. Bake for 13-15 minutes [mine were done in about 13, but original recipe said 15] or until golden brown. Serve warm.

Be sure to check out the other fabulous recipes posted today (click below) for this week’s SRC reveal. Have a great day!


Breads, Recipes

Oatmeal Buttermilk Bread

I love the simplicity of baking bread. I know many might think that it’s a bit intimidating, but it’s really quite simple [albeit time consuming!]: mix, knead, rise, shape, rise, bake, enjoy. Personally, I think baking bread [can be] even easier than making cookies! All that hassle of individually scooping and shaping a zillion dozen cookies… ugh. Delicious, but ugh. And the added benefit of baking bread versus cookies? The smell of baking and that freshly baked bread lingering in your house…. it’s absolutely heavenly!

Speaking of heavenly, this bread should be right there in the dictionary next to the word “heavenly,” cause that’s how amazing it is! It’s very light and soft thanks to the creamy, tangy buttermilk base of the dough–perfect for dipping in potato soup and those future fall stews that will be popping up soon. Aside from dipping, this bread is divine with a dab of butter and honey, both of which accentuate the sweet, oat-y flavor.

One last thing I loved about this bread was its bakery-esque shape. It made me feel so fancy and accomplished when I opened up the oven and pulled out not just one, but two hearty loaves of Oatmeal Buttermilk Bread. If two loaves are too many, give one away to a friend or halve the recipe… easy as pie! Er… bread. 🙂

Oatmeal Buttermilk Bread [from Clockwork Lemon]

click to print

Ingredients:

  • 1 1/4 cup old fashioned oats + more for sprinkling
  • 1 cup boiling water
  • 2 teaspoons instant yeast
  • 1/4 cup warm water
  • 1 1/2 cups buttermilk
  • 1/2 cup canola oil
  • 1/2 cup brown sugar
  • 1 cup whole wheat flour + 1/2 – 3/4 cup extra [even with 3/4 cup dough should be very sticky]
  • 3 1/2 cups all purpose or bread flour [I used bread flour]
  • 2 teaspoons kosher salt

Directions:

In a small bowl, combine 1 1/4 cups oats with boiling water, stir until water has been absorbed. Set aside.

Next, in the bowl of a stand mixer, stir together yeast and warm water. Let mixture rest for 5 minutes, then stir to dissolve.

While yeast is resting, use another bowl or measuring cup to whisk together buttermilk, oil, and brown sugar. Stir until brown sugar is almost dissolved, then set aside.

Combine flours [not including “extra” whole wheat flour] and salt in another bowl.

By this point, the yeast should be dissolved. Add flour mixture alternately with buttermilk mixture with mixer running on low, using the paddle attachment. Then add oats and mix until combined. At this point, add up to 3/4 cup extra whole wheat flour. The dough will still be very sticky so it’s definitely a judgement call–I added about 1/2 cup.

Switch to the dough hook and knead on low-medium for 10-12 minutes. The original recipe advised 15-20 minutes but I was fearful of wearing out my mixer’s motor and the dough was springing back substantially after about 10 minutes, so I stopped early. Scrape sides and bottom of the bowl occasionally during this process to make sure everything is getting kneaded well.

Remove dough from bowl, then oil bowl and replace dough. Cover with plastic wrap and a kitchen towel and set in a warm place [I used our balcony!] to double. This should take about an hour.

Turn dough onto a floured countertop. Flatten into a 12×6 inch rectangle. Cut this in half and then pat into two slightly bigger rectangles. Fold the two sides to overlap [like folding a letter] then roll the dough away from you to form a loaf. Flip the loaf over and let it sit on its seam for a minute. Repeat with second piece, then place the formed loaves on baking sheets. [My thanks to Stephanie for this paragraph of instructions, there is no way I could have explained this better.]

Cover in greased plastic wrap and let rise for 30-45 minutes. After about 30 minutes, preheat the oven to 385 degrees.

Brush water on top of each loaf of bread, then top with extra oats. Bake for 30-40 minutes or until crust is dark brown and hollow-sounding when tapped.

Cool on baking sheets for 10 minutes, then remove to cooling racks. Cool completely before cutting so it holds it’s shape… but don’t worry, you can reheat for fresh, warm buttered bread… amazing!

Time: 4 hours [1 hour active, max].

Yield: 2 loaves.