Beans, Main Dishes, Recipes, Rice, Sides

Southwest Veggie + Taco Rice Casserole

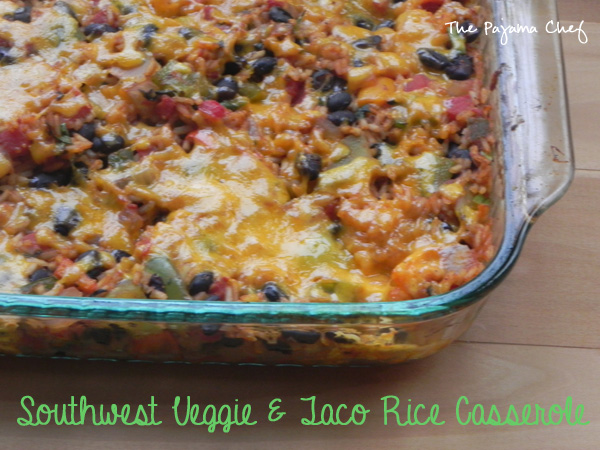
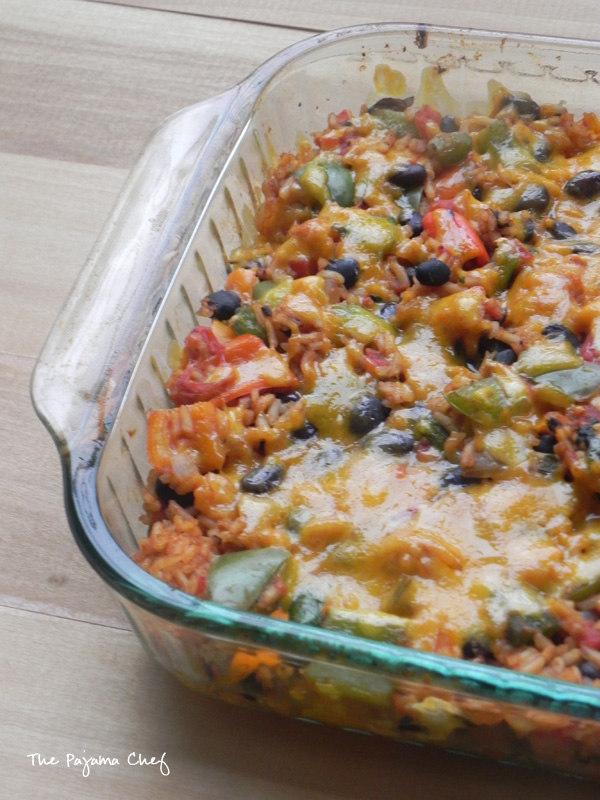
This simple, healthy casserole is filled with lots of vegetables, black beans, and a delicious taco rice. It’s perfect for dinner and makes enough for lunch leftovers too. Mmm!

Southwest Veggie + Taco Rice Casserole | thepajamachef.com

Once upon a time, when we were first married, our go-to dinner was tacos, spaghetti, or some sort of seasoned chicken dish. There’s nothing wrong with any of those dinners, but unless you are using assorted boxed or packaged ingredients they aren’t that easy. Well, if you don’t buy that stuff on a regular basis, that is. [For the record, I do buy that stuff sometimes. I just don’t keep it at home regularly. My pantry is too full of seventeen kinds of grains, pastas, mustards, and sauces. Seventeen EACH that is. :)]

Southwest Veggie + Taco Rice Casserole | thepajamachef.com


Now, my go-to dinner is much simpler. Black beans and rice. Directions: Open freezer, remove black beans that I make by the pound in the oven. Defrost in the sink while making some rice on the stove. Heat black beans up on the stove with some homemade taco seasoning. Serve together, with assorted toppings like avocado, cilantro, green onions, hot sauce, sour cream, cheese, lettuce, spinach, tomatoes, etc. It’s rare that I have all those toppings on hand at once, but when I do… it’s parrrtytime! [Yes, I realize that if black beans and rice with toppings is my definition of partytime, I’m probably not very exciting. Ha.]

Southwest Veggie + Taco Rice Casserole | thepajamachef.com

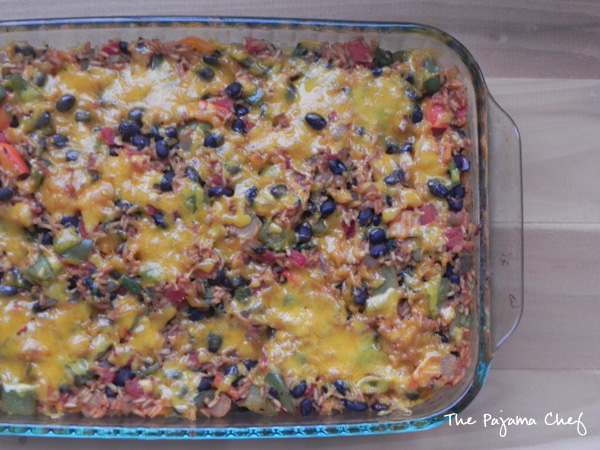
This casserole is the kicked up version of black beans and rice, except everything is all mixed up together and baked til it’s ooey gooey. MMM! If you like regular black beans and rice, you’ll LOVE this version. It’s from the Budget Bytes cookbook so you know it has to be good. Probably what makes it so freakin’ awesome is that the rice isn’t just normal… it’s taco rice! If your family isn’t comfortable with meatless meals yet, I think this would be a great way to introduce the concept. There’s tons of flavor in one lil casserole dish! We loved this meal and hope you do too! 🙂

one year ago: Oreo Ice Cream Pie
three years ago: Spaghetti and “Meat” Balls
four years ago: Caramelized Onion Dip

Southwest Veggie + Taco Rice Casserole

  • Servings: 6
  • Print

from the Budget Bytes cookbook

Ingredients:

for taco rice

  • 1/2 tablespoon chili powder
  • 1/2 teaspoon ground cumin
  • 1/2 teaspoon garlic powder
  • 1/4 teaspoon dried oregano
  • 2 tablespoons tomato paste
  • 2 cups long-grain white rice

for casserole

  • 2 tablespoons canola oil
  • 1 medium yellow or white onion, diced
  • 2 cloves garlic, minced
  • 1 medium jalapeno, diced [deseeded if desired]
  • 1 bell pepper, diced
  • 1 zucchini, sliced and quartered – or 1 cup mushrooms, another bell pepper, or an extra cup of corn
  • 1/2 tablespoon chili powder
  • 1 cup frozen corn
  • 1 – 15 ounce can diced tomatoes with green chiles
  • 1 – 15 ounce can black beans, drained and rinsed
  • 3 cups prepared taco rice [from above]
  • 2 cups shredded cheddar cheese
  • 2 green onions, thinly sliced
  • 1/2 cup cilantro, chopped

Directions:

In a saucepan, whisk together chili powder, cumin, garlic, oregano, tomato paste, and 3 cups water. Whisk together then stir in rice. Cover and bring to a boil, then reduce heat to low and simmer for about 20 minutes or until rice is fully cooked. Then fluff with a fork and set aside.

Preheat the oven to 375 degrees. Grease an 8×8 or 9×9 inch dish with cooking spray.

In a large skillet, heat oil over medium heat. Add the onion and cook until soft, about 5 minutes. Add garlic and cook about 30 seconds. Then, add rest of the veggies: jalapeno, bell pepper, zucchini, and chili powder. Stir to combine and cook for about 8-10 minutes, or until soft and all liquid has evaporated, stirring frequently.

Remove from heat and stir in corn, tomatoes, and black beans. Add the taco rice [you will have extra rice left] and the cheese and stir well. Transfer to prepared pan, then bake for 20 minutes or until heated through and bubbly.

Serve with green onions and cilantro.

Note:

Recipe can also be doubled [casserole portion–do not make extra rice] and baked in a 9×13 pan. Bake for about 25 minutes or until bubbly.


Breakfast, Muffins, Recipes

Healthy Tropical Banana Muffins

Fresh ginger, yogurt, and coconut oil make for a healthy tropical banana muffin that you won’t be able to resist! 

Healthy Tropical Banana Muffins | thepajamachef.com

Banana muffins… can you ever have enough recipes? I think not. These banana muffins aren’t your basic cinnamon/nut laced version. These banana muffins are tropical and healthy. Perfect for a dreary January morning, methinks. And the shredded coconut on top is just the start of the amazingness!

Healthy Tropical Banana Muffins | thepajamachef.com

It’s honestly been a few months since I made these delicious muffins, so I don’t have one in front of me right now. Sad day! But I do remember just how wonderful these tasted. It’s only been recently that I’ve started to buy fresh ginger, and let me tell you… fresh ginger is just SO wonderful. It’s fragrant as you’re grating it, and then it adds a little extra burst of flavor with the bananas, coconut oil, and warm spices. These muffins are a nice way to escape on a lil vacation at breakfast or snacktime, even if it’s just an average winter weekday back at home. Enjoy!

one year ago: Cranberry Steel Cut Oats with Caramelized Pears
two years ago: Mexican Cornbread Pot Pie
three years ago: Lasagna Soup
four years ago: Whole Wheat Cornbread

Healthy Tropical Banana Muffins

  • Servings: 12 muffins
  • Print

adapted from A Hint of Honey

Ingredients:

  • 1 cup white whole wheat flour
  • 1/2 cup whole wheat flour [could use all white whole wheat/all all-purpose]
  • 1/4 cup all-purpose flour [could use all white whole wheat/all all-purpose]
  • 2 teaspoons baking powder
  • 1/4 teaspoon cinnamon
  • 1/4 teaspoon nutmeg
  • 1/2 cup vanilla yogurt [or plain yogurt/sour cream]
  • 2 tablespoons brown sugar [may want to increase to 1/4 cup if using plain yogurt or sour cream]
  • 1/4 cup coconut oil, melted and cooled
  • 2 large eggs
  • 2 teaspoons fresh grated ginger
  • 1 teaspoon vanilla
  • 2 large ripe bananas, mashed [about 1 cup]
  • shredded coconut, for topping

Directions:

Grease muffin pan with cooking spray or line with paper liners. Preheat oven to 375 F.

In a large bowl, whisk together flours, baking powder, cinnamon, and nutmeg. In a separate bowl, stir together yogurt, brown sugar, oil, eggs, ginger, vanilla, and bananas. Fold wet ingredients into the dry and mix until just combined.

Fill muffin cups 3/4 of the way full, then top with shredded coconut. Bake until golden, approximately 15-17 minutes, or until a toothpick inserted in the center comes out clean.

Cool in the pan for 5-10 minutes before removing to a wire rack to cool completely.

Store at room temperature in an airtight container for up to 3 days. Leftovers can be frozen for a later time.

Cookies, Desserts, Recipes

Chewy Ginger Cookies

These chewy ginger cookies are filled with molasses, warm spices, and lots of love! Don’t let the Christmas plate fool you… your family will love these cookies year round! 

Chewy Ginger Cookies | thepajamachef.com

My mom started making these cookies when I was in high school, and over the years they have been called many, many names [aside from delicious]. Ginger cookies, big soft ginger cookies, harvest ginger cookies, harvest cookies… so when I decided to make them this Christmas season, I didn’t know what to call them. Ultimately, the descriptive title won out: Chewy Ginger Cookies. These cookies are unmistakably gingery and SUPER chewy. I have to admit that since they’re a fairly basic cookie I didn’t immediately think of making them for Christmas. But recently, a family friend messaged me on Facebook for the recipe and BOOM! They popped into my head and just wouldn’t leave. 🙂

Chewy Ginger Cookies | thepajamachef.com

I altered this recipe a little from the original: namely, I made them about half the size as the recipe calls for. I don’t remember how big my mom used to make them but these were plenty large for us… plus you get double the amount of cookies. Enough for BOTH of our families. 🙂 Score! Since we were seeing our families different weeks, I put half the cookies in the freezer and was pleasantly surprised that they retained their chewiness despite a stint in the freezer. Perfect!

Chewy Ginger Cookies | thepajamachef.com

Though these cookies are pretty simple, they taste pretty amazing. I meant to share this recipe before Christmas but alas. You’ll just have to tolerate a Christmas plate in January, alright? Be sure to enjoy these cookies soon! They’re amazing with a glass of milk or a cup of tea. Mmm! Enjoy!

one year ago: Sweet Potato Chorizo Chile Mac
two years ago: Chicken Tinga Tacos
three years ago: Crockpot Cran-Apple Sauce
four years ago: Chicken and Wild Rice Soup

Chewy Ginger Cookies

  • Servings: 48 cookies
  • Print

from Better Homes and Gardens

Ingredients:

  • 4 1/2 cups all-purpose flour
  • 4 teaspoons ground ginger
  • 2 teaspoons baking soda
  • 1 1/2 teaspoons cinnamon
  • 1 teaspoon cloves
  • pinch of salt
  • 1 1/2 cups butter or shortening, room temperature
  • 2 cups sugar
  • 2 large eggs
  • 1/2 cup molasses
  • 3/4 cups coarse sugar or regular sugar

Directions:

In a medium bowl, whisk together flour, ginger, baking soda, cinnamon, cloves, and salt.

In the bowl of an electric mixer, beat butter for 30 seconds. Gradually add sugar and beat for 2 minutes, scraping sides of the bowl occasionally. Beat in eggs and molasses to combine. Slowly add in flour mixture, as much as possible with the mixer. Finish mixing in the rest with a wooden spoon.

At this point, dough can be shaped and baked or refrigerated for up to 24 hours.

When ready to bake, preheat oven to 350 degrees. If desired, line baking sheets with parchment or a silpat. Roll dough in 2 tablespoon sized balls [approximately 35 grams/1.25 ounces], then roll in coarse sugar. Place 2 1/2 inches apart on baking sheets. Bake for 12-14 minutes, or until puffy and light brown. Do not overbake. If desired, rotate pans halfway through baking [front to back and top to bottom] and allow baking sheets to cool before baking the next batch.

Cool cookies on baking sheet for 5 minutes before removing to a cooling rack to cool completely.


Cookies, Desserts, Recipes

Mystery Dish: Spiced Biscotti with Eggnog Glaze

Delicious spiced biscotti with some holiday cheer in the eggnog glaze! Mmmm!

Spiced Biscotti with Eggnog Glaze | thepajamachef.com #mysterydish

Merry Monday after Christmas! No, really. Merry Christmas! I hope you had a wonderful day with family and friends. We were on the sunny beaches of Florida… an absolutely perfect destination Christmas with my parents and sister and brother-in-law. So much FUN!! Except for when my phone took a tumble in the ocean on Christmas day. So, so sad. I got a new phone [woohoo]; fortunately my old phone was about 1 1/2 years old. Now we’re back in Tennessee, back to reality, kinda sorta. Ben and I both have another week off… and I can’t wait! I forsee lots of reading, kitty snuggles, and relaxing in my immediate future. Aside from popping in today to share this biscotti recipe for Mystery Dish, I don’t know if I’ll be blogging much til after the new year. But we will see! 🙂

Spiced Biscotti with Eggnog Glaze | thepajamachef.com #mysterydish

Anyways, I made these biscotti last week before heading to Florida for Mystery Dish. The lovely Colleen from The Smart Cookie Cook was our host. She gave us a GREAT list of ingredients to work with, including:

  1. White Chocolate
  2. Peppermint Bark
  3. Muenster cheese
  4. Eggnog
  5. Canned biscuits
  6. Nutmeg
  7. Browned butter
  8. Cherry tomatoes
  9. Spinach
  10. Roasted Garlic
  11. Vanilla ice cream
  12. Cream cheese

Spiced Biscotti with Eggnog Glaze | thepajamachef.com #mysterydish

These biscotti are made with three of the above ingredients: eggnog, nutmeg, and white chocolate. Let’s start with the biscotti: aside from allll the lovely spices like cinnamon, nutmeg, ginger, and cloves, I also added some sliced almonds and some chopped white chocolate. Tiny sliced almonds + chocolate = lotsa small pieces in each bite. Small pieces also makes slicing the biscotti easier after its initial bake.

Spiced Biscotti with Eggnog Glaze | thepajamachef.com #mysterydish

After the biscotti baked and cooled, I finished it off with a super simple eggnog glaze. It was just eggnog and powdered sugar. Easy as pie! 🙂 We have been enjoying our biscotti over the past week or so with coffee, tea, and even hot cocoa! They’re a fun treat to an already fun season. Hope you enjoy, and be sure to check out other recipes from this month’s edition of Mystery Dish!

one year ago: Baked Fish Tacos with Cranberry Salsa
two years ago: White Chocolate Peppermint M&M Cookies
three years ago: Classic Sugar Cookies
four years ago: Cranberry Scones

Spiced Biscotti with Eggnog Glaze

  • Servings: 16
  • Print

biscotti from Bon Appetit; glaze from Cupcake Project

Ingredients:

for biscotti

  • 1 large egg
  • 1/2 cup sugar
  • 1 tablespoon brandy
  • 1 teaspoon vanilla extract
  • 3/4 cup + 2 tablespoons flour
  • 3/4 teaspoon baking powder
  • 3/4 teaspoon cinnamon
  • 1/2 teaspoon nutmeg
  • 1/4 teaspoon ginger
  • 1/4 teaspoon cloves
  • 1/3 cup sliced almonds, toasted
  • 1/3 cup white chocolate chips, chopped [measure then chop]

for glaze

  • 1 1/3 cup powdered sugar
  • 1/4 cup eggnog

Directions:

Preheat oven to 375 degrees F. Line a baking sheet with parchment paper or lightly grease.

With an electric mixer, beat egg and sugar on medium speed for 2 minutes, until light and fluffy. Add in brandy and vanilla, beating to combine. In another bowl, whisk together flour, baking powder, cinnamon, nutmeg, ginger, and cloves. Slowly mix in flour mixture into egg mixture. Fold in almonds and white chocolate.

Spoon batter onto baking sheet. With wet hands, shape into a 2 by 10 inch log.

Bake for 20 minutes, until golden brown, then remove from oven and let cool for 15 minutes.

Transfer biscotti to a cutting board and slice into 1/3 inch pieces. Return pieces to baking sheet, then bake for 10 minutes. Flip and bake for another 8-10 minutes. Remove from oven. Biscotti will continue to harden as it cools.

When cool, whisk together powdered sugar and eggnog in a small bowl. Brush or drizzle onto biscotti and let glaze set. When set, brush or drizzle on a second layer if desired.

Store in an airtight container for up to one week.

Check out what else my Mystery Dish pals made this month! 

Brown Butter Eggnog Banana Bread with Cream Cheese Glaze from Flavor the Moments

Brown Butter Nutmeg Melted Ice Cream Cupcakes from The Sweet {Tooth} Life

Chocolate Peppermint Bark Cookies from I Dig Pinterest

Creamy Chicken Pasta Skillet from Simply Gloria

Peppermint Bark Milkshake from The Smart Cookie Cook

Roasted Garlic, Spinach & Tomato Whole Wheat Pizza from Yummy Healthy Easy

Spiced Biscotti with Eggnog Glaze from The Pajama Chef

Spinach and Tomato Quiche with Whole Wheat Crust from The Well Floured Kitchen

Spinach, Tomato & Roasted Garlic Flatbread from Inspiration Kitchen

White Chocolate Chip Gingerbread Blondies from Culinary Couture


Cookies, Desserts, Recipes

SRC Cookie Carnival: Orange Spritz

Cute little crisp, buttery Spritz cookies are the perfect addition to your cookie plate this Christmas season! This version has an orange twist for a bit of freshness! 

Orange Spritz | thepajamachef.com

It’s always more fun to make cookies at Christmastime, don’t you think? This year for the Secret Recipe Club we are celebrating all things COOKIES by having a fun little cookie carnival.

2014 SRC Cookie Carnival | thepajamachef.com


For this event I was asked to make one of Marsha’s recipes from her blog, The Harried Cook. Marsha is a mom of two girls who loves Jesus too! She lives in India with her family and from glancing at her Twitter, I learned that she teaches cooking classes. How fun! 🙂

Orange Spritz | thepajamachef.com

Marsha’s girls love these Orange Spritz cookies–both the eating, and the making. I remember eating Spritz cookies every Christmas growing up… and truthfully, they weren’t my favorite cookies. But as an adult I have given them another chance. They’re so delicate and light, the perfect accompaniment to tea or coffee or even a richer cookie treat. I almost made Marsha’s Lime and Pepper Cookies because they sounded so interesting, so you might want to check that recipe out too!

Orange Spritz | thepajamachef.com

But back to these cookies. This was my first time making Spritz cookies on my own and it was kinda fun, once I got the hang of my cookie press. By “me getting the hang of it” I clearly mean me desperately calling for Ben to come help because I could NOT figure out the instructions. It didn’t help that I have an Italian cookie press and the [oddly] translated instructions are spread out over several pages. Cookie press problems aside, the results were awesome. Thanks, Marsha for the great recipe! Merry Christmas!

Orange Spritz | thepajamachef.com

four years ago: Cranberry Sauce Two Ways

Orange Spritz

  • Servings: about 2 dozen medium cookies
  • Print

from The Harried Cook

Ingredients:

  • 1/2 cup unsalted butter, softened
  • 1/2 cup + 2 tablespoons powdered sugar
  • pinch of salt
  • 1 large egg yolk
  • 1/2 teaspoon vanilla
  • zest of 1/2 an orange
  • 1 1/4 cups all-purpose flour

Directions:

Preheat oven to 350 degrees F. Line baking sheets with parchment or a silpat.

With a mixer, cream together butter and sugar in a large bowl. Beat in salt and the egg yolk until just combined. Add vanilla and orange zest, then beat again. Stir in flour.

Fill your cookie press and press out according to the cookie press’ instructions, placing on baking sheets approximately 1 inch apart.

Bake for about 8-12 minutes, until edges are golden brown. The original recipe said baking time might be about 6 minutes, but mine was definitely about 12.

Cool on baking sheets for a few minutes, then transfer to a cooling rack to cool completely.


Check out other cookie recipes here: