Beans, Main Dishes, Pasta, Recipes

Mexican Lasagna

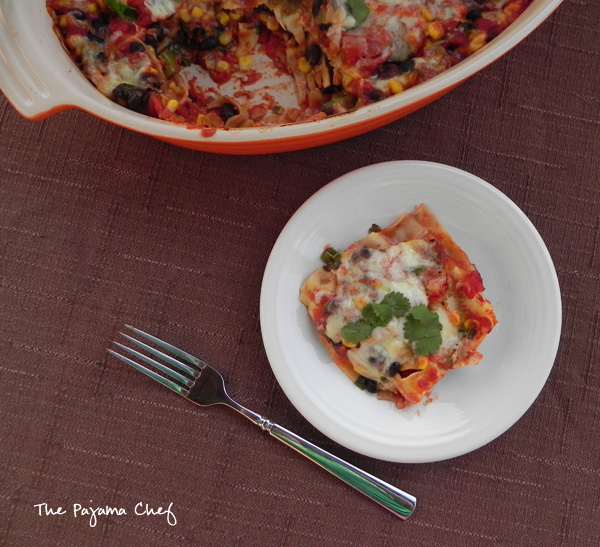
Mexican Lasagna… this epic (vegetarian) meal is weeknight-friendly, pantry-friendly, and oh so tasty! I definitely need to make this dish more often. Enjoy!

Mexican Lasagna... this epic (vegetarian) meal is weeknight-friendly, pantry-friendly, and oh so tasty! I definitely need to make this dish more often. Enjoy!

Lasagna… one of my favorite dinners of all times. I don’t get people who say it’s complicated. Sure, it’s a little more involved than tossing together sauce and noodles, but all it takes is a little layering and baking and then you have an amazing cheesy comfort dish that pretty much everyone loves. Right?? Right.

Normally, I’m a regular lasagna girl. I have several lasagna recipes on my site but my go-to is my Mom’s (and Grandma’s) lasagna. I made it on Friday, actually, with a fussy baby (who didn’t sleep the night before) attached to my leg. Fun times. But sometimes you want something a little different. You still want the lasagna experience, but with a new palate of flavors. (Yes, I totally think in those terms. Please let me know I’m not alone.) Enter… MEXICAN Lasagna. All the goodness of lasagna mixed with all the goodness of taco night!

Mexican Lasagna... this epic (vegetarian) meal is weeknight-friendly, pantry-friendly, and oh so tasty! I definitely need to make this dish more often. Enjoy!

This is an epic fusion dish that I do not make often enough. The recipe, as is written, is vegetarian–but if that’s not your thing, add some meat. Chicken, beef, chorizo… they’d all work I think! I usually have most of the ingredients in the pantry and fridge, so even though it’s (gasp) lasagna, it’s totally possible as a weeknight “what do I make for dinner” recipe. Busy weeknight WIN! Enjoy!

one year ago: Awesome Kale Salad
two years ago: Cheesy Veggie Pasta
three years ago: Chocolate Cream Filled Cupcakes
four years ago: Double Chocolate Banana Muffins
five years ago: Chocolate Zucchini Muffins
six years ago: Crock Pot Santa Fe Chicken
seven years ago: Potato Soup

Mexican Lasagna

  • Servings: 6
  • Print

from Annie’s Eats

Ingredients:

  • 1 – 15 ounce can black beans, drained and rinsed — I usually cook my black beans from scratch and use 1 1/2 cups
  • 1 1/2 cups corn kernels — fresh (usually about 3 ears) or frozen
  • 4-5 green onions, green and white parts sliced
  • 1/2 cup chopped cilantro + more to serve
  • 1 teaspoon dried oregano
  • 1 teaspoon garlic powder
  • 1 teaspoon cumin
  • black pepper
  • 1 – 28 ounce can crushed tomatoes
  • 9 no-boil lasagna noodles
  • 8 ounce shredded Mexican blend cheese — I’ve also used sharp cheddar, pepper jack, or monterey jack

Directions:

Preheat oven to 400 degrees F. Grease a 9×9 inch square baking dish with cooking spray.

In a large bowl, toss together black beans, corn, green onions, cilantro, oregano, garlic powder, cumin, and pepper.

Spread 1/4 of the crushed tomatoes on the bottom of the prepared pan. Top with 3 lasagna noodles. If necessary, break them to fit the pan. Spoon 1/3 of the black bean mixture over noodles, then spread with tomatoes and 1/3 of the cheese. Repeat to use up remaining ingredients: noodles, beans, tomatoes, cheese, noodles, beans, tomatoes, cheese.

Cover pan with foil, then bake for 35-45 minutes until noodles are fully cooked. Remove foil and bake for 3-5 minutes, until cheese is melty and golden brown.

Allow lasagna to rest for 10-15 minutes before slicing. Enjoy!

Note: I’ve also used 12 lasagna noodles and made this in a large oval serving dish. I’m sure a 9×13 dish would work as well.

Advertisement
Beans, Main Dishes, Recipes

Deconstructed Falafel Bowls

Welcome spring with a light and flavorful deconstructed falafel bowl! This vegetarian dinner is so fresh and delicious, perfect for busy weeknights. 

Welcome spring with a light and flavorful deconstructed falafel bowl! This vegetarian dinner is so fresh and delicious, perfect for busy weeknights.

Spring is here! My birthday was yesterday, and #BabyVolde’s is next week. He’ll be ONE on Friday. I can hardly believe it. Last weekend we celebrated his birthday and his baptism. Almost our entire family came down for the occasion. It was a whirlwind weekend (and unfortunately it rained the whole time) but it was so fun.

Our little family

One of the best parts of spring (aside from the great running weather) is all the fresh produce at the grocery store! It’s almost farmer’s market season too. I can’t wait. I foresee quite a few lighter meals in our future, like these deconstructed falafel bowls. Regular falafel, while delicious, are a little too intense for weeknight dinners at my house. All that shaping and frying/baking. Noooo thanks! BUT if you just roast the chickpeas in the oven and layer them up with some grains, a tasty Mediterranean salsa bursting with fresh tomatoes, cucumber, and herbs, and drizzle a tangy tzatziki yogurt sauce over top, suddenly falafels on a random Wednesday night is doable. Even if you have a baby crawling all over the kitchen, getting into evvvvvvverything.

Welcome spring with a light and flavorful deconstructed falafel bowl! This vegetarian dinner is so fresh and delicious, perfect for busy weeknights.

Though they take about 45 minutes to put together, most of that time is hands-off, waiting for the chickpeas to get all crispy in the oven. To make this meal faster, you can prepare the grain base (I used bulgur but anything goes–couscous, quinoa, rice, etc.) and tzatziki yogurt sauce ahead of time. Then, when the chickpeas are cooking you can throw the Mediterranean salsa together in a hurry… and presto! Dinner is served. 🙂 We loved all the textures/flavors in this dish, as well as the temperature contrast between the hot, smoky chickpeas and the cool, creamy tzatziki sauce. This is a great one dish meal that has definitely earned a spot on my spring/summer dinner rotation. Next time, I’ll be sure to pick up some pita bread and hummus to enjoy on the side. Happy Friday!

one year ago: Chocolate Peanut Butter Oreo Dream
two years ago: Spicy Chickpea Bacon Burgers
three years ago: Easy Homemade New York Bagels
four years ago: Kale Fried Rice
five years ago: Lemon Orzo Chicken Soup
six years ago: Mexican Pizza

Deconstructed Falafel Bowls

  • Servings: 3
  • Print

adapted from Delish Knowledge; Tzatziki from my blog

  • 1 – 15 ounce can chickpeas, drained, rinsed and patted very dry with towel
  • 1 teaspoon olive oil
  • 1/4 teaspoon cayenne pepper
  • 1/2 teaspoon ground cumin
  • 1/4 teaspoon smoked paprika
  • 3/4 cup uncooked bulgur, couscous or other grain/grain susbtitute of choice

for the Tzatziki

  • 2 cups plain greek yogurt
  • 1/2 cucumber, seeded and grated, pressed dry with a clean dish towel
  • 2 teaspoons dried dill (or 2 tablespoons fresh dill, chopped])
  • 1-2 tablespoons mayonnaise
  • freshly ground pepper, to taste
  • salt, to taste

for the Mediterranean salsa

  • 1 1/2 cups chopped tomatoes
  • 2/3 cup chopped cucumber
  • 1/4 cup chopped red onion
  • 1/3 cup fresh parsley, minced
  • 1/3 cup fresh mint, minced
  • freshly ground black pepper

Directions:

Begin by making the chickpeas. Preheat oven to 400 degrees. Toss the chickpeas–they should be very dry–with olive oil, then spread on a baking sheet in a single layer. Cook for 30 minutes, tossing halfway through. Remove from oven and season with cayenne, cumin, and paprika.

While chickpeas are cooking, prepare grain according to package directions. I made bulgur but couscous, quinoa, farro, or even rice would be great choices! Basically, anything goes here.

Next, make tzatziki. In a small bowl, stir together greek yogurt with grated cucumber, then fold in dill. Season with pepper and salt to taste. If desired, add mayonnaise. It adds a little extra tang that I love, but it can be omitted. Cover and refrigerate to let flavors blend. Tzatziki can be made the day before if desired.

Finally, make the Mediterranean salsa. Stir together tomatoes, cucumber, and red onion in a medium bowl. Gently fold in parsley and mint, then season with a bit of pepper. Let rest while chickpeas finish cooking.


When ready to serve, place bulgur in individual bowls. Top with chickpeas, Medterranean salsa, and a drizzle of tzatziki. Enjoy!

Easy and flavorful red lentil soup...this curried red lentil soup is simply the best!
Main Dishes, Recipes, Soups

Curried Lentil Soup

Easy and flavorful red lentil soup…this curried red lentil soup is simply the best!

I already showed you the soup along with this fabulous hearty Whole Wheat Pumpkin Bread… and now here’s the recipe! This Curried Lentil Soup is also fabulous. Why would I share anything less than fabulous? Ha! Lentil soup is always a go-to vegetarian soup because it’s filling and flavorful without meat. This time, we’ve taken a regular ‘ole lentil soup and added red lentils and a south Asian flavor profile to  make something extra special.

Easy and flavorful red lentil soup...this curried red lentil soup is simply the best!

If you’re a fan of dal, you’ll like the soup. The flavors are incredible–garlic, ginger, onion…and of course, curry! There’s nothing better on a cold night, especially when served with some hearty bread. Mmm! The fact that this soup is made in about 30 minutes, thanks to the magic of the microwave [Iiiiiiii know–I never use the microwave in cooking, but it’s magic here], is an added bonus. Perfect for busy weeknights! Hope you guys enjoy!

two years ago: Honey Cornbread
three years ago: Sweet ‘n Spicy Apple BBQ Chicken & Slaw
four years ago: Peach Raspberry Clafouti
five years ago: Peach Shortbread
six years ago: Tropical Granola

Curried Lentil Soup

  • Servings: 4-6
  • Print

from Jenna’s Everything Blog

Ingredients:

  • 2 cups red lentils, rinsed
  • 8 cups low sodium vegetable or chicken broth
  • 3 tablespoons olive oil
  • 1 large onion, diced
  • 6 cloves garlic, minced
  • 2 tablespoons grated fresh ginger
  • 2 tablespoons curry powder
  • 2 – 15 ounce cans petite diced tomatoes
  • freshly ground black pepper
  • cilantro, chopped
  • plain yogurt

Directions:

In a large bowl, microwave lentils and half of the broth for 10-12 minutes, until liquid is mostly absorbed

In a stockpot or dutch oven, heat olive oil over medium heat. Saute onion for 5-7 minutes, until soft and translucent. Season with pepper to taste, then add garlic, ginger, and curry powder. Cook for 30 seconds until fragrant.

Add the microwaved lentil mixture to the pot, then add the remaining broth and tomatoes. Simmer for 15-20 minutes, seasoning with pepper as desired.

Serve with cilantro and plain yogurt.


Beef, Main Dishes, Recipes

Oven Baked Tacos

You’ll love these crispy, melty baked tacos! The filling is made from both beef and beans, so it’s extra delicious! 🙂

You'll love these crispy, melty baked tacos! The filling is made from both beef and beans, so it's extra delicious! :)

What’s better than–and easier than–regular tacos? Oven tacos! I’m totally serious! These have been a thing for a few years now, so you may have already seen them before. But if you haven’t tried them yet, you should. ASAP. They’re a great way to make tacos for a crowd and in general, they’re just a great change up from regular taco night. Plus, it’s also fun to make homemade crispy taco shells! Though it involves being extra careful when you’re working with hot oven racks, I bet kids would LOVE to watch corn tortilla shells transform into crispy shells. 🙂 I mean… I do, so what kid wouldn’t? Haha.

You'll love these crispy, melty baked tacos! The filling is made from both beef and beans, so it's extra delicious! :)

I’ve made this recipe as written below a handful of times, but I’ve always thought about how I could switch up the filling but keep the concept the same. I haven’t ventured very far yet–just subbing black beans from refried beans, but that’s a tasty start! I think these tacos would be great with shredded chicken, carnita meat, fajita veggies, pinto beans, or any other filling your little taco-loving heart desires! No matter how you make it, this dish is a favorite. It’s hard to decide what the best part of these tacos are–the crisp homemade shells, the bubbly and melty cheese, or the flavorful beef and bean filling… but I do know that these tacos have been part of our regular taco rotation for a couple years now so I hope you try them! If you need any sides for taco night, why not try my Mexican RicePerfect Black Beans, or this yummy Guacomole Salsa? Enjoy!

You'll love these crispy, melty baked tacos! The filling is made from both beef and beans, so it's extra delicious! :)

one year ago: Turkey Sloppy Joes
two years ago: BBQ Baked Spaghetti
three years ago: Honey Lemon Thyme Iced Tea
four years ago: Chocolate Chip Banana Pancakes
five years ago: Spiced Waffles

Oven Baked Tacos

  • Servings: 8-10 tacos
  • Print

from Macaroni & Cheesecake

Ingredients:

  • 8 to 9 corn tortillas [or for an easier twist, premade hard taco shells]
  • 1 pound lean ground beef
  • 8 ounces refried beans [from half of a 15 ounce can]
  • 8 ounce can tomato sauce
  • 1 1/2 tablespoons taco seasoning  [about half of a store-bought packet]
  • 1 1/2 cups shredded cheese
  • taco toppings – chopped lettuce, avocado, tomatoes; sour cream; cilantro; etc.

Directions:

Begin by making the crispy taco shells. Preheat oven to 375 degrees. In batches, microwave tortillas in a damp dishtowel or paper towel, if you prefer, for about 20-30 seconds until tortillas are pliable. Coat on each side with cooking spray, then lay on a cutting board or plate. When all are ready, open oven and carefully pull out the top oven rack partially. Drape tortillas over rungs so they are hanging upside down and forming that hard taco shell shape. If you prefer, you can remove the rack before you preheat the oven so you can do this step with a cool oven rack and just slide it back in. I found it easier to do it this way personally though. Bake for about 6-8 minutes, until crispy, then carefully remove from the oven with tongs and allow to cool on a cooling rack.

Adjust oven temperature to 400 degrees, then spray a 9×13 inch baking dish with cooking spray.

Meanwhile, brown ground beef in a large skillet. Remove grease, then stir in tomato sauce, refried beans, and taco seasoning. Heat on medium-low for a few minutes to heat through.

Remove pan from heat and fill each cooled taco shell with the meat mixture. Stand each filled shell up in prepared pan. Sprinkle everything with cheese, then bake for 10-12 minutes, until cheese melts. Serve with desired toppings and enjoy!

Note:

To reheat and retain the crispy shell, heat leftovers at 350 degrees for about 10 minutes, checking carefully so nothing burns.

Chicken, Main Dishes, Recipes

Spicy Ranch Chicken Rice Skillet

In 30 minutes you can have a deliciously wonderful dinner on the table! Take your go to easy dinner components–rice, chicken, and veggies–then toss them in a [slightly spicy] ranch sauce… and sit back and enjoy! 

Spicy Ranch Chicken Rice Skillet: In 30 minutes you can have a deliciously wonderful dinner on the table! Take your go to easy dinner components--rice, chicken, and veggies--then toss them in a [slightly spicy] ranch sauce... and sit back and enjoy!

If healthier skillet meals and casseroles are my favorite things ever now [minimal dishes, no real need for a side dish cause you have the protein + veggies + starch all in one happy mix], I can only imagine how valuable they’ll be once Baby Volde arrives in May! 🙂 I’m planning on doing some freezer cooking before his arrival, but those meals will eventually be depleted and when I go back to work having these sort of tasty yet healthy meals on hand will be key to my happiness. I’m sure of it! So I’m making certain I find some good recipes now so I’m ready then. If this Spicy Ranch Chicken Rice Skillet doesn’t fit the bill for easy, yummy, and delicious while still being healthy, then I don’t know what would!

Spicy Ranch Chicken Rice Skillet: In 30 minutes you can have a deliciously wonderful dinner on the table! Take your go to easy dinner components--rice, chicken, and veggies--then toss them in a [slightly spicy] ranch sauce... and sit back and enjoy!

This meal is SO good, you guys. If you’ve ever looked around my blog or know me in real life, you know that I’m a Mexican/Southwestern/Tex Mex food addict. I could go for tacos, black bean and rice bowls, carnitas, enchiladas, or quesadillas just about any day. It’s not any one thing about that kind of cuisine–the spices, or the cheese, or the toppings, but all of that at once. And this dish, though it’s not “Mexican” at all, it reminds me of a Mexican/Southwestern/Tex Mex-influenced meal thanks to the combo of chicken, black beans, rice, and tomatoes, plus all the yummy toppings! Cheese! Sour cream! Cilantro! Scallions! Yum!

Spicy Ranch Chicken Rice Skillet: In 30 minutes you can have a deliciously wonderful dinner on the table! Take your go to easy dinner components--rice, chicken, and veggies--then toss them in a [slightly spicy] ranch sauce... and sit back and enjoy!

Seriously, this stuff is ahhhmazingly good! Plus it has veggies, so that makes it good for you! Ha. 🙂 But it does, right?!? Don’t be put off by the “spicy” label on this recipe. It’s really only lightly spicy… the cheese and ranch combo cools things down, and if your family doesn’t do spice, then omit the crushed red pepper and cayenne and use regular diced tomatoes instead of fire-roasted. No matter how you make it, everyone will certainly love it! Though I’m a fan of making this dish with leftover roasted chicken, you can certainly make it with other proteins like ground turkey, chorizo, or even leftover shredded pulled pork for a new flavor profile. Now I have a new dinner idea for later this week because I just so happen to have a bunch of leftover pulled pork in the freezer! Score! 🙂 Enjoy!

one year ago: Chocolate Coffee Bundt Cake
two years ago: Strawberry Yogurt
three years ago: Cumin-Scented Cabbage Salad
four years ago: Extraordinary Grilled Cheese
five years ago: The Best Egg Salad

Spicy Ranch Chicken Rice Skillet

  • Servings: 6
  • Print

adapted from Well Plated

Ingredients:

  • 1 1/2 cups white rice
  • 3 cups low sodium chicken broth
  • 2 teaspoons extra virgin olive oil
  • 1/2 cup yellow onion, minced
  • 2 cups bell pepper, chopped [I used a mix of red, yellow, and orange]
  • 3 cloves garlic, minced
  • 1 – 15 ounce can black beans, drained and rinsed
  • 1 can no-salt fire-roasted tomatoes or petite diced tomatoes [depending on your preferred level of spice]
  • 2 cups cooked and shredded chicken
  • 2-3 tablespoons homemade ranch seasoning [or one small package from the grocery store]
  • crushed red pepper, to taste
  • cayenne pepper, to taste
  • freshly ground black pepper, to taste
  • 1/2 cup water or additional chicken broth, if necessary
  • shredded cheddar cheese, for serving
  • cilantro, for serving
  • chopped scallions, for serving
  • sour cream, for serving

Directions:

In a saucepan, combine rice and chicken broth. Bring to a boil, then reduce heat to low. Cook until rice is tender.

Meanwhile, in a large skillet, heat olive oil over medium heat. When hot, add onion and bell pepper and cook for about 5 minutes, until soft. Add garlic and saute for 30 seconds until fragarent. Reduce heat to low and stir in black beans, tomatoes, and chicken. Sprinkle with 2 tablespoons of ranch seasoning. Stir to combine, then add red pepper, cayenne, and black pepper to taste. Add additional ranch seasoning to taste. Cover and let simmer for 5 minutes or until hot.

When rice is cooked, stir into veggie and chicken mixture. Add up to 1/2 cup additional chicken broth/water if it is too thick to stir. Serve with cheddar cheese, cilantro, and scallions. For a creamy treat, stir in a bit of sour cream. Enjoy!