Desserts, Pies, Recipes

Mystery Dish: Maple Apple Pie-Crisp with Cheddar Crust & Bacon Crumb Topping

This month I’m participating in a new, fun challenge with twelve new and old blogging friends [well, this month it’s eleven but still!] It’s called Mystery Dish, and the premise is this: each month, one blogger will create a mystery box of ingredients. Ingredients can be themed related to a cuisine, a meal, a season, a specific ingredient, or anything else creative. Then, the other eleven bloggers have to create a recipe using some of the ingredients. SO FUN!

mystery dish collage

This month, the ingredients we had to work with included the following:

Apples
Cheddar Cheese
Bacon
Cinnamon
Maple Syrup
Peanut Butter

Thanks to Dani and JT at See Hubby Cook for brainstorming this challenge and the first month’s ingredients!

Of course, I like to make things difficult for myself and even though I knew this post would be live right around the date of our move [yes, we are in NASHVILLE now!], I wanted to include as many ingredients as possible, and managed to make a delicious dessert utilizing all ingredients but one. Peanut butter sadly was excluded, but all the others make an appearance in this fabulous pie-crisp!

Maple Apple Pie-Crisp with Cheddar Crust & Bacon Crumb Topping | thepajamachef.com

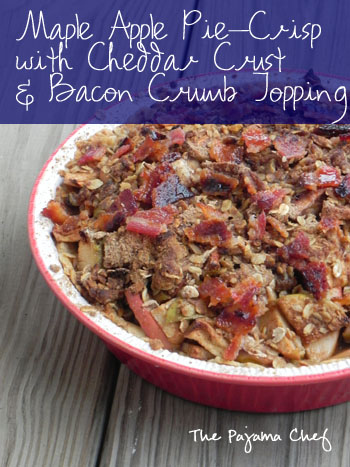
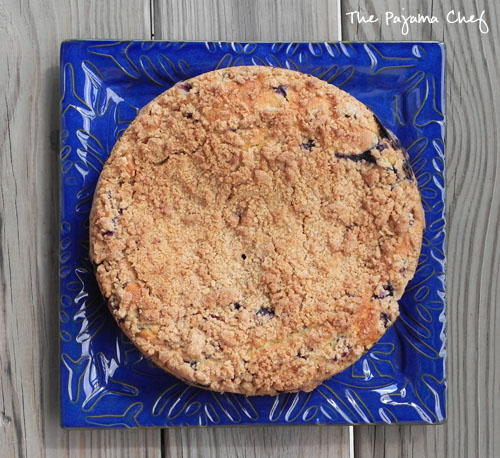
What is a pie-crisp, you may ask? Well, it’s something that was intended to be a pie but fell apart and as such, resembled more of a crisp than anything. No matter what you call it, Maple Apple Pie-Crisp with Cheddar Crust & Bacon Crumb Topping should be called delicious because that is exactly what it is.

Maple Apple Pie-Crisp with Cheddar Crust & Bacon Crumb Topping | thepajamachef.com

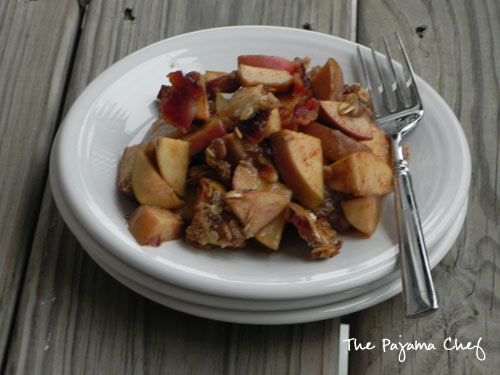
Let’s go through this fabulous dessert, shall we? It starts with a crust studded with shredded cheddar cheese. For appearance, I’d recommend using white cheddar, but since I wanted to use things up before the move, I just used a basic sharp cheddar. The filling is apples [Gala + Macintosh, but tart would be good next time too] sweetened with maple syrup and warm cinnamon, allspice, cloves, and vanilla. Simple, perfect, wonderful. I think I’m in love with maple apples now, and might try that in my next batch of applesauce.

Maple Apple Pie-Crisp with Cheddar Crust & Bacon Crumb Topping | thepajamachef.com

Lastly, this pie-crisp is finished off with an oat-based crumb topping. Ben’s addition to the recipe [I say addition, but he actually made the crust himself while I lay miserable on the couch with a cold–go Ben!] was to cook up some bacon rubbed with brown sugar which he then crumbled on the pie as it cooled. The salty-sweet bacon was the perfect, surprising finishing effect to each bite of warm apple pie-crisp. This is a dessert I can’t wait to make again and again!

Be sure to check out the other recipes for this month’s Mystery Dish at the links below. Have a great Monday!

Nora @ Buttercream Fanatic: Soft Baked Maple Bacon Cookies
Allie @ Baking a Moment: Apple Cinnamon Pancake Cupcakes
Dani and JT @ See Hubby Cook: Apple Bacon Cheddar Soup
Kat @ I Want Crazy: Brie, Apple, Bacon Grilled Cheese  
Krista @ Joyful Healthy Eats: Apple Cinnamon Crepes with Maple Mascarpone Topping
Amanda @ The Taste Tester: A Fall Inspired Apple Chicken Salad
Sherri @ The Well Floured Kitchen: Cheesy Bacon Monkey Bread
Christine @ I Dig Pinterest: Peanut Butter Apple Crisp
Meriem @ Culinary Couture: Apple Peanut Butter Muffins with Cinnamon Glaze
Jen @ Yummy Healthy Easy: Apple Muffins with Nut Crumble Topping

two years ago… Butternut Squash Apple Soup
three years ago… A Different Kind of Meatloaf

Maple Apple Pie-Crisp with Cheddar Crust & Bacon Crumb Topping [crust from Martha Stewart]
click to print

Ingredients:

for Cheddar Pie Crust

  • 1 1/4 cups all-purpose flour
  • 1/4 teaspoon salt
  • 1 sticks cold unsalted butter, cut into small pieces
  • 1/4 cup ice water
  • 1/2 cup shredded sharp cheddar cheese

for Maple Apple Pie Filling

  • 8 cups apples, thinly sliced [peel or not–your choice]
  • 1/2 cup maple syrup
  • 1 teaspoon vanilla
  • 1 1/2 teaspoons cinnamon
  • 1/2 teaspoon cloves
  • 1/2 teaspoon allspice

for Bacon Crumb Topping

  • 2 slices bacon
  • 1/2 cup oats
  • 1/4 cup brown sugar + more for bacon
  • 1/4 cup flour
  • 1/2 teaspoon cinnamon
  • 1/8 teaspoon allspice
  • 1/8 teaspoon cloves
  • 3 tablespoons butter

Directions:

First, prepare pie crust. Pulse together flour and salt in a food processor several times, then gradually add butter, pulsing in between additions. Pour in water tablespoon by tablespoon until mixture begins to hold together–it shouldn’t be wet/sticky. Add cheese, pulse until combined. Add more water if dough is dry, then turn out onto clean countertop. Shape into a disk, then wrap in plastic and refrigerate at least an hour or better, overnight.

When ready to make pie, preheat oven to 425 degrees. Remove pie dough from refrigerator and rest at room temperature for 10 minutes.

To make filling, toss together apple slices, maple syrup, vanilla, cinnamon, cloves, and allspice. Set aside.

Roll out pie crust on floured surface, then press into a 10 inch pie pan. Fill with maple apple filling, then prepare crumb topping.

Toss together oats, brown sugar, flour, cinnamon, allspice, and cloves. Cut in butter with pastry blender, then sprinkle evenly on top of pie.

Bake at 425 for 15 minutes, then reduce heat to 350 and bake for an additional 30 minutes or until golden brown and bubbly.

After temperature is reduced, place bacon on a foil-lined baking sheet and rub with brown sugar. Place in oven and bake for 15-20 minutes or until fully cooked. Remove and degrease, then crumbled over pie before serving.

Time: 3 hours or more [including time to chill dough].

Yield: 8 servings.

Cookies, Desserts, Recipes

Chocolate Chip Orange Cookies

I never make plain ‘ole Chocolate Chip Cookies. It’s rare that I’m craving a chocolate chip cookie in the first place, and if I absolutely had to make one, I normally add a bunch of other things like pumpkin, coconut, peanut butter, etc. But a few weeks ago I needed to make a dessert for our small group and these cookies just sounded good. I think it was the orange and chocolate combo. Even though it’s summer, and the citrus chocolate thing is so Christmasy, I had to have it. And I am so glad I did, because these cookies are out of this world!

Orange Chocolate Chip Cookies | thepajamachef.com

This may be my new go-to chocolate chip cookie altogether. The cookie itself is practically perfect–chewy on the inside, crispy on the outside. They stay soft for days–though I bet they won’t last long! When you add in orange zest and juice, the flavor gets even better!

And the best part of these cookies besides their incredible flavor and texture? The fun faces in a couple cookies as they baked. See below. 🙂 Yes, I’m a dork.

Orange Chocolate Chip Cookies | thepajamachef.com

OH! And one other thing. I know there’s some debate in the cookie world about how to do the butter. Melted? Softened? Throw it straight in from the fridge? [I know some people actually do that, and if you cream it well enough it actually sorta works.] The original recipe calls for melted butter, but I prefer using softened, so I just did that and it worked out fine. Click on over to the original if you prefer melted [or need to hurry up the process]. One thing I wouldn’t hurry up is the chilling! Chilling the dough is essential. It deepens the flavor [tried the dough before + after and found a definite difference!] and it firms up the dough so it doesn’t spread as much. The thicker the cookie, the better imo. Hope you try these fabulous orange chocolate treats. They’re a fun twist on a classic cookie. Enjoy!

a year ago… Brown Sugar Squash Muffins
two years ago… The Best Panini Ever
three years ago… Creamy Lemon Squares

Chocolate Chip Orange Cookies [slightly altered from Crazy for Crust via Chef in Training]
click to print

Ingredients:

  • 1 cup butter, softened
  • 3/4 cup white sugar
  • 1 cup brown sugar
  • 2 large eggs
  • 2 teaspoons vanilla extract
  • 2 teaspoons orange juice
  • 1 tablespoon orange zest [from 1 large orange]
  • 3 1/4 cups all-purpose flour
  • 2 teaspoon baking soda
  • 2 cups semi-sweet chocolate chips

Directions:

Cream together butter and sugars until soft and fluffy, about 2 minutes. Add eggs one at a time, mixing on low in between. Then add vanilla, orange juice, and orange zest, and beat on low for 1 minute until combined.

Gradually beat in flour and baking soda, then fold in chocolate chips. Do not overmix.

Chill dough, covered, in the refrigerator for at least 30 minutes–but an hour + is best.

Preheat oven to 350 degrees while you form the dough into balls. Line baking sheets with parchment or a silpat, then scoop dough into 1.5 to 2 tablespoon balls and place on prepared baking sheets. Bake for 10-11 minutes or until golden brown around the edges but still slightly soft in the middle. Cool on the baking sheet for 5 minutes before removing to cooling rack to cool completely.

Time: 30 minutes, plus time to chill.

Yield: 3-4 dozen depending on how size.

Linked up with: Foodie Friday, Weekend Potluck.

Bars, Cheesecakes, Desserts, Recipes

SRC: Churro Cheesecake Bars

I absolutely love being in the Secret Recipe Club! Getting to peruse another blogger’s favorite recipes and then pick one to make secretly is just so fun… and delicious! This month I was assigned to Lesa who writes the blog Edesia’s Notebook. Lesa has been blogging since 2007 and has literally hundreds of recipes to choose from on her site. It was kind of overwhelming… in the best way possible, of course! Lesa is a mom of two adorable little girls, and a variety of recipes that kids and adults will love, both sweet and savory. Perfect!

Churro Cheesecake Bars | thepajamachef.com

This month, I left the final decision to Ben. He had his choice of cookies, pancakes, and cheesecake bars. Apparently it was no contest. Cheesecake bars it was! But not just any cheesecake bars–Churro Cheesecake Bars! A layer of creamy vanilla cheesecake is sandwiched between a cinnamon sugar crust reminiscent of everyone’s favorite Mexican pastry. These bars are so utterly amazing that I could hardly believe how quick and easy they were to make!

Churro Cheesecake Bars | thepajamachef.com

The shortcut to these fabulous bars is using a seamless crescent roll dough sheet. You could totally make your own dough, but I certainly took advantage of this easy option. 🙂 And don’t worry if you accidentally rip your sheet trying to get it out of the tube… it’ll work juuust fine, even a little torn, haha. I swear, I almost always have issues with so called “convenience” foods. Does anyone else have this problem, or is it just me? These Churro Cheesecake Bars are sweet and rich. They come together in a snap and are great for a party because a little goes a long way. We loved them and hope you will too! Thanks, Lesa, for a great recipe!

Churro Cheesecake Bars [from Edesia’s Notebook]
click to print

Ingredients:

  • 1 cup sugar, divided
  • 1 tablespoon cinnamon
  • 2 [8 ounce] cans refrigerated seamless crescent dough sheet
  • 2 [8 ounce] packages cream cheese
  • 1 teaspoon vanilla
  • 1 egg

Directions:

Preheat oven to 350 degrees and spray a 9×13 pan with cooking spray.

Combine 1/2 cup sugar and cinnamon in a small bowl. Stir and sprinkle half evenly in the bottom of the prepared pan. Unroll one of the crescent dough sheets and lay it over the cinnamon sugar.

With a mixer, beat together the remaining 1/2 cup sugar, cream cheese, vanilla, and egg until smooth [about 2-3 minutes]. Pour filling over dough, smoothing with a spatula if necessary. Unroll the other dough sheet and gently place over filling. Top with remaining cinnamon sugar.

Bake for 30-35 minutes or until golden brown. Cool before cutting, then store in the refrigerator.

Time: 45 minutes.

Yield: 24 servings.

Notes: If your dough sheet tears, even the top one, it’s not really a big deal. Patch it together as best you can and the cinnamon sugar will help cover up the mess. 🙂 These bars can be served warm or cold, but we liked them best warm.

Be sure to check out other recipes from other SRC members here today too! 🙂

Cakes, Desserts, Recipes

Blueberry Buckle

This dessert is a great way to enjoy fresh blueberries during the summertime!

Blueberry Buckle | thepajamachef.com

If I had to pick, nine times out of ten I would choose a fruit dessert over a chocolate dessert. The other time? If it was a PEANUT BUTTER and chocolate dessert, like these yummy bars. So addicting! But back to fruit. I’d had never really heard of the dessert called a ‘buckle’ until recently, but when I got a great deal on fresh Michigan blueberries, I knew I had to try it out.

Blueberry Buckle | thepajamachef.com

From what I could tell, its basically a crumb-topped blueberry coffee cake. Serious Eats gets a little more technical and explains: “A buckle is a popular New England dessert that’s made by adding berries or sliced fruit to a single layer of cake batter. During baking, the fruit sinks and the cake emerges from the oven with a “buckled” appearance.” Well, I’m not sure my berries sank quite as much as they were supposed to since I floured them before folding them in, but nevertheless, this dessert is out of this world amazing!

Blueberry Buckle | thepajamachef.com

The crumbs! The juicy berries! Whatever you do, use sweet, fresh, juicy blueberries for this treat. There isn’t much sugar so the berries really shine. We’ve been enjoying our Blueberry Buckle all week long as a light dessert, and think we’ll fancy it up tonight with some homemade vanilla ice cream. I can’t even imagine how good that’s going to be. Crumb streusel + ice cream + blueberries has got to equal fabulous, I’m sure. You can’t go wrong with this, so I hope you enjoy!

Blueberry Buckle | thepajamachef.com

P.S. So, Saturday was my three year blogiversary! I celebrated by doing nothing, haha. But I’m going to start linking back to my old recipes to bring ’em back to life. It’s crazyville to consider that I’ve been blogging here for THREE YEARS!! It’s true. 🙂 Have a great weekend!

a year ago: Mango Coconut Granola
two years ago: Lavender-Lime Scones
three years ago: Enchilada Sauce

Blueberry Buckle [from Martha Stewart]
click to print

Ingredients:

for cake

  • 1/2 cup unsalted butter, softened + more for pan
  • 2 cups all-purpose flour + more for pan
  • 1 1/2 teaspoons baking powder
  • 3/4 cup sugar
  • 1 large egg
  • 1 teaspoon vanilla extract
  • 1/2 cup milk
  • 5 cups blueberries, patted dry and sprinkled lightly with flour

Mrs. Kostrya’s Streusel Topping

  • 1 cup all-purpose flour
  • 1/4 cup brown sugar, packed
  • 1 teaspoon cinnamon
  • 1 teaspoon vanilla
  • 6 tablespoons unsalted butter, softened

Directions:

Preheat oven to 350 degrees. Butter and flour a 10 inch springform pan, then set aside.

In a bowl, combine flour and baking powder. In the bowl of a stand mixer, cream butter and sugar for 3 minutes on medium speed. Reduce speed to low and beat in egg and vanilla. Scrape sides of bowl as necessary.

Alternately add the flour mixture and milk to bowl, starting and ending with the flour mixture. Remove from mixer and fold in blueberries. Pour into prepared pan and set aside.

Prepare streusel topping by stirring together flour, brown sugar, and cinnamon. Cut in vanilla and butter with a pastry blender or two knives. Sprinkle topping over batter.

Bake for 60-70 minutes or until streusel is golden brown and a cake tester inserted in the center comes out clean. Cool in pan for 10 minutes, then release the sides and cool on a wire rack for 15 minutes before cutting.

Time: 90 minutes.

Yield: 16 servings.

Linked up with: Foodie Friday, Friday Food Frenzy, and Weekend Potluck.

Desserts, Pies, Recipes

SRC: Pineapple Cream Pie

It’s a Secret Recipe Club Monday! They are my favorite Mondays so I’m excited. 🙂 This month I made a great Pineapple Cream Pie to share with you. And I wish you were here with me now I so I could give you a piece, because it’s a sweet, creamy, tropical treat. We loved it!

Pineapple Cream Pie | thepajamachef.com

If you’re new, you might be a bit confused. SRC? What’s that? Let me explain. It’s a pretty amazing blogging club. Basically, the premise is this: you’re assigned a different member’s blog every month. You visit their blog, choose any recipe you want, then make it and share it on your blog… all while keeping your assignment a secret! Everyone else posts about their secret blog the same day. It’s fabulously fun to try out new blogs. If you have a blog, definitely check it out and consider joining! I highly recommend it.

When I was assigned Lisa’s blog, before I even started perusing her recipe index, I knew I had to make a dessert recipe, no question about it. I mean, with a blog called Sweet as Sugar Cookies, how could I not?!? Lisa is such a sweetie [word choice –> totally on purpose!!]. She’s from Hawaii [how cool is that?] and she’s been baking since she was 12, so she has tons of great recipes on her site. Her passions aside from baking include her faith and her family, both of which come through so clearly on her site. When trying to decide what to make, so many things sounded delicious, but I pretty much narrowed it down quickly to this pie or ice cream. I just got an ice cream maker, and have yet to test it out. I think that all of her ice creams sound divine [especially spicy peanut butter, ginger, or cherry] but I wasn’t able to clear the freezer out quickly enough to make that happen. Sad day. So pie it was!! And guess what–making this pie was not a sacrifice at all. It was so tasty!

Pineapple Cream Pie | thepajamachef.com

This Pineapple Cream Pie is a snap to whip up–you basically make a flavorful vanilla pudding on the stovetop, stir in crushed pineapple, and pop it all in a baked pie shell to chill for awhile. When you’re ready to enjoy a huge piece, just top with Cool Whip or whipped cream. I used Cool Whip, and as you can see, it was a little melty. Though this pie won’t win any beauty contests [mine at least… Lisa’s is gorgeous, and she has a great family story to tell about it too. Check it out here!], the taste is just incredible. I made my pie in my fail proof pie crust, but feel free to use your own recipe or even a store bought crust. Ben and I ate this as part of our 4th of July meal, and have been snacking on it ever since. I’ve seriously never had anything like it… I want to say it reminds me of Banana Cream Pie, but it really doesn’t, so you’ll just have to try out this fruity cream pie for yourself. I can just imagine eating it on the beach in Hawaii… how perfect would that be? 🙂 Mmmm. Thanks, Lisa! Enjoy!

Pineapple Cream Pie

  • Servings: 8-10
  • Print
pie from Sweet as Sugar Cookies, crust from Simply Recipes
Pineapple Cream Pie via thepajamachef.com - a creamy, tropical treat!Ingredients:

for the crust

  • 8 ounces unsalted butter, cut into small cubes and frozen for at least 15 minutes, but better 1 hour to overnight
  • 1 1/4 cups all-purpose flour
  • 1 1/2 teaspoons sugar
  • 1/4 teaspoon salt
  • 3-6 tablespoons ice water [very very cold water]

[You can also substitute your own pie crust recipe or a storebought crust.]

for the pie filling

  • 1/2 cup sugar
  • 1/2 teaspoon salt
  • 3 tablespoons cornstarch
  • 1 tablespoon flour
  • 2 1/2 cups skim milk
  • 3 egg yolks
  • 1 tablespoon butter
  • 1 teaspoon vanilla
  • 1 20 ounce can crushed pineapple, well drained [crushed pineapple to equal about 1 packed cup]

for topping

  • 6-8 ounces Cool Whip or whipped cream

Directions:

To make pie crust, begin by freezing 8 ounces [1 stick] unsalted butter, cubed into very small pieces. Preferably, this will be done the day before you want to make the crust, but the butter needs to freeze for at least 15 minutes to an hour for ultimate flakiness.

After butter is frozen, combine flour, sugar, and salt in food processor and pulse several times. Add half of the butter and pulse 6-8 times, then add the rest and pulse 6-8 more times. At this point, the dough should resemble cornmeal. Add ice water tablespoon by tablespoon, pulsing in between additions. I usually use about 4-5 tablespoons water, and the goal is to make the dough just hold together when you pinch it.

Turn dough out onto a clean countertop and gently knead it together to form a disk. You should be able to see pieces of butter–this is good, and will cause it to be flaky. Cover  disk with plastic wrap and refrigerate at least 1 hour [or overnight].

When ready to bake pie crust, preheat oven to 425 degrees. Let dough come to room temperature for about 5 minutes, then roll into a 10-11 inch circle on a floured countertop. Transfer to a 9 inch pie plate, then lightly spray with cooking spray and cover with aluminum foil. Add pie weights of some type [pennies, dried beans, rice] to the top of the foil and bake for 15 minutes. Remove pie from oven, reduce heat to 375 degrees, and remove foil and pie weights. Return to pie to oven and bake for 12-18 minutes or until crust is golden brown and fully cooked. Set aside to cool while preparing the pie filling. [At this point, crust can be cooled and covered until the next day.]

To make the pie filling, combine sugar, salt, cornstarch, flour, milk, and egg yolk in a large saucepan. Whisk together until smooth–yolks beaten, cornstarch and flour making no lumps. Set saucepan over medium heat, and bring to a boil, stirring constantly. The mixture should thicken as you go, and once boiling, let cook for 1 minute and keep stirring. Remove from heat, add butter and vanilla. Stir until butter melts, then add crushed pineapple. Stir and add to baked pie shell.

Refrigerate for at least 3 hours to allow filling to firm up, then top with Cool Whip or whipped cream as desired. Serve immediately and enjoy!

P.S. For more great SRC recipes, check out the links below! 🙂

Tuesday Talent Show on Chef in Training