If you love cinnamon rolls, and you love blueberries, you NEED TO MAKE THIS RECIPE! Recipe for Blueberry Sweet Rolls on thepajamachef.com @thepajamachef
Breakfast, Pastries, Recipes

Blueberry Sweet Rolls

If you love cinnamon rolls, and you love blueberries, you NEED TO MAKE THIS RECIPE!

If you love cinnamon rolls, and you love blueberries, you NEED TO MAKE THIS RECIPE! Recipe for Blueberry Sweet Rolls on thepajamachef.com @thepajamachef

Long time no blog. Lots has been going on in my corner of the real world… including a new job (still at my library, just new responsibilities) and the start of marathon training (Rocket City Marathon in December). I know I could blog in the evening but I’ve honestly been more interested in reading a nice book. Currently, The Outsider by Stephen King. Eeeeek! I’m actually typing away at this post during my lunch break. But I’m back, and I bring BLUEBERRY SWEET ROLLS! These are absolutely phenomenal and I hope you can make them before summer is up. If you like cinnamon rolls, and you like blueberries, you will l-o-v-e these blueberry sweet rolls. #promise

If you love cinnamon rolls, and you love blueberries, you NEED TO MAKE THIS RECIPE! Recipe for Blueberry Sweet Rolls on thepajamachef.com @thepajamachef

Homemade cinnamon rolls are my love language. If someone tells me they’re making cinnamon rolls for brunch, and I show up expecting homemade cinnamon rolls and am greeted with their sad canned counterpart… I have to admit I’m a little disappointed. Not that people need to make good food (read: homemade cinnamon rolls) to be my friend exactly, but just that soft, fluffy sweet rolls are absolutely fabulous… and the canned kind are just a little blah. I know people are scared of baking with yeast, but it’s totally doable–and this recipe is a great place to start! For these blueberry sweet rolls, I use the same dough as my Copycat Cinnabon Cinnamon Rolls… and that dough is SO forgiving. I’ve screwed it up more times than I can count. I’ve mismeasured the yeast, added too much flour, forgotten the buttermilk… I could go on. Basically, it takes a lot to mess up that dough, and even if you do, chances are good that your sweet rolls will still bake up soft and tender. And still be easy to roll out. #winning And for the record, if you invite me over, ask ME to make the cinnamon rolls. I’ll be happy to oblige!

If you love cinnamon rolls, and you love blueberries, you NEED TO MAKE THIS RECIPE! Recipe for Blueberry Sweet Rolls on thepajamachef.com @thepajamachefI could eat regular cinnamon rolls year round, but in the summer, I want to add fruit to everything! I mean, I eat copious amounts of fruit every day… so it’s only natural. Peaches! Watermelon! Berries of all types! This time, I loaded up on the blueberries because why not? The sweet blueberry filling I made is good enough to eat with a spoon, but please save some for your sweet rolls. You’ll probably have extra so you can swirl it in your oatmeal, top your ice cream with it, or just enjoy it as is. I added some cinnamon to the blueberry filling because it seemed only natural, but there’s also some cardamom in there to make it extra special. The best part about the blueberry filling is that some of it pools on the bottom of the baking dish as the rolls rise and bake. Yum!! After the rolls are baked up and before you dive in, take a minute to make a super easy cream cheese frosting. I added a bit of lemon juice and lemon zest, and that citrus addition was perfection! I prefer cream cheese frosting on my cinnamon rolls, blueberry or otherwise, but if you want something a little lighter, you could just make a glaze with powdered sugar, cream/milk, and lemon juice. There are recipes online but you could improvise with a cup of powdered sugar, a tablespoon of cream/milk, and a tablespoon of lemon juice and go from there. I highly recommend the cream cheese frosting but if you want something simpler, that glaze would also be fantastic.

If you love cinnamon rolls, and you love blueberries, you NEED TO MAKE THIS RECIPE! Recipe for Blueberry Sweet Rolls on thepajamachef.com @thepajamachef

Oh, and while this post is 100% NOT sponsored, if you’re in Nashville… be sure to check out Mr. Blueberry for the delivery service of your blueberry dreams. I used their luscious Michigan blueberries to make these sweet rolls (and to devour!). The season is almost ending (I think the last delivery is next weekend, August 24-25, 2018). Just FYI, friends! 🙂 Have a great Wednesday!!

one year ago: Mexican Lasagna
two years ago: Awesome Kale Salad
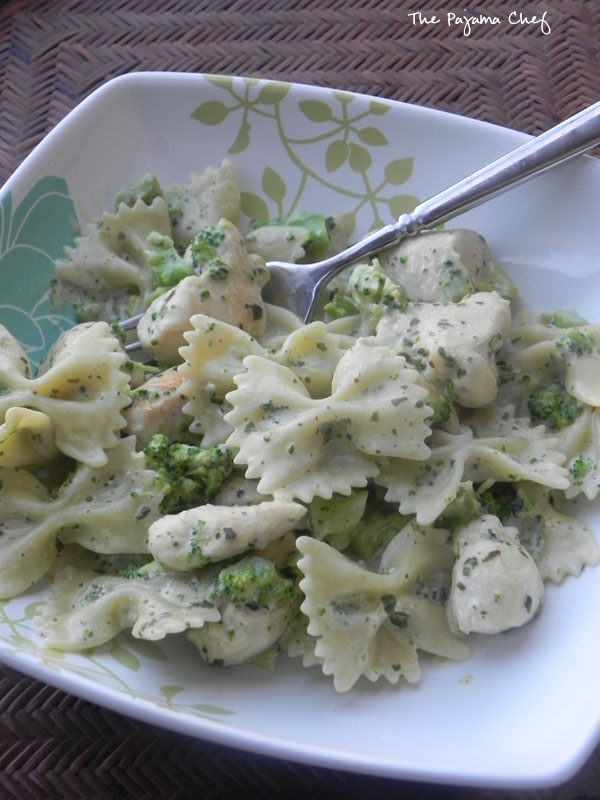
three years ago: Cheesy Veggie Pasta
four years ago: Dulce de Leche Peanut Butter Sandwich Cookies
five years ago: Chocolate Zucchini Muffins
six years ago: Cinnamon Bacon Carbonara
seven years ago (wow!): Maple Pecan Pear Scones

Blueberry Sweet Rolls

  • Servings: 12-15 rolls
  • Print

adapted from my Copycat Cinnabon Cinnamon Rolls

Ingredients:

for dough

  • 3/4 cup water – microwaved for about 15-20 seconds, should feel warm like bathwater, about 105-110 degrees F
  • 2 1/4 teaspoons active dry yeast
  • 1/2 cup sugar, divided
  • pinch of salt
  • 1/4 cup buttermilk [1/4 cup milk + a couple drops of lemon juice/vinegar stirred and left to sit for 5 minutes works great]
  • 1 egg, beaten
  • 1/3 cup canola oil
  • 4 1/2 to 5 cups all-purpose flour

for filling

  • 2 cups blueberries (fresh or frozen)
  • 1/2 cup brown sugar, packed
  • 1 1/2 tablespoons cinnamon
  • 1/2 teaspoon cardamom
  • 2 tablespoons lemon juice
  • 1 tablespoon cornstarch
  • 1/2 teaspoon vanilla
  • 1/4 cup unsalted butter, softened

for frosting

  • 2 ounces cream cheese, softened
  • 3 tablespoons unsalted butter, softened
  • 1 teaspoon vanilla extract
  • 1 teaspoon lemon juice
  • zest of one large lemon
  • 1 – 1 1/2 cups powdered sugar

Directions:

In the bowl of a stand mixer, stir together warm water, yeast, and 1 tablespoon of the sugar. Let rest for 5-10 minutes until yeast starts to bubble. When frothy, add salt, buttermilk, egg, oil, and remaining sugar. Whisk to combine. With a wooden spoon, stir in 2 cups of the flour. Then using a dough hook, add flour in 1/2 cup increments, mixing on low speed until dough begins pulling away from the side of the bowl. When a total of 4 1/2 cups flour have been added, increase speed to medium and knead for 5 minutes. If you need to add an additional 1/2 cup flour, do so during this kneading process. I usually add the extra flour if the dough seems too sticky.

Grease a bowl with cooking spray [you can use the same bowl if you are coordinated enough to grease while the dough is in there/hold it to the side], then allow dough to rise in a warm location, covered with a dish towel, until doubled in size. This should take 1-2 hours.

When dough is almost ready, prepare filling.

In a medium saucepan set over medium-high heat, stir together blueberries, brown sugar, cinnamon, and cardamom. Bring to a boil, then reduce heat to low. Cook for 4-5 minutes, stirring occasionally. In a small bowl, whisk together lemon juice and cornstarch, then pour into blueberry mixture. Cook for another minute or two until mixture begins to thicken. Remove from heat and stir in vanilla. Allow to cool. Mixture will thicken a little more as it cools.

Grease a 9×13 inch baking pan and set aside.

When dough is ready, flour your clean counter top/work surface. Punch down the dough and roll into a large rectangle, about 20×30 inches. Spread butter over dough, leaving a 1 inch margin on all edges.

Next, top with the blueberry filling mixture. You probably won’t use all of it, and if your filling is very runny, you will want to use a slotted spoon to remove excess liquid. I overfilled the rolls so I would recommend starting with 1/3 cup of the filling and adding more from there. Extra filling is great on ice cream or oatmeal, or by the spoonful!

Roll into a tight log, rolling from the long side closest to you. When you are almost to the other end, bring the far long side up and over so the seam is on top. Gently press the exposed edge to the top of the dough to seal.

Divide the log into three sections, then divide each section into four or five rolls depending on how big you want them. Cut with a sharp knife and gently transfer cinnamon rolls to prepared pan. If you lose the filling along the way, just gather it up and sprinkle over cinnamon rolls. Cover rolls with a dish towel and let rise in a warm location for another 1-2 hours, or cover with plastic wrap and place in the refrigerator to bake the next morning [this is what I always do]. For the refrigerator rise, remove from refrigerator and let rest at room temperature for 30 minutes before baking.

When ready to bake, preheat the oven to 350 degrees and bake for 15-17 minutes for 15 rolls or about 18-22 for 12 rolls. Bake until tops begin to brown, but check in the middle to make sure the dough isn’t raw. If they need additional baking time, cover with foil to prevent excess browning.

While rolls bake, prepare frosting. Using a stand mixer, hand mixer, or a whisk, beat together cream cheese and butter until smooth. Add vanilla, lemon juice, and lemon zest, beating until combined. Add powdered sugar gradually, mixing until smooth. In my stand mixer this usually takes about 2-3 minutes. When I make the rolls the night before, I leave the butter and cream cheese on the counter overnight so they are soft in the morning.

When rolls come out of the oven, immediately spread half of the frosting on top. Add additional frosting on individual rolls for serving, or when they have cooled down considerably. Serve warm–they reheat well too!

Desserts, Pies, Recipes

Mandarin Pie #CookoutWeek

A creamy, dreamy mandarin orange pie made with an Oreo crust and topped off with mini chocolate chips… this cool treat is perfect for hot nights. 

A creamy, dreamy mandarin orange pie made with an Oreo crust and topped off with mini chocolate chips... this cool treat is perfect for hot nights. #CookoutWeek 2017

I’ve always been a fan of fruit and chocolate. Separately or together, this combination is pretty great. I can hardly think of a single fruit that doesn’t taste good with a bit of chocolate. Can you? Oranges and chocolate is one of my favorite combos. I love it in these cookies and these muffins, so it should come as no surprise that I also love it in pie form!

A creamy, dreamy mandarin orange pie made with an Oreo crust and topped off with mini chocolate chips... this cool treat is perfect for hot nights. #CookoutWeek 2017

The first time I tried this pie was a pretty bad night. Maybe “pretty bad” is a bit of an exaggeration, but over Christmas, both Ben and I got pinkeye. It was pretty much the worst. We were visiting my parents in beautiful Bluffton, South Carolina when the dreaded infection struck. My eyes looked awful and vacation went from relaxing to constant laundry, handwashing, and disinfecting. I blame the baby. Haha. 🙂 Maybe I’m still exaggerating about how bad it was, but I wouldn’t wish pinkeye on anyone! The only highlight of the evening I spent at urgent care was this dessert that I got to enjoy afterwards. This pie was graciously shared with our family by my parents’ friends. We each got a slice and I was so sad it was all gone. I couldn’t stop thinking about it! Eventually I got the recipe and the rest is history! I forsee a LOT of mandarin pie in my future!

A creamy, dreamy mandarin orange pie made with an Oreo crust and topped off with mini chocolate chips... this cool treat is perfect for hot nights. #CookoutWeek 2017

The goodness of this pie starts off with an Oreo crust. The original recipe suggested a chocolate crust, but I amped it up a bit with some Oreos (or fauxreos, as Ben calls them because in baking, I tend to use the store brand). The crust is then filled with a glorious mixture of cream cheese, sweetened condensed milk, orange juice, and sour cream. It’s light and sweet and almost cheesecake-y in texture. Utterly amazing! Fold in some mandarin oranges, spoon into crust, and top with mini chocolate chips and a few decorative mandarin oranges and there you have it! Every bite is filled with chocolatey orange goodness. Since this pie doesn’t require any baking, it’s perfect for summer. This would be a great pie to bring to a cookout, as long as it could be kept cold until serving. Wherever you enjoy this pie, be sure to share it with those you love. 🙂 ❤

I hope you’ve enjoyed all the recipes I’ve shared for #CookoutWeek. Don’t forget to enter the #CookoutWeek 2017 giveaway, happening NOW! Lots of great prizes and an easy entry!

Check out some other delicious cookout recipes shared today for #CookoutWeek here!

Tell me: what’s your favorite no-bake dessert for cookouts?

two years ago: Iced Coconut Mocha
three years ago: Chewy Coconut Oil Granola Bars
four years ago: Coconut Chocolate Chip Buttermilk Crumb Cake
five years ago: BBQ Ranch Pasta Salad
six years ago: Lemony Roasted Vegetable Couscous

Mandarin Pie

  • Servings: 8
  • Print

from my mom’s friend Karen – addition of the Oreo crust by yours truly

Ingredients:

for Oreo crust (can also substitute your favorite chocolate crust or a storebought one)

  • 25 Oreos
  • 5 tablespoons butter

for pie

  • 8 ounces cream cheese, softened (I use Neufchâtel)
  • 1 – 14 ounce can sweetened condensed milk
  • 1/2 cup orange juice concentrate, thawed
  • 1/2 cup sour cream
  • 8 ounces frozen whipped topping (Cool Whip), thawed
  • 1 – 15 ounce can mandarin oranges, divided
  • 1 ounce semi sweet chocolate OR a handful of mini chocolate chips

Directions:

Begin by preparing crust. Crush Oreos in a food processor to form fine crumbs. Transfer to a bowl. Then melt butter and drizzle into Oreo crumbs. Use a fork to combine, then press into a 9 inch pie pan. Place in the refrigerator to chill for at least 30 minutes before using.

To prepare pie filling, beat cream cheese in a stand mixer until fluffy. Add sweetened condensed milk, orange juice, and sour cream. Beat until smooth. Fold in whipped topping.

Transfer half of the pie filling to crust, then top with most of the mandarin oranges. Reserve eight oranges for the pie topping. Cover with remaining filling. Depending on how deep the pie pan is, you may have a little leftover. Top pie with mandarin oranges and mini chocolate chips.

Instead of mini chocolate chips, you can also melt 1 ounce of semi sweet chocolate (a baking square if possible) and drizzle over the pie. Either way tastes great!

Chill in the refrigerator for at least 4 hours before slicing. Best enjoyed the same day, especially for presentation, but leftovers are also good for ~48 hours.

I haven’t made this, but I think this pie filling would also be amazing as parfaits: Oreo crumbs, pie filling, mandarin oranges, chocolate chips, and repeat. Yum!

Cakes, Desserts, Recipes

Chocolate Covered Strawberry Cake

Fresh strawberry cake from scratch… no Jello, artificial flavorings, or anything fake! This cake is delicious and easier than you would think! Top it with a rich chocolate frosting and you have Chocolate Covered Strawberry Cake that everyone will want an extra slice…or two…or three of!

Fresh strawberry cake from scratch... no Jello, artificial flavorings, or anything fake! This cake is delicious and easier than you would think! Top it with a rich chocolate frosting and you have Chocolate Covered Strawberry Cake that everyone will want an extra slice...or two...or three of!

On Halloween, a Dairy Queen opened about five minutes from our house. Dangerous! Before that, we had to drive a decent distance to reach one. Some of the folks in our area were upset, saying the DQ would “ruin” the area with another fast food area. Ruin the area? Ummm, no! Ruin people’s diets, more likely! Haha. Is there anything more delicious than a Blizzard or a dipped cone? I don’t think so… unless it’s this Chocolate Covered Strawberry Cake!

Fresh strawberry cake from scratch... no Jello, artificial flavorings, or anything fake! This cake is delicious and easier than you would think! Top it with a rich chocolate frosting and you have Chocolate Covered Strawberry Cake that everyone will want an extra slice...or two...or three of!

Now I realize that Chocolate Covered Strawberry Cake and Dairy Queen don’t really relate to many of you. But for longterm DQ lovers like me, do you remember the Chocolate Covered Strawberry Blizzard? I used to get them all the time in college and then they took them off the menu. It was a very sad day. Some stores would make them, and others wouldn’t, which made NO sense to me because it’s just strawberries [that they already have from the sundaes!] and chocolate [like chips/shavings OR that dipped cone topping…yum!]. Yum and yum. It’s so basic, but so good, ya know?

Fresh strawberry cake from scratch... no Jello, artificial flavorings, or anything fake! This cake is delicious and easier than you would think! Top it with a rich chocolate frosting and you have Chocolate Covered Strawberry Cake that everyone will want an extra slice...or two...or three of!

Now, I haven’t been to my local DQ [I just got chills typing that, you guys…yay!] yet to see if they’ll make me my favorite Blizzard, but right now I have this cake and the world is a-okay. You can make this fresh strawberry cake with fresh or frozen strawberries, making it a great year-round treat. There’s absolutely nothing fake or artificial in this cake, just lots of pure strawberry goodness! If you want more of a pink/red color, you’ll have to use a little food coloring but I was happy with the color of my cake without that. The strawberry cake is light and fluffy, and when combined with the rich chocolate frosting is absolutely heavenly! I hope you enjoy this cake as much as I did!

one year ago: Pumpkin Cranberry Bread
two years ago: Cranberry and Cream Cheese Muffins
three years ago: Pumpkin Graham Muffins
four years ago: Pollo alla Poggia Alloro {A Family Farm in Tuscany}
five years ago: Homemade Maple & Brown Sugar Almond Butter
six years ago: Pumpkin Soup and Homemade Croutons

Chocolate Covered Strawberry Cake

  • Servings: 12
  • Print

for Fresh Strawberry Cake

for Chocolate Frosting

Ingredients:

for cake

  • 24 ounces very ripe strawberries, hulled – or frozen strawberries work too!
  • 1-2 teaspoons sugar, optional
  • 1/4 milk, at room temperature
  • 6 large egg whites, at room temperature
  • 2 teaspoons vanilla extract
  • 2 1/4 cup cake flour, sifted
  • 1 3/4 cup sugar
  • pinch of salt
  • 4 teaspoons baking powder
  • 12 tablespoons unsalted butter, at room temperature
  • red or pink food coloring, if desired

for frosting

  • 3 cups powdered sugar [plus up to an extra 1/2 cup as needed]
  • pinch of salt
  • 8 ounces cream cheese, softened
  • 12 tablespoons unsalted butter, at room temperature
  • 9 ounces bittersweet chocolate, melted
  • 6 ounces milk chocolate, melted
  • 8 ounces sour cream

Directions:

If using frozen strawberries [I did!], set in a fine strainer placed over a bowl. Let rest until thawed, tossing occasionally to remove excess juices. Reserve liquid for another use or discard as desired.

If using fresh strawberries, hull and toss with 1-2 teaspoons sugar. Let rest at room temperature for an hour or two, until juicy.

Place strawberries in a food processor and pulse. Reserve 3/4 cup puree for the cake. Use the rest for something else–I stirred mine into plain yogurt. Yum!

Preheat oven to 350 degrees F. Grease and flour two 8 or 9 inch round baking pans. Mine are 9 inches. If desired, you can also grease pan, line with parchment circles, then grease and flour again.

In a medium bowl, whisk together 3/4 cup strawberry puree, 1/4 cup milk, egg whites, and vanilla.

In the bowl of a stand mixer, combine flour, sugar, baking powder, and salt. While mixer is running on low, add butter. Mix until moist crumbs form.

Add strawberry puree mixture to bowl of stand mixer. Beat on medium speed for about a minute, then turn off mixture. Scrape sides and stir together by hand for about 30 seconds. Add a drop or two of food coloring if desired–original recipe said that batter won’t get pinker so add food coloring if you want more of a pink/red color!

Divide batter between prepared pans. Smooth tops with a rubber spatula, then bake for 22-25 minutes, or until a toothpick inserted in the center comes out clean. I usually start checking around 18 minutes and cover with foil if top is browning too much.

When finished, let cake rest in pan for 10-15 minutes before turning out onto wire rack to cool completely.

Meanwhile… make that frosting!

In a small bowl, mix 3 cups powdered sugar, cocoa, and salt. With an electric mixer, combine cream cheese and butter until smooth and fluffy.

Add cocoa mixture to cream cheese concoction in 1/3 cup increments, mixing until fully incorporated. Pour in the chocolate [it helps to melt it in a glass measuring cup with a spout] while mixer is running on low, then add sour cream and beat until combined, scraping the sides as necessary. If desired, add additional powdered sugar to reach desired consistency.

Frost the cake once cooled–first between the two layers, then on top and sides. Some people use the extra strawberry puree in between the layers but I didn’t do that. Check out original recipe for more details! Enjoy!

P.S. I stored the leftovers in the fridge due to the frosting. It’s great cold!

Main Dishes, Pasta, Recipes

Creamy Pesto Pasta with Broccoli and Chicken

This delicious, creamy pasta dish comes together in a flash! It’s like a grown-up broccoli & cheese casserole, pasta-fied!

Creamy Pesto Pasta with Broccoli + Chicken | thepajamachef.com

I don’t think “pasta-fied” is a word, but I want it to be. This pasta dish is one of my absolute favorite quick dinners… and you gotta make it soon! Promise? It is reminiscent of SO many other dishes that I bet you know and love… those rice/pasta packet side dishes… the ever-classic broccoli & cheese side dish… pesto pasta… mac & cheese… I could go on and on and on, but then I wouldn’t get to the goodness of this dish! Sure, it’s not the healthiest pasta dinner, but it is flavorful and has veggies, protein, and carbs so it’s pretty all-encompassing. And on nights when you have less time than you want, but still want a homemade dinner, meals like this are the BEST.

Creamy Pesto Pasta with Broccoli + Chicken | thepajamachef.com

Creamy Pesto Pasta with Broccoli and Chicken is fast and flavorful. The creamy sauce is basically pesto + cream cheese + chicken broth [ooooh pesto, how I love thee! Make your own, or use some storebought pesto… it matters not]. The creamy sauce coats your pasta [duh], chicken, and broccoli to make a wonderful all-in-one meal that’s just a bit cheesy and creamy and a whole lot delicious. You can use fresh chicken for this, or even leftover chicken [rotisserie chicken would be SO  yum and SO easy I think]. I used frozen broccoli for ease, but fresh steamed broccoli would be great too. Basically, this recipe is just a guideline. The sauce makes the dish though so keep that in mind. I hope you love it as much as we do! 🙂

one year ago: Red Cabbage, Raisin, and Apple Slaw
two years ago: Healthy Crumb Topped Zucchini Bread
three years ago: Pumpkin Coconut Soup
four years ago: Chocolate Mousse
five years ago: Pumpkin Granola
six years ago: The Bestest Pizza Sauce Ever [+ Pizza How-To]


Budget Bytes

Creamy Pesto Pasta with Broccoli and Chicken

  • Servings: 4
  • Print

Ingredients:

  • 8 ounce small pasta, like bow ties
  • 8 ounces frozen broccoli
  • 1 tablespoon olive oil
  • 1 pound chicken breast, thinly sliced [or 2 cups chopped, cooked chicken – rotisserie chicken would be great here!]
  • freshly cracked black pepper
  • 1/3 cup basil pesto
  • 1/2 cup low sodium chicken broth
  • 4 ounces cream cheese, cubed [I always use 1/3 less fat]
  • Parmesan cheese, for topping, optional

Directions:

Bring a large pot of water to boil and cook pasta according to package directions. Once pasta is nearly cooked, add frozen broccoli to the water with the pasta. Cook for a minute, then drain pasta and broccoli together.

Meanwhile, in a large skillet set over medium heat, heat olive oil until it shimmers. Add sliced chicken and season with black pepper. Stir frequently, and cook for about 5-6 minutes until cooked through [no pink]. If you are using pre-cooked chicken, simply heat chicken in pan over medium-low heat until hot. You can add a little olive oil or water if you would like to keep it moist.

Then, add pesto and chicken broth to cooked chicken. Bring to a simmer over medium-low heat. Whisk in cream cheese gradually, constantly stirring to allow the sauce to thicken. Fold in cooked and drained pasta and broccoli. Stir well to combine, and serve!

Pasta is best fresh, but heats up well. You can top it with a little Parmesan cheese too… extra cheese never hurt anyone! 🙂

Appetizers, Chicken, Main Dishes, Recipes

SRC: Buffalo Chicken Lettuce Wraps

Fancy up your buffalo chicken by serving it in some cool, crisp lettuce wraps! This is the perfect game day appetizer or light dinner option. Mmmm!

Fancy up your buffalo chicken by serving it in some cool, crisp lettuce wraps! This is the perfect game day appetizer or light dinner option. Mmmm! #secretrecipeclub

This month for Secret Recipe Club I was assigned to The Avid Appetite, a fun blog written by Rachel. Rachel lives in Jersey City with her family and shares her love of family, fun, and food through her wonderful blog that she’s maintained for 5+ years. So many of her recipes sounded so delicious that it was hard to just pick one! After checking out my options, I narrowed it down to Pepperjack Pimento Cheese Dip, her favorite Iced Coffee recipe, Spicy Sweet Potato Wedges, and Berry Baked Oatmeal… and my final pick, Buffalo Chicken Lettuce Wraps. I wish I had time to try everything!

Fancy up your buffalo chicken by serving it in some cool, crisp lettuce wraps! This is the perfect game day appetizer or light dinner option. Mmmm! #secretrecipeclub 
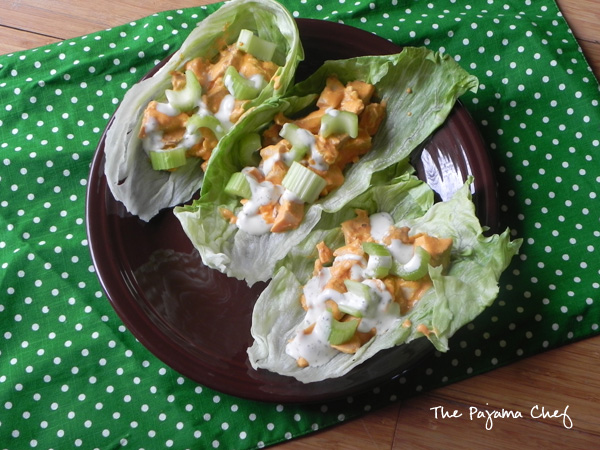
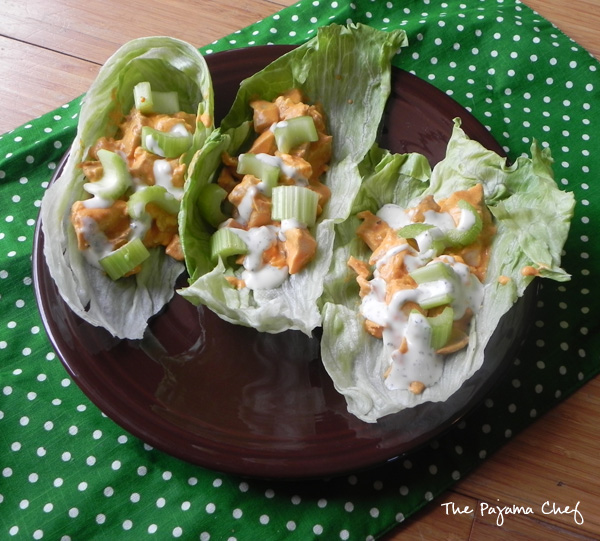
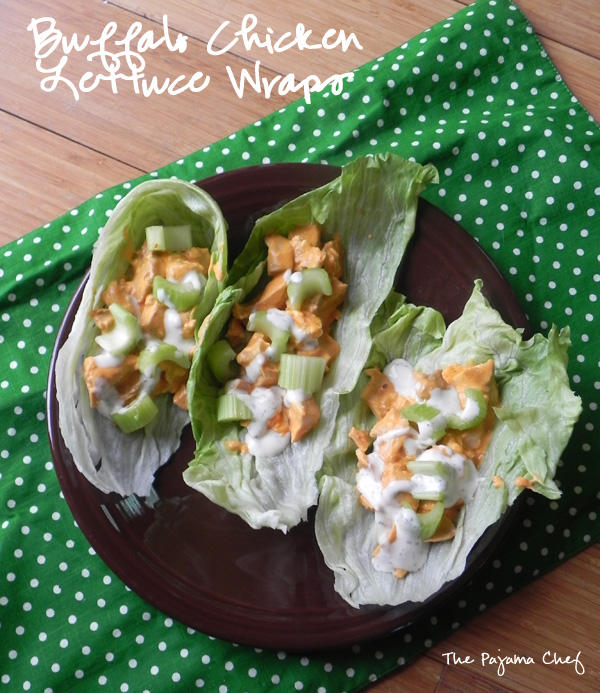
These buffalo chicken lettuce wraps certainly hit the spot! They were the perfect blend of spicy, creamy, cheesy, and cool. We enjoyed them during Selection Sunday last week [go Hoosiers!], but they’d be equally good during any sporting event, party, or get together. To be honest, buffalo chicken isn’t always my favorite–some versions are too spicy, and most versions are too messy–but this recipe may make me a diehard fan. 🙂 If you like buffalo chicken, you’ll love this recipe!

Fancy up your buffalo chicken by serving it in some cool, crisp lettuce wraps! This is the perfect game day appetizer or light dinner option. Mmmm! #secretrecipeclub

I changed a few things with Rachel’s original recipe–namely, using feta cheese and ranch dressing in place of bleu cheese and bleu cheese dressing, but the heart of the recipe is still there. If you’re a bleu cheese fan, knock yourself out, haha. I also added celery on top for some crunch! Yum! Thanks, Rachel, for this tasty treat!

one year ago: French Toast Casserole
two years ago: Tasty Mexican Lentils

three years ago: Quick Chocolate Pudding
four years ago: Alice’s Vanilla Tea-Infused Granola
five years ago: Roasted Tomato and Black Bean Soup

Buffalo Chicken Lettuce Wraps

  • Servings: 8 as an appetizer, 4 as a meal
  • Print

from The Avid Appetite

Ingredients:

  • 3 chicken breasts or 4-5 chicken thighs – I used bone in, skin on chicken thighs but boneless skinless would work too
  • freshly ground black pepper
  • 1/2 teaspoon paprika
  • 1/2 teaspoon dried thyme
  • extra virgin olive oil, if using boneless skinless chicken
  • 4 ounces cream cheese
  • 1/2 cup Frank’s red hot sauce
  • 1/2 cup crumbled feta or bleu cheese
  • 1 head Boston or iceberg lettuce, washed and dried, then separated into individual leaves
  • 1/3 cup ranch or bleu cheese dressing
  • 2 stalks celery, chopped

Directions:

Preheat oven to 425 degrees. Place chicken on a large baking sheet lined with foil. [If using boneless skinless chicken, brush chicken with olive oil.] Sprinkle chicken with pepper, paprika, and thyme. Bake for 20-25 minutes until cooked through. Let rest for about 10 minutes to cool, then remove skin and bones and chop into bite size pieces.

Meanwhile, place cream cheese, hot sauce, and feta in a large mixing bowl. Stir together and add chicken. Transfer mixture to an oven safe baking dish to heat through, or place in a skillet set over low heat. Cook until cheese has melted, about 10 minutes.

When ready to serve, spoon buffalo chicken into prepared lettuce leaves. Drizzle with ranch dressing and top with celery.

Enjoy!

Be sure to check out all the other recipes made by my SRC friends this week at the link below!