Peach season is almost over… so sad. Just this weekend Ben told me that the thing he’ll miss most about the summer farmer’s market [as opposed to the fall or winter ones] is peaches. They have just been so juicy and sweet this summer! And while I know that fall doesn’t officially start for a few more weeks, some of us [like me] have already gotten into that fall mindset… craving pumpkin anything, wearing scarves, and praying for cool temperatures. Check, check, and CHECK. Oh wait, I was praying for cool temps in like July. But wait! Hold up! I still have some yummy summer recipes that I want to share… because goodness knows I rarely make the same thing twice [so many recipes, so little time], so waiting til next summer to make a recipe again just isn’t happening. So I need to sneak in some more peaches, tomatoes, and other yummy summer foods now before it’s too late for you to get some and make some of these great things, like this awesome-incredible-I-can’t-believe-this-is-gone-I-want-more-now Peach Ginger Pie.
 I know many people are intimated by making pies, specifically making pie crust, but people! Hear this! It is not hard. Butter, sugar, flour, water, salt. Mix, chill, roll. Presto, pie crust. Mucho better than storebought. And look what you can do with it!
 This crust from Simply Recipes has become my default pie crust over the past few years, after I made a bunch of pies for a church event. [Ten in one day. What was I thinking, deciding it was a good idea to make pie for 80 people?] If you click on the link, there are great directions and photos for how things should look every step of the way, as well as tips for sweet vs. savory pies for the sugar content etc. It’s a great resource, and the crust always comes out perfectly light, buttery, and flaky, the perfect vehicle for whatever filling you choose. Or you can just munch away on unbaked pie crust as you’re rolling it out like I do… anyway…
 In this case, my filling of choice was a simple blend of peaches, sugar, and ginger. I didn’t use a lot of sugar, so if you like really sweet pie, feel free to increase the amount of sugar used. However, if you have good, quality peaches, then just a bit of sugar [white + brown for diversity] and a smattering of freshly grated ginger will be just perfect! Those simple flavors play off the fruit really well. We loved the slight spice of the ginger–it was just enough to not be overpowering, but enough to make an impact. Even though I JUST said that I rarely make the same thing twice… I think next summer I might have to eat my words because this is just SO good. Other recipes, other smecipies. This is where it’s at!
 Oh, and next summer I’ll have to try my hand at a better lattice crust. This was my first attempt! 🙂
Peach Ginger Pie [crust from Simply Recipes, filling slightly adapted from Smitten Kitchen]
click to print
Ingredients:
crust
- 16 tablespoons unsalted butter, very-cold, cut into 1/2 inch cubes
- 2 1/2 cups all-purpose flour, plus more for rolling
- 1 teaspoon salt
- 1 tablespoon sugar
- 6 to 8 tablespoons ice water, very cold
filling
- 6-7 cups peaches, cut into 1/3-inch slices [Deb says this is about 3.5 pounds or 6 large, 7 medium or 8 small. I did not peel my peaches but if you want to, check out the instructions on this post.]
- 1 tablespoon lemon juce
- 1/4 cup white sugar
- 1/3 cup brown sugar, packed
- 2 teaspoons ginger, peeled and freshly grated
- 3 tablespoons cornstarch
Directions:
for the crust
Begin by placing butter cubes on a sheet of aluminum foil. Wrap into a loose package–don’t worry if some of the butter touches, but you don’t want it in a giant clump either. Place in the freezer for at least 15 minutes, but between an hour and overnight is preferable.
After butter is chilled, combine flour, salt, and sugar in a food processor. Add half of the butter cubes, and pulse 6-8 times to incorporate. Repeat with other half of the butter. The goal is to make the butter pieces look like tiny pea-sized pieces at this point.
Add water tablespoon by tablespoon, pulsing in between additions. The goal here is to get the dough to barely clump together in the food processor. I usually add about 6 tablespoons maximum–it’s best to take the lid off and test the clumpability with your fingers. Check out the photos on this post to get a better idea about what I mean.
Remove dough from food processor and place on a clean countertop. Divide dough in two and form into discs. Wrap with plastic wrap, then refrigerate for at least an hour or overnight before preceding.
If you have a smaller food processor, you might want to make each disc of dough individually. My [1980s] food processor can accommodate all that flour and butter, but it just comes out better if I employ a bit of patience and half the recipe and do everything twice.
for the filling
Toss peaches with lemon juice. Add sugars, ginger, and cornstarch and toss again to coat.
to assemble
Preheat oven to 425 degrees.
Remove dough from refrigerator about 5 minutes before you want to roll it, just so it isn’t quite so cold and is easier to roll.
Generously flour a clean countertop, unwrap one disc, and place on floured surface. Sprinkle a little bit of flour on top of dough, then start rolling from the center out. I usually roll a few times in one direction, then switch gears and roll in another place to keep things even. Some directions advocate turning the dough as you roll, I find that difficult but just try different methods [Google and YouTube are your friends] and see what works for you. It’s just dough–you can always ball it back up and start again. Basically, the goal is to get the dough to form a circle with a diameter of about 12-13 inches and a thickness of about 1/8 inch. Pick up dough, folding in quarters loosely if necessary to carry, and place in pie pan. Press it gently into place, and trim any overhang to about 1 inch.
Add filling over top bottom pie dough, then roll out other disc of dough for the top. Follow the same instructions as before if you want to make a regular lidded pie, otherwise, cut into even 1/2-1 inch strips for a lattice top. Place half of your strips over filling evenly in one direction. Then fold every other strip back up to insert a new strip the opposite direction, repeating until all strips are used. [I know those aren’t very good instructions, but again–Google and YouTube are your friends–I just eyeballed it and it all worked out]. Gently crimp together rim of bottom crust with lattice strips.
Brush crust with milk, water, or egg as desired for shine, and add a little decorative sugar. Place pie pan on rimmed baking sheet to catch any spills, then place in oven and bake for 20 minutes. Then reduce heat to 375 degrees and bake for an additional 30-40 minutes, or until filling is bubbly and crust is golden brown. Oh! Be sure to check crust earlier than 30 minutes–mine started to get pretty golden after 15 minutes at 375, so I just covered it with foil.
Let cool for 3 hours before cutting to let the filling thicken if you can! Store leftovers in the fridge or covered on the countertop. Serve with a scoop of ice cream, and enjoy!
Time: A good 3-4 hours, minimum. But active time is definitely less than an hour.
Yield: one 9-inch pie, about 8 servings.
linked up at Life as Mom’s URS: Pies.

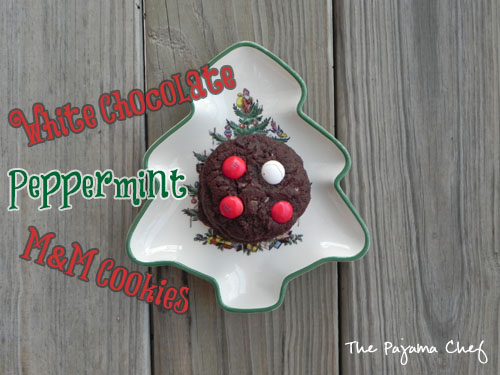
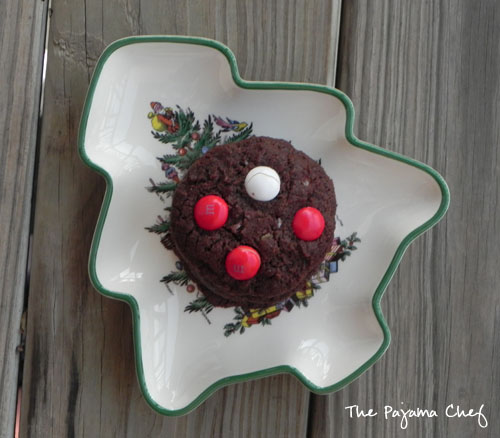
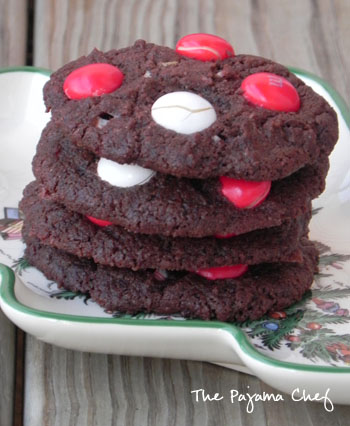
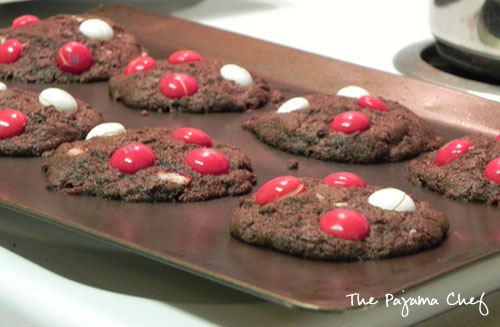 Two kinds of chocolate and two kinds of mint is a combination that cannot be beat. I mean, chocolate and mint together is classic, but white chocolate peppermint in the M&Ms provides the extra boost to the more traditional cocoa that makes the cookies uber chocolatey and thick as well as to the epitome of peppermint during the Christmas season: candy canes.