Appetizers, Recipes, Sides, Vegetables

Asian Peanut Veggie Dip

I’m one of those weird people who loves to eat their veggies. Every Sunday, without fail, I chop up a week’s worth of vegetables, crudites if you will, for lunch and snacking. Anything goes–carrots, bell peppers, cucumbers… just whatever looked good at the grocery store. Except celery. I’m not a big celery snacker–that’s Ben’s territory. 🙂 Mostly, I eat these veggies plain and it really doesn’t bother me. I love the taste of veggies. [See, I’m weird!] Carrots and peppers are my fave! But I know that everyone isn’t as weird as me, and sometimes people need incentive to eat their veggies. Is this incentive enough?

Asian Peanut Veggie Dip | The Pajama Chef

Though I don’t usually need much incentive to eat my veggies, I can polish off even more when I have a bowl full of this awesome dip on hand! It’s super simple to make, and has just the right amount of sweetness and spice to make me happy. The Asian dressing [I used bottled but you can make your own] is gingery and garlicky  which pairs perfectly with sweet honey, creamy peanut butter, and just a bit of crushed red pepper for spice. You guys, this is SO good! When I first made it for a church event, I wasn’t sure how it would go over, but it turned out to be insanely popular. I’m kind of sad it took me so long to blog about it, actually. But I guess it’s a good thing… now that I’m reminded of it, I can make it again for this week’s lunches.

Asian Peanut Veggie Dip | The Pajama Chef

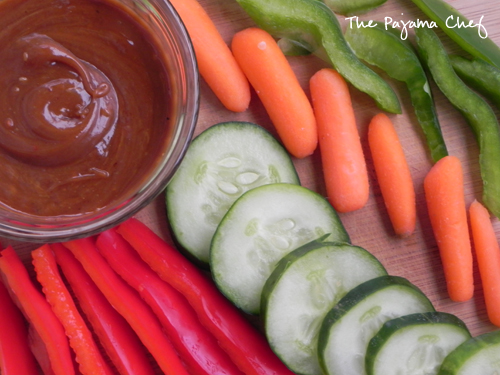
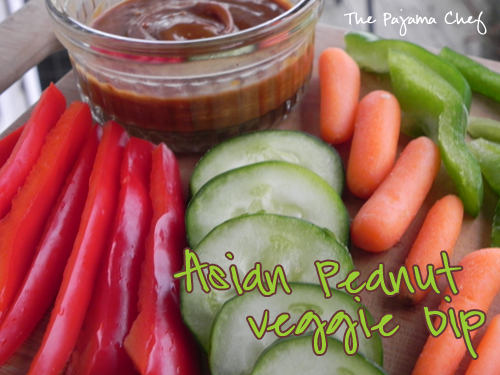
This is a dip you could totally eat by the spoonful, but why not pile it up on some veggies and enjoy it that way? It is totally yum-o! I’ll take it with some red peppers, please. What about you? What’s your favorite veggie? Enjoy!

Asian Peanut Veggie Dip

  • Servings: 8
  • Print

adapted from Kraft

Ingredients:

  • 1/4 cup Asian Toasted Sesame Dressing [like this version from Kraft or this version from Marzetti–I’ve had both and they taste similar… or make your own here or here]
  • 1/4 cup peanut butter [I’ve used natural and regular… both work, but it’s a little thinner with natural]
  • 1/4 cup honey
  • crushed red pepper

Directions:

Add dressing, peanut butter, and honey to a small bowl. Whisk well and then add crushed red pepper to taste. Serve immediately or store in the refrigerator, covered, for up to 1 week.

Menu Plans

Menu Plan

Menu Plan | The Pajama ChefWeek of February 18

Monday: Kung Pao Chicken Burgers [didn’t make before]
Tuesday: Taco Pizza
Wednesday: Lemony Kale Pasta
Thursday: leftovers
Friday: Minestrone Soup
Saturday: Pot Roast
Sunday: out to eat

Bars, Desserts, Recipes

Red Velvet Marshmallow Bites

Happy Valentine’s Day!

Valentine’s Day came a little early to our kitties! Ben and I had a little coffee/shopping/errands date last Friday night and went to the pet store for some kitty toys. Now, don’t get me wrong, our cats are spoiled little girls. They don’t get along so we have to keep them separated unless we are around, so we do have to have multiples of most cat items just to keep ’em happy. But we’re suckers for making sure they have exactly what they want [right down to the milk out of our cereal bowls], so when Misty’s favorite toy broke recently, we had to get her a replacement.

Misty

Of course, we had to get Sheba a toy too… how could we not? Yes, we are crazy cat people in case you were wondering. 🙂

Sheba

Not sure if you can see the detail, but it’s pink with white hearts! How appropriate for Valentine’s Day, huh? And speaking of appropriate for Valentine’s Day… check out these Red Velvet Marshmallow Bars!

Red Velvet Marshmallow Bites | The Pajama Chef

I didn’t get these made far enough in advance for you to make them before today, but if you’re looking for a super fast and tasty holiday treat, these are just the ticket! With a thick, brownie-like red velvet base, these bites don’t really need anything else to be delicious, but topping them with gooey marshmallows and a few chocolatey M&Ms makes them even better!

Red Velvet Marshmallow Bites | The Pajama Chef

The original recipe made these miniature sized treats in bar form, but since I made these to take them today to my class and for Ben to take to work, I decided I didn’t want to mess with cutting a whole pan of Red Velvet Marshmallow Bars into nice pieces. Mini muffin cups are my BFF sometimes! If you would prefer to make them in a pan, you can totally do that–just click over to the original recipe for altered times and quantities. But I personally love anything miniature, I think these are just perfect… and I think you will too!

Red Velvet Marshmallow Bites | The Pajama Chef

Hope you have a lovely Valentine’s Day! What are your plans? My sweet husband is cooking me dinner and making me a pie! I can’t wait! 🙂

Red Velvet Marshmallow Bites [slightly adapted from Confessions of a Cookbook Queen]
click to print

Ingredients:

  • 1 [18.25 ounces] box red velvet cake mix
  • 1/4 cup canola oil [or melted butter]
  • 1/4 cup water
  • 1 egg
  • 2 cups mini marshmallows
  • 1 cups Valentines M&Ms

Directions:

Preheat oven to 375 degrees. Prepare two mini muffin pans by spraying with nonstick cooking spray or lining with paper liners.

In the bowl of a stand mixer, combine cake mix, oil, water, and egg. Mix on low until fully combined, scraping the sides as needed.

Scoop thick batter into mini muffin cups in generous tablespoon increments [a cookie scoop would be helpful if you have one]. If batter is not smooth, use a spatula coated with a little cooking spray to spread it in place.

Bake for 14-15 minutes or until toothpick inserted into center comes out clean.

Press in 3 mini marshmallows and top with 3 M&Ms, then return to oven for 2 minutes to allow marshmallows to melt.

Time: 35 minutes total time, 15 minutes active time.

Yield: 38 bites.

Breakfast, Pancakes, Recipes

Go-To Pancakes {Repost}

So, I used to post once a month on a blog called Today’s Housewife. Last fall, the group decided together to stop posting due the busyness of life and families and such. Though sad, I enjoyed being part of the group. As of early January, the blog was officially taken down. But I don’t want to lose my recipes, so periodically I will be reposting them on here. Enjoy!

~

from November 10, 2011…

In my house, we love pancakes. Well, let me rephrase that. I love pancakes. My husband tolerates them [and sometimes is in the mood for them]. The cat just tries to steal them. That’s how it goes.I realized today that while I have six different pancake recipes on my blog [update! now it’s 10 wow!], I haven’t yet posted my go-to pancake recipe. This go-to pancake recipe was a conglomeration of several different recipes from the internet and cookbooks that I started making back in the summer of 2009 when Ben and I were first married. I wrote it down in my recipe journal next to the likes of other household classics like my crockpot chunky applesauce.

My perfect, tried & true pancake recipe. Go-To Pancakes are great alone or with your favorite mixins! We make these alllll the time. :)

It’s the perfect tried and true pancake for any variety of mix-ins, and is great solo to allow toppings to shine. Sometimes to fancy it up, I’ll add a little vanilla extract or cinnamon to the mix, but it’s not necessary at all. These pancakes are a hit any way they’re served because they bake up thin with nice crispy edges–everything a pancake should do, in my opinion. I hope you like them as much as we do!

… and I totally should have posted these yesterday, since it was Fat Tuesday. Alas. Hope you enjoy them anyways! 🙂

Go-To Pancakes

  • Servings: 12-14 pancakes
  • Print

Ingredients:

  • 1 1/2 cups flour
  • 3 1/2 teaspoons baking powder
  • sprinkle of salt
  • 1 tablespoon sugar
  • 1 1/4 cup skim milk, at room temperature
  • 1 egg, at room temperature
  • 3 tablespoons butter, melted and cooled [can sub oil too]
  • oil for cooking
  • mix-ins if desired [chocolate chips, blueberries, sliced bananas, chopped apples, etc.]
  • butter and syrup for serving

Directions:

Preheat skillet over medium heat.

In a medium size bowl, mix together flour, baking powder, salt, and sugar. Make a well in the center. Measure out milk in a measuring cup and then add egg. Beat gently with a fork. Add [cooled] butter and stir again. Pour liquid ingredients into well of dry ingredients, then stir gently to combine. Don’t worry if batter is lumpy.

Pour batter onto hot skillet in 1/4 cup increments, topping with mix-ins as desired. Cook for a couple minutes on the first side until bubbles form, then flip and cook on other side until golden brown. Keep warm on a dinner plate covered with an aluminum foil tent until all are prepared, then serve with butter and syrup.

Notes: My “syrup” in the photo is actually leftover raspberry sauce from my Lime Yogurt Cake. It is not 100% necessary to let milk and egg come to room temperature, but it yields better results. Recipe can be easily doubled with good results!


Breads, Recipes

60 Minute Sandwich Buns

Over the years, I’ve tried several recipes for homemade sandwich buns. They were all okay, but I never became loyal to a single recipe. Too dry, too chewy, too time consuming, too sweet, too tough. I think that just might have changed… and here’s why:

60 Minute Sandwich Buns | The Pajama Chef

Oh my yum. These are the best sandwich buns I have ever made!! They are soft and fluffy, but substantial enough to hold drippy, savory, spicy pulled pork [watch for this recipe coming soon!] or even a store-bought chicken patty, just like you enjoyed at lunch in 5th grade [gasp! My guilty pleasure, purchased by my sweet husband as I freak out about finishing my thesis.]. For this batch, I used about 1/3 whole wheat flour, but plan to try to increase that gradually as I make them in the future for even more of a nutty, hearty sandwich bun.

60 Minute Sandwich Buns | The Pajama Chef

And you know what’s awesome about these sandwich buns? They come together so quickly that they are totally do-able on a weeknight so you don’t have to suffer through tasteless, dry, papery store-bought buns, thanks to an abundance of yeast [fyi this is NOT a packet of yeast, but 2 tablespoons]. No sireebob. You can even make these while writing a master’s thesis, they’re that easy. I’m definitely gonna be making them again soon and think you should too… even if you’re scared of yeast. Just pay attention to the measurements and the temperature of the water. And use fresh yeast… that is VIP!

60 Minute Sandwich Buns | The Pajama Chef Enjoy!

60 Minute Sandwich Buns

  • Servings: 8
  • Print

barely adapted from Taste of Home

Ingredients:

  • 2 tablespoons active dry yeast
  • 1 cup + 2 tablespoons warm water [110-115 degrees F]
  • 1/3 cup canola oil + more for brushing
  • 1/4 cup sugar
  • 1 egg
  • 1 teaspoon salt
  • 1 cup whole wheat flour
  • 2 – 2 1/2 cups bread flour
  • 1 tablespoon vital wheat gluten
  • 1 tablespoon poppy seeds

Directions:

In the bowl of a stand mixer, dissolve the yeast in warm water. Pour in 1/3 cup oil and sugar, then stir and let rest for 5 minutes.

Add egg, salt, whole wheat flour, 2 cups bread flour, and vital wheat gluten. Using the dough hook, let mixer knead the mixture on medium speed for 3-5 minutes until a soft dough is formed. Add up to 1/2 cup more flour if the dough seems too wet or sticky.

Next, immediately divide dough into 8 pieces. The best way to go about this is to divide dough in half, then divide each piece in half again [making 4 pieces total], then divide each of those pieces in half again. Roll into a ball, then place 3 inches apart on greased or lined [with parchment paper/Silpat] baking sheets. Brush with oil and sprinkle with poppy seeds.

Cover with a damp towel and let rise for 30 minutes. Meanwhile, preheat oven to 425 degrees. After dough is finished rising, bake for 8-12 minutes or until golden brown. Remove to cooling racks until cool. Store in covered container for up to a week.


Linked with: Weekend Potluck.