Bars, Desserts, Recipes

SRC: Coffee Blondies

If you like coffee, then you will love these rich and sophisticated glazed coffee blondies. They’re delicious!

Coffee Blondies via The Pajama Chef - If you like coffee, then you will love these rich and sophisticated glazed coffee blondies. They’re delicious!

I was really excited to see that I was given Kate’s blog, Kitchen Trial and Error, for this month’s Secret Recipe Club. Kate lives in New York with her family–including two adorable little boys–and she’s always cooking up something new in her kitchen. I’ve long admired Kate’s blog for her lovely photographs and creative, challenging recipes, and was thrilled to get to make something from it! She’s been blogging since 2010 so there were lots of recipes to choose from, and I was quickly overwhelmed [does that ever happen to other SRCers? There’s just so many options!]. So I turned to my Pinterest boards, and found four of her dishes that I wanted to make–Quinoa Cakes, Chocolate Peanut Butter Sandwiches Cookies, Fish in Crazy Water, and what I ultimately chose… Coffee Blondies.

Coffee Blondies via The Pajama Chef - If you like coffee, then you will love these rich and sophisticated glazed coffee blondies. They’re delicious!

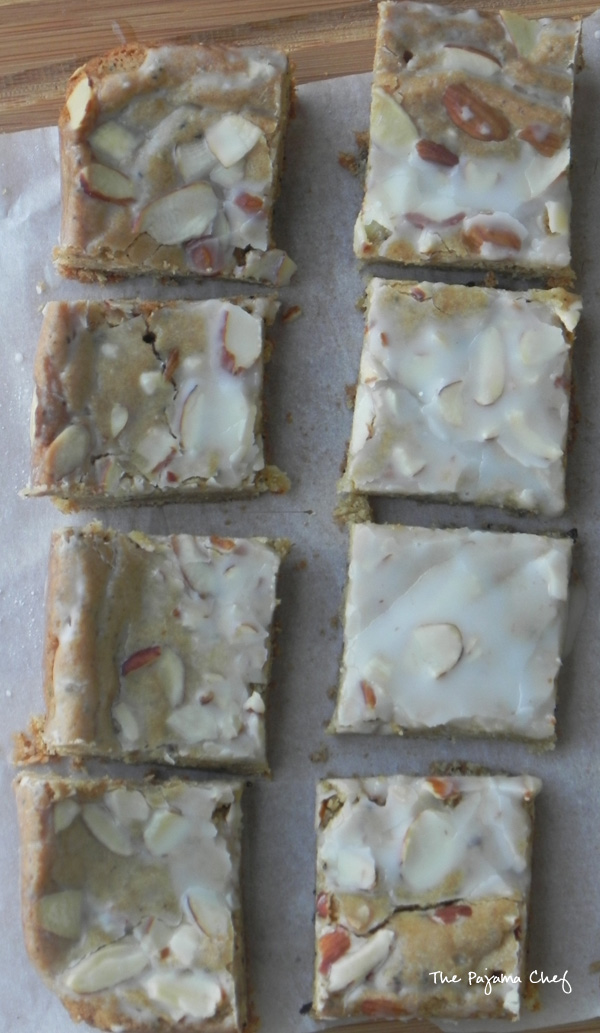
Kate first made them to fulfill a craving for a flavorful, non-chocolatey dessert. And seriously? These blondies are the perfect way to do so! They’re rich and chewy, and taste like something out of a fancy bakery. Since this recipe uses coffee grounds [and not just brewed coffee], the coffee flavor is very prominent but really isn’t too overwhelming–similar to coffee ice cream.

Coffee Blondies via The Pajama Chef - If you like coffee, then you will love these rich and sophisticated glazed coffee blondies. They’re delicious!

The topping of these blondies is my favorite part, I think! I hardly ever make glazes for things, and truthfully almost just sprinkled powdered sugar on top of the blondies. But then at the last second, I changed my mind. Before I put the blondies in the oven I threw a handful of sliced almonds on top, per the recipe, and then after the blondies were cool, glazed them with a simple powdered sugar glaze. After the glaze hardened, I took one bite and was just overwhelmed by how delicious these blondies are! The almonds and glaze give them a nice crunchy, sugary bite that pairs perfectly with coffee… almost like almond flavored coffee. These blondies are perfect with a refreshing glass of milk, and I bet they’d be awesome with a nice cup of coffee for a double caffeinated treat! Thanks, Kate, for a great recipe!

Coffee Blondies via The Pajama Chef - If you like coffee, then you will love these rich and sophisticated glazed coffee blondies. They’re delicious!

one year ago: Pineapple Cream Pie
two years ago: Grandma’s Blueberry Muffins 

three years ago: Linda’s Caramel Ritz Bits Crackers

Coffee Blondies via The Pajama Chef - If you like coffee, then you will love these rich and sophisticated glazed coffee blondies. They’re delicious!

Coffee Blondies

  • Servings: 16
  • Print

Coffee Blondies via The Pajama Chef - If you like coffee, then you will love these rich and sophisticated glazed coffee blondies. They’re delicious!from Kitchen Trial and Error

Ingredients:

  • 1/2 cup unsalted butter, melted and cooled
  • 1 cup brown sugar
  • 1 1/2 tablespoons freshly ground coffee
  • pinch salt
  • 1 egg
  • 1/2 teaspoon vanilla extract
  • 1 cup all-purpose flour
  • 1 teaspoon baking powder
  • 2-4 tablespoons sliced almonds
  • 1/4-1/2 cup powdered sugar

Directions:

Heat oven to 350 degrees F. Line a 8×8 or 9×9 square baking pan with parchment paper. Spray any exposed sides with cooking spray if you don’t overlap.

In a large bowl, whisk melted butter, brown sugar, coffee, and salt. Add egg and vanilla; whisk to combine. Slowly stir in the flour and baking powder, then spoon evenly into prepared pan. Top with almonds–as few or as many as desired, then bake for 25-30 minutes until toothpick inserted in the middle comes out clean. Cool completely in the pan before icing.

To make icing, whisk together 1/4 cup powdered sugar with 1 teaspoon water. Add more powdered sugar to make it thicker or more water to make it thinner. I liked it with a generous 1/2 cup powdered sugar. Ice blondies, then put in the fridge for a bit to harden. Cut into bars when icing is dry.

Be sure to check out what else was whipped up for SRC this month below:

Bars, Desserts, Recipes

Fudgy Fresh Mint Brownies

Every summer, I grow lots of herbs on my balcony. I can’t wait for the day I have a yard so I can have a garden! But until then, I’m content with my low-maintenance substitute. My choice of herbs varies from year to year, but this year I have Thai basil, Greek oregano, catnip, and peppermint growing happily on my balcony. I always grow mint but never really do much with it aside from making copious batches of mint water, mint iced tea, etc. Sometimes I make fruit salad with mint dressing or a vinaigrette with mint, but more often than not, my mint kind of goes to waste. Except for the smell. I just LOVE the smell of fresh mint. Don’t you?

Fudgy Fresh Mint Brownies | thepajamachef.com

One thing I’ve always wanted to do is make a chocolate dessert with fresh mint, and last weekend, I finally got around to it! These brownies are not overwhelmingly minty–nothing like those over the top, ooey gooey Andes Mint Brownies that are super popular. I’m sure you know the ones I’m talking about! Those are good, but these are something extra special. There’s nothing artificial tasting here! Just fudgy, frosted cocoa brownies with a hint of mint. They’re refreshing and super tasty!

Fudgy Fresh Mint Brownies | thepajamachef.com

But enough about the mint… the brownies deserve some love too, right? I’ve tried quite a few homemade brownie recipes. They’ve either been too cakey, too dry, too complicated, too expensive [as in: half a pound of butter, half a pound of chocolate, etc. etc. etc.]. I don’t mind spending money on a recipe if it’s going to be good, but if it’s gonna flop…? Ugh, I might as well buy a box! But these… these brownies are perfect every time! I’ve made these fudgy cocoa brownies with frosting several times and always have been impressed with their chewy texture and consistency. Most people are shocked to hear that they’re just made with cocoa and not chocolate chips or bars… or a box! For the brownie AND the frosting. They’re just the best–and I know I’m not eating a bunch of chemicals! Win win! No one will be able to resist them!

Fudgy Fresh Mint Brownies | thepajamachef.com

For this batch of Fudgy Fresh Mint Brownies, I changed Jen’s base recipe just a tad to use coffee instead of milk in the frosting. I also added some coffee to the brownie batter to add some extra moisture since I threw in a bunch of fresh mint leaves. Speaking of the mint leaves… I chopped them up veryyy finely and baked ’em right in. You can hardly tell, unless you cut into one on the edges. If the thought of that bothers you, you could a) blend the batter with a blender or b) let the mint steep in the melted butter for awhile to infuse it, then drain it out through a fine sieve. I actually tried to do that second option, but made the mistake of also adding the sugar and found it was too thick to efficiently strain out. No matter your method, the end result is fabulous. I think these would make some pretty terrific brownie sundaes! Oh, and btw… these brownies are so fudgy and moist that they aren’t dried out, even a week later, if they’re kept tightly covered. I mean, they probably won’t last that long, but for the record it’s good to know! Enjoy! 🙂

Fudgy Fresh Mint Brownies | thepajamachef.com

Fudgy Fresh Mint Brownies

  • Servings: 12
  • Print

adapted from Yummy Healthy Easy

Ingredients:

for the brownies

  • 1/2 cup butter
  • 1 cup sugar
  • 1/2 cup fresh mint, finely minced
  • 2 eggs
  • 1 teaspoon vanilla extract
  • 1 tablespoon strongly brewed coffee, optional
  • 1/3 cup cocoa powder
  • 1/2 cup all-purpose flour
  • 1/4 teaspoon baking powder

for the frosting

  • 3 tablespoons butter, softened
  • 1 tablespoon honey
  • 1 tablespoon strongly brewed coffee [or milk]
  • 1 teaspoon vanilla extract
  • 1 cup powdered sugar
  • 3 tablespoons cocoa powder

Directions:

Preheat oven to 350 degrees. Grease an 8×8 pan with cooking spray.

Melt butter in a saucepan set over low heat. Add sugar and mint and stir to combine. Remove from heat and let rest for 10 minutes. Mix in eggs, vanilla, and coffee, then add in cocoa powder, flour, and baking powder. Spoon into prepared pan.

Bake for about 25 minutes, then remove to cooling rack to cool. Do not overbake!

Make frosting by stirring together butter, honey, coffee, and vanilla. Slowly whisk in cocoa powder and powdered sugar. Spread on brownies while they are still warm–I like to wait about 10 minutes so they aren’t super hot. Cool completely to set frosting, then cut into bars to serve.

Cookies, Desserts, Recipes

Dark Chocolate Double Coconut Macaroons

Last bridal shower post! I received these cookies [and the recipe] back at Christmas from Mary Beth at A Carrot and A Cupcake for the Great Food Blogger Cookie Swap. Since the bride loves coconut, these were a natural addition to our menu. Can’t go wrong with chocolate and coconut, right?! 🙂  I must say, I was a bit nervous making these macaroons for a bridal shower because you want bridal showers to be pretty, not trashy. And let’s face it: sometimes working with melted chocolate causes things to look trashy. Or is that just me? ANYWAYS…

Dark Chocolate Double Coconut Macaroons | thepajamachef.com

I breathed a sigh of relief when these macaroons came out of the oven golden brown, with crunchy exteriors and soft interiors. And I breathed a second sigh of relief when my dipped chocolate looked… well… normal. Not drop-dead-candy-shop gorgeous, but passable. Normal, even for a home kitchen. And then I wanted to run away to the beach with the entire tin of Dark Chocolate Double Coconut Macaroons. They were so good [c’mon, I had to allow myself one to taste test. That’s just a thing ya do!] and I wanted more. But guys… I decided to share. 🙂 It was just the right thing to do.

Dark Chocolate Double Coconut Macaroons | thepajamachef.com

More chocolate, more coconut, more more more. That’s the problem with little rich desserts. You can convince yourself ahead of time that “one is enough” and “I couldn’t possibly eat another. I am too full/stubborn/ridiculous girl embarrassed/pick your poison.” But no. One isn’t enough. These macaroons are rich and addictive. I heard that non-coconut lovers inhaled these macaroons. I must have done something right. 🙂

Dark Chocolate Double Coconut Macaroons | thepajamachef.com

If the length of the recipe and all the steps scare you… don’t let it. These macaroons are foolproof, tested, and relatively simple. If you’ve ever had a dry macaroon and have sworn off making them because of that, well–this recipe is for you. These macaroons aren’t dry and they don’t have weird ingredients either. Just lots of delicious coconut and chocolate sweetness! I know these will be my go-to Christmas cookie and bridal/baby shower treat for years to come. Food bloggers always say that sort of thing, but I really mean it. I’ve never had a macaroon as good as these and I bet you haven’t either! Hope you enjoy them as much as I do! 🙂

one year ago: Pretzel Rolls
two years ago: Orange-Glazed Chicken Stir Fry
three years ago: Strawberry Chocolate Coconut Pancakes


Dark Chocolate Double Coconut Macaroons [from A Carrot and A Cupcake]

Ingredients:

  • 28 ounces sweetened shredded coconut
  • 1 1/3 cup powdered sugar
  • 1/2 cup canned cream of coconut [i.e. Coco Lopez] – or if you can’t find that, substitute an equal amount of sweetened condensed milk
  • 2 ounces softened cream cheese
  • 6 tablespoons all-purpose flour
  • 2 large egg whites
  • 1 teaspoon vanilla or coconut extract
  • pinch of salt
  • 16 ounces semisweet or dark chocolate, chopped
  • 2 tablespoons coconut oil

Directions:

Preheat oven to 325 degrees.  Line 2 large cookie sheets with parchment paper. Set aside.

Combine 14 ounces coconut and the powdered sugar in a food processor. Pulse until chopped into small pieces. Add cream of coconut, cream cheese, flour, egg whites, vanilla and salt. Pulse until mixed well. This batter will be soft, wet, and gooey so refrigerate for 15-30 minutes to make it easier to work with.

Place some of the remaining coconut flakes in a shallow bowl or baking dish [you can put it all in but you may not use it all, so I used a bowl and added more as necessary]. Drop rounded tablespoons of chilled batter into the coconut flakes, toss some coconut on top, and then gently roll with your hands to form balls. I found that some of the softer balls required more coconut to hold them together. Repeat until all batter is used.

Place 1 inch apart on prepared pans. Bake for 25-30 minutes, rotating pans from bottom to top and front to back halfway through. Be sure to check early and often so they don’t burn! Let cool on baking pans for about 5 minutes and then transfer to cooling racks to cool completely. I cooled mine overnight and just covered up the cooling racks with a kitchen towel.

Line a baking sheet with parchment paper [just reuse what you already have, and discard excess coconut flakes]. Combine chocolate and coconut oil in a small bowl and melt in microwave until smooth. I always melt chocolate at 50% power with 30 second bursts, stirring in between.

Dip bottoms of macaroons in melted chocolate, then place chocolate-side down on prepared pan. Refrigerate 30 minutes or until set.

Store macaroons covered in the refrigerator until ready to serve.

Time: 60 minutes active, plus time to chill.
Yield: 4 dozen cookies.

Linked up with: Weekend Potluck.

30 Before 30, Beans, Chicken, Main Dishes, Other, Recipes, Salads, Sides

Mystery Dish: BBQ Chicken Salad with Jalapeno Basil Ranch Dressing

Today I have the BEST SALAD EVER to share with you!! I am so psyched, I can hardly wait to tell you about it [even though it is not original at all. But that’s okay.] But first, this recipe qualifies for not just one, but two challenges. Woohoo! First of all, I created this recipe for Mystery Dish. But since it includes a fantastic homemade ranch dressing, it also helps fulfill one of my 30 before 30 goals. Score!

BBQ Chicken Salad with Jalapeno Basil Ranch Dressing | thepajamachef.com #mysterydish #salad #summer

This month for Mystery Dish, Chez Catey Lou is our host. Cate is so sweet and gave us such a creative list to work with! We had to use at least two ingredients from this list: raspberries, peanut butter chips, edamame, lemon, yeast, whole wheat pastry flour, bacon, buttermilk, basil, and zucchini. There were a thousand ways I thought about going [I probably say that every month…sorry] but my craving for a salad won out in the end. I used a few of Cate’s ingredients [lemon, buttermilk, and basil] to make an awesome Jalapeno Ranch Dressing to dress up a BBQ Chicken Salad.

BBQ Chicken Salad with Jalapeno Basil Ranch Dressing | thepajamachef.com #mysterydish #salad #summer

I have long searched for a good homemade ranch dressing. I’ve made this recipe once before and let me tell you..it’s a keeper! It’s creamy, spicy, and best of all… clean! No weird mystery ingredients in the powder, thankyouverymuch. The key to this recipe is the jalapeno. It just elevates this creamy, herby dressing with a bit of spice. Oh so good!

BBQ Chicken Salad with Jalapeno Basil Ranch Dressing | thepajamachef.com #mysterydish #salad #summer

You know what else is good? This salad! I know a zillion restaurants have variations of BBQ Chicken Salad and this was mine. I just used seven ingredients so it’s pretty basic: lettuce, chicken, BBQ sauce, corn, tomatoes, black beans, and ranch dressing. You could also add avocados, onions, bacon, or anything else that strikes your fancy.

BBQ Chicken Salad with Jalapeno Basil Ranch Dressing | thepajamachef.com #mysterydish #salad #summer

I kept it simple though so the flavors could really shine. You will really want to make it again and again. One bite of this and Ben was swooning. Seriously! This is a man’s salad, and definitely fancy enough for a restaurant. Hope you enjoy it as much we do!

BBQ Chicken Salad with Jalapeno Basil Ranch Dressing | thepajamachef.com #mysterydish #salad #summer

one year ago: Strawberry Muffins
two years ago: Sweet-Tart Quinoa Salad
three years ago: BAST sandwich

BBQ Chicken Salad with Jalapeno Ranch Dressing

  • Servings: 4 meal-size salads or 8 side salads; 2 cups dressing
  • Print

Ingredients:

  • 2 cups cooked chicken [leftovers from a roasted chicken work great]
  • 1 cup bbq sauce [I used Sweet Baby Ray’s]
  • 1 large tomato, chopped
  • 2 cups black beans, drained and rinsed
  • 3 cups fresh corn, cut from 3 ears of corn
  • 1 head romaine lettuce
  • Jalapeno Ranch Dressing, recipe below

Directions:

Stir together chicken and bbq sauce in a skillet set over medium-low heat. Heat for 5-7 minutes or until heated through, stirring occasionally. Meanwhile, toss together romaine lettuce and Jalapeno Ranch Dressing in desired amounts. Divide lettuce between four plates, then top each with a quarter of all ingredients: chicken, tomato, black beans, and corn. Toss together and enjoy!

Jalapeno Ranch Dressing [slightly adapted from The Lively Kitchen]

Ingredients:

  • 1/4 cup mayonnaise
  • 1/2 cup sour cream
  • 1 tablespoon olive oil
  • 1 tablespoon lemon juice
  • 1/2 cup buttermilk [for this I use real buttermilk, a substitute could be kinda weird]
  • 4 green onions, chopped, with white bottoms removed
  • 1/2 of a chopped, deseeded jalapeno [~2 tablespoons]
  • 3 tablespoons  fresh parsley, chopped [or 1 teaspoon dried parsley]
  • 1/3 cup fresh Thai basil, chopped [or cilantro, basil, etc.]
  • 1 clove garlic, minced
  • freshly ground black pepper to taste

DIrections:

Place all ingredients in a blender or food processor and pulse until smooth. An immersion blender works great!

Dressing thickens in the fridge so add some extra buttermilk before serving leftovers as desired.

Please check out the other awesome recipes from this month’s Mystery Dish!

May Mystery Dish Collage

1. Raspberry Lemon Sweet Roll Cake with Buttermilk Glaze – Baking a Moment
2. Twice Baked Zucchini Boat – Chelsea’s Messy Apron
3. Buttermilk Panna Cotta with Raspberry Mint Compote – Blahnik Baker
4. Lemon-Raspberry Bundt Cake – I Dig Pinterest
5. Peanut Butter Chip Cookies – The Dessert Chronicles
6. Mini Coconut Cupcakes with Lemon Cream Cheese Frosting – I Want Crazy
7. Zucchini Noodles with Meat Mushroom Tomato Sauce – Joyfully Healthy Eats
8. Baked Wonton Cups Filled with Edamame Corn Salad – The Well Floured Kitchen
9. Easy 30 Minute Orange Rolls – Yummy Healthy Easy
10. BBQ Chicken Salad with Jalapeno Basil Ranch Dressing – The Pajama Chef
11. Mini Reese’s Peanut Butter Cupcakes – Culinary Couture
12. Zucchini Muffins with Lemon Glaze – The Weary Chef
13. Lemon Bundt Cake – Chez CateyLou

Cookies, Desserts, Recipes

Tropical Cake Mix Cookies

So, I used to post once a month on a blog called Today’s Housewife. During fall 2012, the group decided together to stop posting due the busyness of life and families and such. Though sad, I enjoyed being part of the group. As of early January, the blog was officially taken down. But I don’t want to lose my recipes, so periodically I will be reposting them on here. Enjoy!

~

from August 23, 2012

I’m all in favor of cooking and baking from scratch, but sometimes using the dreaded processed product or two isn’t so bad. In fact, sometimes using a little something out of the ordinary is not only fun and tasty, but helpful too. Like when you’re baking for 80 for a church event… mhmm, helpful is always good in those circumstances. In those cases, I like to rely on a little thing called cake mix. Not for making a cake, mind you–cake for 80 isn’t really my thing–but for cookies. Normally, cake mix cookies are made out of Funfetti and are pretty much just sprinklicious sugar bombs. Not these cookies. Well, the Funfetti part at least. [No guarantees about the sugar bomb thing… can’t most cookies be described that way?]

Tropical Cake Mix Cookies | thepajamachef.com

Tropical Cake Mix Cookies are made with fluffy yellow cake mix, tropical trail mix, white chocolate chips, and loads of coconut for a taste of vacation even at the start of a busy school year. These two-bite cookies are incredibly addicting, so make sure you have a plan for them when you make them… Otherwise you might wind up eating them one after another without even realizing it. Don’t say I didn’t warn you! The soft cookie combined with crunchy nuts and tantalizing tropical dried fruit like papaya and pineapple will get you every time! If you have nut allergies, just sub out the trail mix for a tropical dried fruit blend.  Enjoy!

one year ago: Jalapeño Popper Grilled Cheese
two years ago: OTT: Pork Chops with Balsamic Blackberry Salad + Orzo

Tropical Cake Mix Cookies

  • Servings: about 4 dozen cookies
  • Print

from Averie Cooks

Ingredients:

  • 3/4 cup butter, softened
  • 3 eggs
  • 1 tablespoon vanilla extract [or coconut or almond for a little extra goodness!]
  • 1 – 15 ounce box of yellow cake mix
  • 6-12 tablespoons all-purpose flour
  • 1 1/2 cups coconut flakes
  • 1 cup tropical trail mix, finely diced [mine was from Walmart and had pineapple, papaya, raisins, cranberries, almonds, cashews, etc. in it]
  • 3/4 cup white chocolate chips

Directions:

In the bowl of a stand mixer, combine butter, eggs, and vanilla. Beat on medium speed until well combined–mixture does not have to be creamed.

With mixer running on low, slowly add in cake mix until cookie dough is smooth. Add flour tablespoon by tablespoon to solidify cookie dough. The more flour used, the more cake-like the cookies will be. I used about 3-4 tablespoons.

Next, fold in coconut flakes, trail mix, and white chocolate chips. Dough will be very sticky.

Cover and refrigerate for about 30 minutes. At the end of that time, preheat oven to 350 degrees. Prepare cookie sheets by lining with parchment paper or a silpat, or spraying lightly with cooking spray.

After dough has chilled, it will still be sticky but much easier to work with and will not spread so much during baking. Scoop dough out in generous 1 tablespoon balls, rolling between greased hands before placing 2 inches apart on the cookie sheet.

Bake for 10-12 minutes, or until bottoms are lightly browned and tops just barely look done. Let cool on the cookie sheet for at least 5 minutes, or until cookies are stable enough to be moved. This allows the cookies to firm up a bit as well as cook a little more on the cookie sheet. Repeat until all dough is used up, returning mixing bowl to refrigerator in between batches.

Store on the counter in a covered container for a week [if they last that long!] or in the freezer up to three months.