Appetizers, Recipes

Jalapeno Beer Cheese Spread

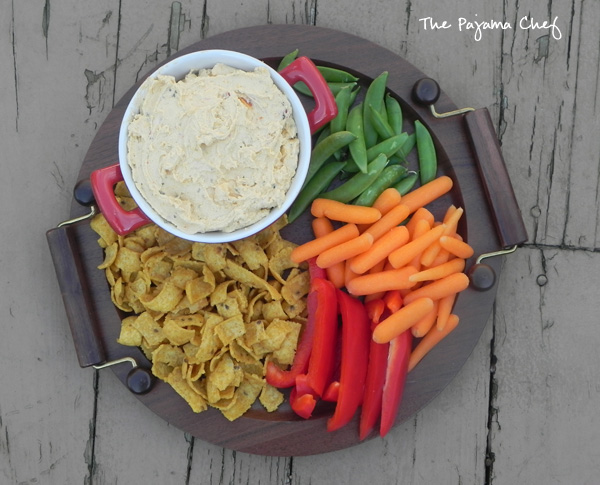
Spicy, spreadable cheese dip… what could be a better way to eat your veggies? 🙂 This Jalapeno Beer Cheese Spread is a great make-ahead holiday appetizer!

Jalapeno Beer Cheese Spread--spicy and spreadable cheese dip is a great addition to your holiday table!

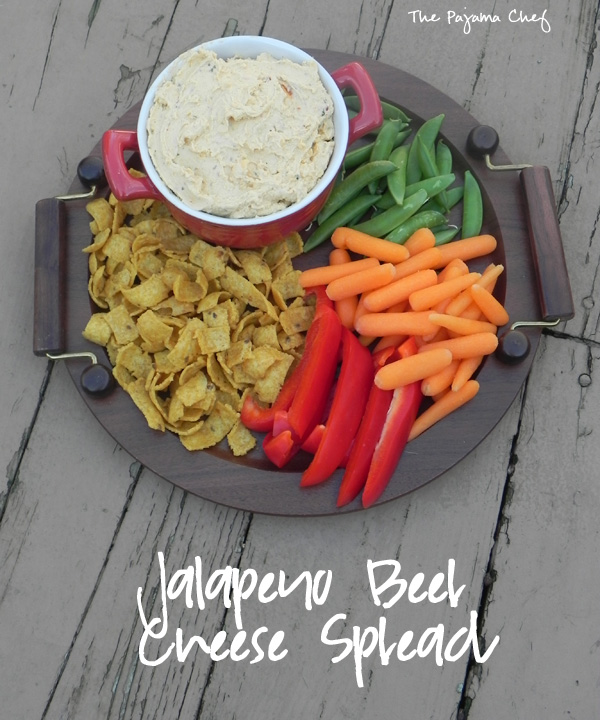
One of our favorite Trader Joe’s finds is their Jalapeno Pub Cheese. We first tried it at their sample station with corn chips and totally walked out of the store with both items. Suckers! Haha. All their pub cheese options are good, actually, but the jalapeno flavor is our fave. Last year for New Year’s Day [I know… I am so behind], we whipped up an appetizers feast, and this was one of our favorite snacks from the day! I know we could have gone to Trader Joe’s and bought the real deal, but what’s the fun in that? And the Trader Joe’s in Nashville is smack dab in the middle of a busy shopping area that I avoid like the plague during peak times. So clearly, this was the best option even though it was a little work. But honestly? It’s not really that much work and it’s totally delicious and SO worth it.

Jalapeno Beer Cheese Spread--spicy and spreadable cheese dip is a great addition to your holiday table!

Basically, all you do to make this delectable spread/dip of the goddesses is throw some ingredients in your food processor [hope yours isn’t part of the Cuisinart recall 😦 –I have my grandma’s 1980s food processor, fortunately… or a blender would work fine too] and pulse away! Just a few minutes to deliciousness!

Jalapeno Beer Cheese Spread--spicy and spreadable cheese dip is a great addition to your holiday table!

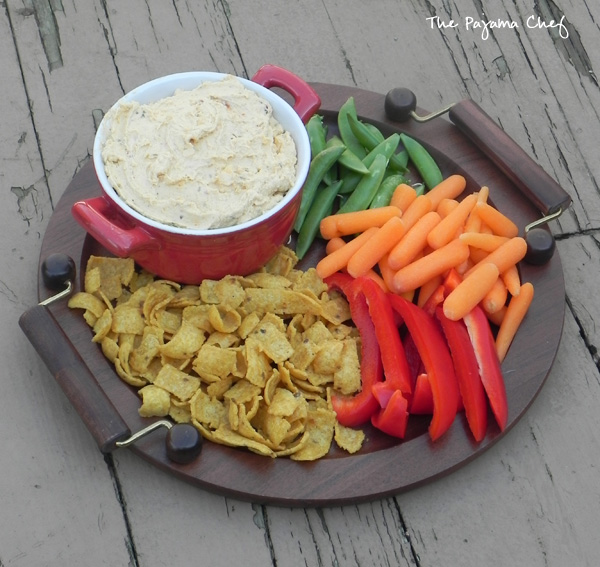
We enjoy this beer cheese spread with corn chips the most. There’s just something about those salty chips with the spicy spread… but if you want to be a little healthier, you can use it as a veggie dip too. The snap peas were surprisingly good with the spicy dip! Now, I know I’ve been going on and on about how spicy and wonderful this beer cheese spread is, and if you use jalapeno–it is going to be spicy! But fear not–if spice isn’t your thing [no shame! I didn’t start delving into the spice world at ALL until I met my husband]–just leave out the jalapeno! It’ll be equally flavorful and delicious without the jalapeno. I mean, who can resist cheese!??!

one year ago: Cranberry Crumb Bars
two years ago: Crockpot Minestrone Soup
three years ago: Dark Chocolate Ginger Squares
four years ago: Streuseled Cran-Apple Sweet Potato Casserole
five years ago: Chocolate Covered Cherry Cookies
six years ago: Sweet-Spicy Pretzel Mix

Jalapeno Beer Cheese Spread

  • Servings: 8
  • Print

adapted slightly from The Fresh Market

Ingredients:

  • 1/2 cup liquid – beer is preferable to make this spread more “authentic” but for serving to children, non-drinkers, pregnant ladies, etc. you can use water, cooking wine, chicken broth, etc. Some people who make this bring the beer to a boil on the stovetop, then reduce it to a simmer and cook it down over an hour or so to reduce the alcohol content. Then you can add extra water/broth to make a 1/2 cup of liquid. Use whatever liquid you feel comfortable with!
  • 8 ounces sharp cheddar cheese, grated
  • 8 ounces cream cheese, softened to room temperature
  • 1 teaspoon dry mustard
  • 1/2 teaspoon cayenne pepper
  • 1 1/2 teaspoons dried parsley
  • 1 jalapeno, finely minced – most of the seeds removed
  • corn chips, crackers, pretzels, crudites for serving

Directions:

Combine liquid, cheddar cheese, cream cheese, dry mustard, cayenne pepper, and parsley in a food processor. Pulse until blended. Add jalapeno and pulse again–mixture may have some lumps.

Serve with corn chips, crackers, pretzels, or crudites. Jalapeno Beer Cheese Spread can be made ahead of time and stored in the fridge. Letting it sit for awhile before serving helps the flavors marry but it’s addictive no matter when you break into it! Enjoy!

Breakfast, Recipes, Waffles

SRC: Loaded Cornbread Waffles

Cornbread waffles filled with cheese, peppers, and onions are loaded with sausage, tomatoes, a creamy avocado spread, and a fried egg for an impressive brunch like no other! This is a fantastic restaurant-worthy dish that’s easy to make at home. You’ll be sure to love it!

Cornbread waffles filled with cheese, peppers, and onions are loaded with sausage, tomatoes, a creamy avocado spread, and a fried egg for an impressive brunch like no other! This is a fantastic restaurant-worthy dish that's easy to make at home. You'll be sure to love it! #secretrecipeclub

I can’t believe I’m writing my LAST Secret Recipe Club post! So sad. But I’m glad the club is going out on a good note…it was a good run, guys! And this month, I had a GREAT SRC assignment. I was assigned to choose and make a recipe from April’s blog, Home Sweet Homestead. April lives in the great state of Indiana [YAY I still love Indiana even though I now live in Tennessee]. She always is making lots of delicious recipes that her carnivore husband loves while still accomodating her food allergies. I’m always impressed by her creativity and innovation in the kitchen. It was hard to narrow down the list, but I eventually decided to choose between the following: Swedish Meatballs, Fish & Chips, Peanut Butter Quinoa Protein Balls, Chicken Fried Chicken, Apple Pie Breakfast Quinoa, or Loaded Cornbread Waffles. I think by the title of this post you can figure out what recipe I chose, but MAN was it hard to decide. I guess I had frying things [even though I rarely do that] and quinoa on the brain when I browsed her blog… and I chose neither, ha.

Cornbread waffles filled with cheese, peppers, and onions are loaded with sausage, tomatoes, a creamy avocado spread, and a fried egg for an impressive brunch like no other! This is a fantastic restaurant-worthy dish that's easy to make at home. You'll be sure to love it! #secretrecipeclub

For those of you who know me, you know I’m a breakfast fiend so when I saw loaded waffles I said, “sign me up!” April’s original recipe is gluten and egg-free, but I just used my regular all-purpose flour and an egg because that’s what I had on hand. I’m sure the original recipe is wonderful too! It’s been a long time since I’ve made waffles so I was glad to dust off my waffle iron for this delectable meal! It is absolutely perfect for breakfast, brunch, lunch, or dinner. No matter when you serve it, everyone is bound to enjoy this savory take on waffles. [Unless you don’t let them, like poor #BabyVolde below.]

https://www.instagram.com/p/BM_3wzvAdMr/

There is so much good stuff in and on these cornbread waffles. Though loaded dishes are super popular at restaurants, I rarely order them because usually the base [fries, tortilla chips, potato soup, etc.] is soggy and/or bland and the dish itself isn’t very healthy. While I won’t say this is the healthiesbreakfast or brunch on the planet, it’s better than some–and these waffles are certainly NOT bland or soggy. 🙂

Cornbread waffles filled with cheese, peppers, and onions are loaded with sausage, tomatoes, a creamy avocado spread, and a fried egg for an impressive brunch like no other! This is a fantastic restaurant-worthy dish that's easy to make at home. You'll be sure to love it! #secretrecipeclub

The waffles are filled with peppers, onions, cheese, and garlic and are the crispiest, heartiest waffles I’ve ever made at home! That’s the cornmeal for you! They truly DO deserve that cornbread title. These aren’t cornmeal waffles; they are cornbread in waffle form. Yum. In terms of toppings, I took a slightly different route than April–I added some ground sausage and a fried egg to the mix. But don’t forget April’s fresh toppings! These waffles wouldn’t be the same without the creamy avocado spread, chopped tomatoes, shredded cheese, or sour cream. I suggest using all these toppings but feel free to use what your family will enjoy. 🙂 No matter how you make them, they are sure to be great!

Cornbread waffles filled with cheese, peppers, and onions are loaded with sausage, tomatoes, a creamy avocado spread, and a fried egg for an impressive brunch like no other! This is a fantastic restaurant-worthy dish that's easy to make at home. You'll be sure to love it! #secretrecipeclub

Thanks, April, for a great recipe. And thank you to everyone who has been a part of the Secret Recipe Club–it’s been fun and tasty, guys! 🙂 I’ll miss checking out posts every Monday but look forward to other blogging events in the future.

one year ago: Simple Teriyaki Chicken
two years ago: Chaider
three years ago: Pizza Frittata 
four years ago: Lemon Herb Eggs in Ciabatta 
five years ago: Honey Whole Wheat English Muffins
six years ago: Pumpkin Cinnamon Rolls

Loaded Cornbread Waffles

  • Servings: 3
  • Print

adapted from Home Sweet Homestead

Ingredients:

for avocado spread

  • 1 avocado
  • 2 teaspoons minced fresh cilantro
  • juice of 1/2 a lime
  • salt

for waffles and toppings

  • 1/3 to 1 pound ground sausage
  • 1/2 bell pepper – approximately 3/4 cup, finely diced
  • 1/4 onion – approximately 1/4 cup, finely diced
  • 2 cloves garlic, minced
  • 1/2 cup all-purpose flour
  • 1/2 cup cornmeal
  • 1 tablespoon baking powder
  • 1/2 cup milk
  • 1/3 cup shredded cheddar cheese
  • 1 egg
  • 2 tablespoons butter, melted and slightly cooled
  • freshly ground black pepper
  • chopped tomato, for topping
  • cilantro, for topping
  • sour cream, for topping
  • 1 egg per person, for topping
  • shredded cheddar cheese, for topping

Directions:

In a bowl, mash avocado. Mix in cilantro, lime juice, and a sprinkle of salt. Cover and refrigerate until ready to serve.

In a large skillet, brown ground sausage. You’ll only need about 1/3 pound for 3 servings, but you could make a whole pound and have leftovers–this is what I did!

When cooked through, remove sausage to a bowl and cover to keep warm.

In the same skillet, add peppers, onions, and garlic and cook for 4-5 minutes until softened.

Meanwhile, prepare waffle batter. In a medium bowl, stir togehter flour, cornmeal, and baking powder. In a measuring cup, whisk together milk, cheese, egg, and butter. Pour wet ingredients into the dry and stir gently to combine. Fold in softened vegetables and a healthy amount of freshly ground black pepper. Batter should be thick but still able to be poured, so add a little extra milk if its too thick. I ended up adding a bit TOO much milk so I had to add another tablespoon of cornmeal too.

Cook batter in your waffle iron according to manufacturer instructions, until crisp and golden brown. Batter should yield about 3 waffles.

While waffles are cooking, fry one egg per person using, you guessed it, the same skillet as before! Scrambled eggs would also be delicious–or no eggs too if that’s what you prefer.

Top each waffle with a smear of avocado spread, sausage, chopped tomatoes, chopped cilantro, cheese, a dollop of sour cream, and a fried egg. Enjoy!


Be sure to check out all the other SRC recipes linked up today below!

Cakes, Desserts, Recipes

Chocolate Covered Strawberry Cake

Fresh strawberry cake from scratch… no Jello, artificial flavorings, or anything fake! This cake is delicious and easier than you would think! Top it with a rich chocolate frosting and you have Chocolate Covered Strawberry Cake that everyone will want an extra slice…or two…or three of!

Fresh strawberry cake from scratch... no Jello, artificial flavorings, or anything fake! This cake is delicious and easier than you would think! Top it with a rich chocolate frosting and you have Chocolate Covered Strawberry Cake that everyone will want an extra slice...or two...or three of!

On Halloween, a Dairy Queen opened about five minutes from our house. Dangerous! Before that, we had to drive a decent distance to reach one. Some of the folks in our area were upset, saying the DQ would “ruin” the area with another fast food area. Ruin the area? Ummm, no! Ruin people’s diets, more likely! Haha. Is there anything more delicious than a Blizzard or a dipped cone? I don’t think so… unless it’s this Chocolate Covered Strawberry Cake!

Fresh strawberry cake from scratch... no Jello, artificial flavorings, or anything fake! This cake is delicious and easier than you would think! Top it with a rich chocolate frosting and you have Chocolate Covered Strawberry Cake that everyone will want an extra slice...or two...or three of!

Now I realize that Chocolate Covered Strawberry Cake and Dairy Queen don’t really relate to many of you. But for longterm DQ lovers like me, do you remember the Chocolate Covered Strawberry Blizzard? I used to get them all the time in college and then they took them off the menu. It was a very sad day. Some stores would make them, and others wouldn’t, which made NO sense to me because it’s just strawberries [that they already have from the sundaes!] and chocolate [like chips/shavings OR that dipped cone topping…yum!]. Yum and yum. It’s so basic, but so good, ya know?

Fresh strawberry cake from scratch... no Jello, artificial flavorings, or anything fake! This cake is delicious and easier than you would think! Top it with a rich chocolate frosting and you have Chocolate Covered Strawberry Cake that everyone will want an extra slice...or two...or three of!

Now, I haven’t been to my local DQ [I just got chills typing that, you guys…yay!] yet to see if they’ll make me my favorite Blizzard, but right now I have this cake and the world is a-okay. You can make this fresh strawberry cake with fresh or frozen strawberries, making it a great year-round treat. There’s absolutely nothing fake or artificial in this cake, just lots of pure strawberry goodness! If you want more of a pink/red color, you’ll have to use a little food coloring but I was happy with the color of my cake without that. The strawberry cake is light and fluffy, and when combined with the rich chocolate frosting is absolutely heavenly! I hope you enjoy this cake as much as I did!

one year ago: Pumpkin Cranberry Bread
two years ago: Cranberry and Cream Cheese Muffins
three years ago: Pumpkin Graham Muffins
four years ago: Pollo alla Poggia Alloro {A Family Farm in Tuscany}
five years ago: Homemade Maple & Brown Sugar Almond Butter
six years ago: Pumpkin Soup and Homemade Croutons

Chocolate Covered Strawberry Cake

  • Servings: 12
  • Print

for Fresh Strawberry Cake

for Chocolate Frosting

Ingredients:

for cake

  • 24 ounces very ripe strawberries, hulled – or frozen strawberries work too!
  • 1-2 teaspoons sugar, optional
  • 1/4 milk, at room temperature
  • 6 large egg whites, at room temperature
  • 2 teaspoons vanilla extract
  • 2 1/4 cup cake flour, sifted
  • 1 3/4 cup sugar
  • pinch of salt
  • 4 teaspoons baking powder
  • 12 tablespoons unsalted butter, at room temperature
  • red or pink food coloring, if desired

for frosting

  • 3 cups powdered sugar [plus up to an extra 1/2 cup as needed]
  • pinch of salt
  • 8 ounces cream cheese, softened
  • 12 tablespoons unsalted butter, at room temperature
  • 9 ounces bittersweet chocolate, melted
  • 6 ounces milk chocolate, melted
  • 8 ounces sour cream

Directions:

If using frozen strawberries [I did!], set in a fine strainer placed over a bowl. Let rest until thawed, tossing occasionally to remove excess juices. Reserve liquid for another use or discard as desired.

If using fresh strawberries, hull and toss with 1-2 teaspoons sugar. Let rest at room temperature for an hour or two, until juicy.

Place strawberries in a food processor and pulse. Reserve 3/4 cup puree for the cake. Use the rest for something else–I stirred mine into plain yogurt. Yum!

Preheat oven to 350 degrees F. Grease and flour two 8 or 9 inch round baking pans. Mine are 9 inches. If desired, you can also grease pan, line with parchment circles, then grease and flour again.

In a medium bowl, whisk together 3/4 cup strawberry puree, 1/4 cup milk, egg whites, and vanilla.

In the bowl of a stand mixer, combine flour, sugar, baking powder, and salt. While mixer is running on low, add butter. Mix until moist crumbs form.

Add strawberry puree mixture to bowl of stand mixer. Beat on medium speed for about a minute, then turn off mixture. Scrape sides and stir together by hand for about 30 seconds. Add a drop or two of food coloring if desired–original recipe said that batter won’t get pinker so add food coloring if you want more of a pink/red color!

Divide batter between prepared pans. Smooth tops with a rubber spatula, then bake for 22-25 minutes, or until a toothpick inserted in the center comes out clean. I usually start checking around 18 minutes and cover with foil if top is browning too much.

When finished, let cake rest in pan for 10-15 minutes before turning out onto wire rack to cool completely.

Meanwhile… make that frosting!

In a small bowl, mix 3 cups powdered sugar, cocoa, and salt. With an electric mixer, combine cream cheese and butter until smooth and fluffy.

Add cocoa mixture to cream cheese concoction in 1/3 cup increments, mixing until fully incorporated. Pour in the chocolate [it helps to melt it in a glass measuring cup with a spout] while mixer is running on low, then add sour cream and beat until combined, scraping the sides as necessary. If desired, add additional powdered sugar to reach desired consistency.

Frost the cake once cooled–first between the two layers, then on top and sides. Some people use the extra strawberry puree in between the layers but I didn’t do that. Check out original recipe for more details! Enjoy!

P.S. I stored the leftovers in the fridge due to the frosting. It’s great cold!

Breakfast, Pancakes

SRC: Apple Cider Pancakes

Flavorful fall pancakes–made with apple cider and topped with cinnamon sugar, these pancakes are a real treat! 

Flavorful fall pancakes--made with apple cider and topped with cinnamon sugar, these pancakes are a real treat!  #secretrecipeclub

It’s time for a FALL DISHES themed edition of Secret Recipe Club! Even though I’m still sad that the club is retiring next month, I’m pumped for today because fall food is my favorite!! Pumpkin and apples and squash… yes, please! For this special edition of SRC, I was assigned to Erin’s wonderful blog, The Spiffy Cookie. Fun fact: the word “spiffy” was one of my favorite words in junior high/early high school. My friends and I were really kind of weird, and had all sorts of nicknames for ourselves. I was Spiffy Sarah. Or Scarah. Or Schara. I don’t know how I spelled it but it basically sounded like “scary+Sarah” combined. Like I said… we were weird. was weird. But I digress…

I don’t know how I first met Erin through blogging, but I’ve been fortunate to be part of a variety of blogging events with her over the years [like our weekly Menu Plan posts]. She always makes such creative dishes, especially for her #PBChocSat where she celebrates all things peanut butter chocolate to support her Buckeyes. 🙂 I obviously had a tough time to choosing what to make from her blog. Some close runner ups to these AMAZING apple cider pancakes included: Penne with Butternut Squash, Kale, and Goat Cheese, Apple Maple Turkey BurgersSpeculoos & Pumpkin Spice Oreo Lasagna, and S’mores Pumpkin Pie. There were a bunch of other runner up recipes too, but I couldn’t link to 20 of her recipes in one post. That would just be crazytown.

Flavorful fall pancakes--made with apple cider and topped with cinnamon sugar, these pancakes are a real treat!  #secretrecipeclub

So let’s talk pancakes, specifically these Apple Cider Pancakes. Pancakes are, without a doubt, my most favorite breakfast food. There’s just something about them that I love. It’s more than just the crispy edges and versatility… but they can be SO flavorful and can be the basis for SO many toppings, it’s unreal. They just seem like breakfast for special days, and who doesn’t like special days?!? I just love them! ❤ I’ll admit they are a little time consuming to whip up and cook on the stove, but homemade pancakes are way better than the plain pucks you can purchase at the grocery store. Did I just say that? Whoops. 🙂

These Apple Cider Pancakes are full of REAL apple cider flavor. Be sure to use good apple cider so all the warm fall spices and apple-y goodness comes through. 🙂 Erin topped her pancakes with a fabulous cinnamon sugar topping, a la an apple cider doughnut from an apple orchard… Let me just say–DON’T SKIP THIS PART.

Flavorful fall pancakes--made with apple cider and topped with cinnamon sugar, these pancakes are a real treat!  #secretrecipeclub

Whoa.

The cinnamon sugar topping takes these pancakes to the next level. They are unbelievable; a real treat without being a big sugar bomb. I know you’ll love them! Enjoy! Thanks, Erin for a great recipe!

one year ago: Beef Stroganoff 
two years ago: Honey-Thyme Roasted Pork Tenderloin
three years ago: Sweet Potato Pie with Cranberry Compote
four years ago: Pumpkin, Kale, & Black Bean Stew
five years ago: Individual Pumpkin Pie Parfaits
six years ago: Aunt Charlotte’s Tex Mex Corn

Apple Cider Pancakes

  • Servings: 20 pancakes
  • Print

from The Spiffy Cookie

Ingredients:

  • 1 cup whole wheat flour
  • 1 cup all-purpose flour
  • 2 teaspoons baking powder
  • 1 teaspoon baking soda
  • 2 eggs
  • 4 tablespoons olive oil
  • 1/2 cup buttermilk
  • 1/2 cup plain or vanilla yogurt, regular or Greek
  • 2 teaspoons honey
  • 1 cup apple cider
  • canola oil
  • butter
  • 2 tablespoons sugar
  • 1 tablespoon cinnamon

Directions:

In a large bowl, stir together both types of flour, baking powder, and baking soda. In a medium bowl, whisk together eggs, olive oil, buttermilk, yogurt, honey, and apple cider. Pour wet ingredients into dry ingredients, then stir until combined. Mixture will be lumpy. Let batter rest for 10 minutes.

Heat a large skillet over medium heat.

When skillet is hot, add 1 tablespoon of canola oil to pan. Pour batter onto hot skillet in 1/4 cup increments. Cook for two to three minutes on the first side until bubbles form, then flip and cook on other side until golden brown. Add extra oil as needed so pancakes don’t stick, and don’t be afraid to adjust heat as needed if pancakes start to get too dark over time.

Meanwhile, mix sugar and cinnamon together in a small bowl.

After pancakes are removed from pan, melt butter on top of each pancake, then top with a sprinkle of cinnamon sugar. Serve immediately and enjoy!

Notes: If your pancakes are, for lack of a better word, greasy enough already – no need to top with extra butter before adding cinnamon sugar. I found I only needed the butter on about half of the pancakes to make the cinnamon sugar stick.

Check out other fall dishes at the link below!

Cookies, Desserts, Recipes

Chocolate Biscotti for #Choctoberfest

Deep, dark, rich chocolate biscotti studded with dark chocolate chunks and topped with crunchy almonds! Thank you to Imperial Sugar for providing the product used in this recipe! All opinions are my own.

Deep, dark, rich chocolate biscotti studded with dark chocolate chunks and topped with crunchy almonds! Thank you to Imperial Sugar for providing the product used in this recipe! All opinions are my own. #sponsored #Choctoberfest

Last recipe for #Choctoberfest! Be sure to enter the giveaway now if you haven’t already! You don’t want to miss this. 🙂 These past two weeks have been so fun and so delicious! I’ve shared Old-Fashioned Chocolate Cobbler, Banana Espresso Chocolate Crumb Cake, Salted Caramel Mocha Overnight Oats… and now, to end the week, some tasty Chocolate Biscotti!

Ben loves it when I make biscotti. Those crunchy little biscuit-cookie hybrids are the perfect excuse to eat cookies for breakfast! 🙂 I know that breakfast cookies are a thing… but they sound a little weird to me, if I’m being honest. But biscotti on the other hand? Sign me up! They’re just so exotic and fancy that I can’t resist them!

Deep, dark, rich chocolate biscotti studded with dark chocolate chunks and topped with crunchy almonds! Thank you to Imperial Sugar for providing the product used in this recipe! All opinions are my own. #sponsored #Choctoberfest

In my past biscotti dealings I’ve stuck with more neutral flavors: pumpkin and almond. This time though, I went all out: chocolate biscotti that’s been amped up with vanilla and almond extracts for maximum flavor, dark chocolate chunks that melt just a bit when you dunk that baby in your coffee [ohhh yeah], AND topped it all off with sliced almonds and a bit of sea salt. This biscotti is a chocolate lover’s dream!! It’s perfect for dipping in your morning [or afternoon or evening] coffee, but kiddos would love it dipped in milk or even hot chocolate for a double dose of chocolately deliciousness!

Deep, dark, rich chocolate biscotti studded with dark chocolate chunks and topped with crunchy almonds! Thank you to Imperial Sugar for providing the product used in this recipe! All opinions are my own. #sponsored #Choctoberfest

To make this biscotti, I used Imperial Sugar. Imperial Sugar served as the Gold Sponsor of #Choctoberfest this year. They were generous enough to send me 40 pounds of granulated sugar, plus a silicone baking mat and a cute apron to use during my #Choctoberfest baking. You can find Imperial Sugar on Pinterest, Facebook, Instagram, Twitter, and Youtube. What I love about Imperial Sugar, aside from their excellent sugar products, is that they are based in the southeast… so they are somewhat of a local company for me in Nashville. Fun! It’s be a great time baking with Imperial Sugar and chocolate over the past couple weeks with #Choctoberfest. I hope you’ve enjoyed it too! Happy weekend! 🙂

two years ago: Pumpkin Chocolate Chip Cookies
four years ago: Mom’s Lasagna
five years ago: Pumpkin Brownies
six years ago: Pumpkin Chicken Tacos, or My Misadventures with Spicy Food

Chocolate Biscotti

  • Servings: 30
  • Print

from David Lebovitz

Ingredients:

  • 2 cups [280 grams] all-purpose flour
  • 3/4 cups [75 grams] good cocoa powder
  • 1 teaspoon baking soda
  • 1/4 teaspoon salt
  • 3 large eggs, at room temperature if you can [I forgot and all was well!]
  • 1 cup [200 grams] granulated sugar – I used Imperial Sugar
  • 1 teaspoon vanilla extract
  • 1/4 teaspoon almond extract
  • 3/4 cup dark chocolate chunks – any kind of chocolate chips would work too
  • ~1/3 cup toasted and sliced almonds
  • sea salt, for sprinkling – optional

Directions:

Preheat oven to 350 degrees F. Line a large baking sheet with a silpat or parchment paper.

In a small bowl, stir together flour, cocoa powder, baking soda, and salt.

In a medium bowl, beat together eggs, sugar, vanilla extract, and almond extract. Mix dry ingredients into the wet ingredients, then fold in chocolate. Batter will be thick! Use a mixer if you like.

Divide batter in  half, and shape each half into a log the length of the baking sheet. Press almonds into the log, gently flattening log into more of a rectangular shape. Sprinkle with sea salt if desired.

Bake for 25 minutes, then remove from oven and let cool for 15 minutes. Then, remove logs to a cutting board. Using a serrated knife, slice into 1/2 inch thick pieces, about 15 per log. Place cut-side down on baking sheet and return to oven. Bake for 20-30 minutes, until the biscotti feels mostly firm. They will harden further as they cool, so you can error on the side of caution for baking time.

Cool completely on a cooling rack before storing in an air-tight container. Serve with a dunking beverage–coffee, hot cocoa, or milk. Enjoy!

For more chocolate, click on the link below!