Before we get into the nitty gritty of this tutorial, let’s talk about why food bloggers should have a Recipe Index. [If you want an example, my Recipe Index is located along the top of my blog, and when you click on it, you are directed here.] It’s a requirement for membership in the Secret Recipe Club, and was something I didn’t quite understand at first when I was first looking to join about a year after starting my blog. However, I have since found that it’s incredibly helpful for many reasons, both for you and your readers. But it can be confusing, time consuming, and challenging to create.
Here are a few reasons why I think having a Recipe Index is super important:
- Basically, without an index, readers might miss relevant information if it is not phrased exactly as they expect. Tags and searches are not perfect, and neither is spelling [your own or others’]. Having a index where you can see a list of recipes without taking the time to go through pages and pages opens up another avenue for blog growth, site traffic, and more followers. It shows readers you are serious with what you do [even if it’s just a family recipe blog! I don’t develop most of my recipes personally but I do organize what I blog about for easier use.
- Having a blog index helps new readers immensely–especially when people are coming to your site without a specific link to your favorite muffins or recent stellar leftover remake. People will find highlighted recipes from Pinterest, links you’ve shared in blog hops, or by searching online. But what about people coming to your blog because you gave them a link, because they were assigned to you in the Secret Recipe Club, because your spouse/parents/siblings/BFF/neighbor gave out the link and told them to look for this really awesome cookie recipe that had chocolate in them. You have seventeen chocolate recipes. Without a Recipe Index, it’s harder to scroll through to find out that you only have four chocolate cookie recipes–the rest are for cake or pie or cheesecake or brownies or whatever.
- Last but not least, it helps with your own personal organization and blog planning.
- You can quickly go to one page on your blog and see what category of recipes you have blogged a lot about [for me, it’s main dishes–nearly half of my recipes are what I’d consider lunch or dinner food]… as well as what you haven’t [Beverages. 3. THREE!]. This can help you if you’re trying to diversify what is available for your readers.
- You can also find your recipes more easily, without having to navigate through pages of search results or hitting the “older entries” button over and over. This can be helpful if you’ve been blogging for a few years and want to link up similar recipes, or even just for your own cooking and baking needs.
I know there are many other reasons why a Recipe Index is VIP. But I’ve been wordy enough. Let’s get to the how to, shall we?
The following tutorial for creating a Recipe Index is for WordPress blogs. My blog is created using the free WordPress [dot com, not self-hosted–dot org], but I believe that the basic administrative software that runs both the free and paid versions looks the same.
Before you begin: In order to use this method to create a Recipe Index, your recipes must be organized using Categories in either list or dropdown format. If you are using a Category Cloud, I suggest that you go to the Widgets section [under the Appearance option on the left menu] and create a Categories area. You can always remove that after you have initially established your Recipe Index. If you don’t organize your blog with Categories [i.e. Appetizers, Beverages, etc.] but rather use those terms [Appetizers, Beverages] as tags, you can adapt this tutorial but the process will not be exactly the same.
Step 1: Have two tabs open in your browser. The first should be your blog homepage. The second should be your Dashboard.
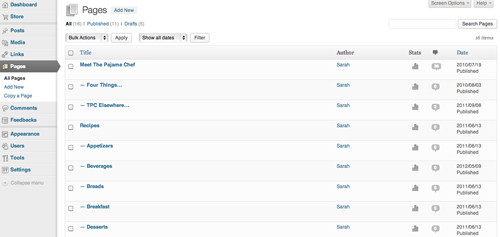
Step 2: When logged into Dashboard, click on the Pages option on the left menu. That will redirect you to the main Pages page.

Click on ‘Add New’ and create a new page called Recipes.

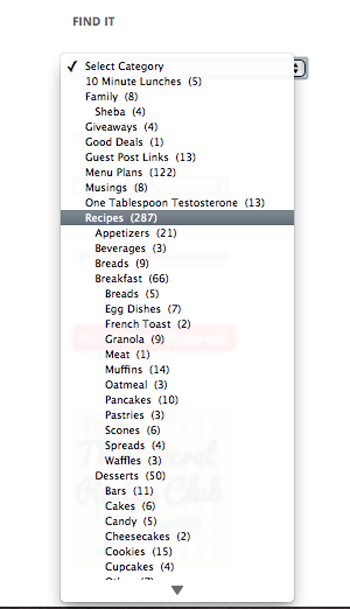
Step 3: Go to your blog homepage, and look at your Categories. Mine are organized as Appetizers, Beverages, Bread, Breakfast, Desserts, Main Dishes, and Sides.

Within those categories I have subcategories [i.e. Egg Dishes within Breakfast], but we’ll come back to that later. After the Recipes page has been created, it should show up on your homepage like this.
 Obviously the exact placement varies due to your theme, but you get the idea.
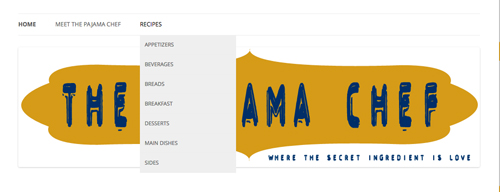
Step 4: Next, go back to your Dashboard, then go to the Pages option, ‘Add New’–just like in Step 2. This time, create a page for each category [Appetizers, Beverages, etc.–use the categories you have created for your own blog]. Except this time, after you have typed the category name in the ‘Enter title here’ section, go over to Page Attributes on the right. Click on the ‘Parent’ dropdown box and then on Recipes.
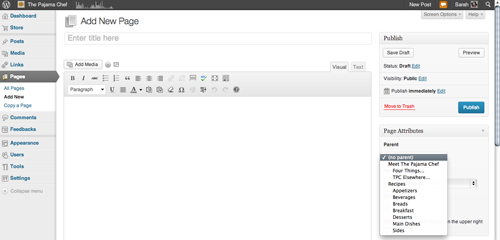
This will create a menu hierarchy, which makes your Appetizer page appear underneath the Recipe tab when it is highlighted by a reader [instead of creating another tab along the top of your blog].

Step 5: Repeat Step 4 with all your Categories that you have used for Recipes in the past. They should automatically populate the menu like mine has in the above image, and should appear on the Dashboard side in a hierarchy, too.

Step 6: Go back to the original Recipe page you created. Type the names of each Category you chose, and then create links to the new pages for them. Alternatively, you can create images and then link the images like I did, but to begin, using text will be simpler.

Step 7: The rest of this process is the most time consuming, and unfortunately there is really no simple fix, so I suggest to go about this in a systematic way over time. It’s a good activity to do while you’re watching TV, as it doesn’t require a great deal of concentration. This is the time when you need to type in all the names of your recipes, using your Category drop down that you were looking at in Step 3 to help compile the index. I use different methods for Categories with and without subcategories.
- Categories without subcategories [i.e. Appetizers, Beverages, Bread]: click on the Category page like this. Go to the Page you created for that type of recipe like this, and just type in the name of each recipe title, then link it up. When you are clicking to add the link, you can speed the process up by searching to link to existing content. That is much faster than loading each blog post within a category and then copying and pasting the link.
- Categories with subcategories [i.e. Breakfast]: click on the Category subpage like this, and basically do the same thing, except adding headings within the Page you are editing. Here’s an example of my Breakfast page.
Step 8: Maintenance. This is very important! Now that you see how long it takes to prepare a Recipe Index, you’ll want to maintain it. I try to update mine every week when I do my menu plan, so that I never get too far behind. If I go longer than a week or so, then I tend to use my method in Step 7 to determine which posts are missing from the index.
~
If you’ve never used Categories, my best advice for replicating this with tags is to think about your process for creating the tags. Are the tags ingredients? Types of foods [muffins, cookies, chicken dishes, etc.]? Recipe sources? Once you know how you created your tags, brainstorm a way to corral all those recipes into a list and adapt my method to fit your organization system. The process might have to look a little different, especially since tags don’t have drop down menus, and not all tags show up on tag clouds, but you can do it. You might have to do it from within the Dashboard but where there’s a will, there’s a way. [Category and Tag lists are within the Posts section on Dashboard, by the way.] It might take time, but do it a little a time and it’ll get done, I promise!
I hope this tutorial for creating a Recipe Index is helpful. Please let me know in the comments or by email [pajamachef at gmail dot com] if you have questions, suggestions, or if I have omitted something important. I usually do recipes, not tutorials so that is entirely possible. This post was just something requested within the Secret Recipe Club group on Facebook, and since I love organization [I’m a librarian, after all]… I jumped at the chance to write down my process. I am also happy to help you think through ways to organize your recipes, so feel free to contact me about that too.
Good luck and Happy Recipe Indexing!! 🙂
for those of you on Blogger, check out Sarah’s post over at Fantastical Sharing of Recipes. 🙂


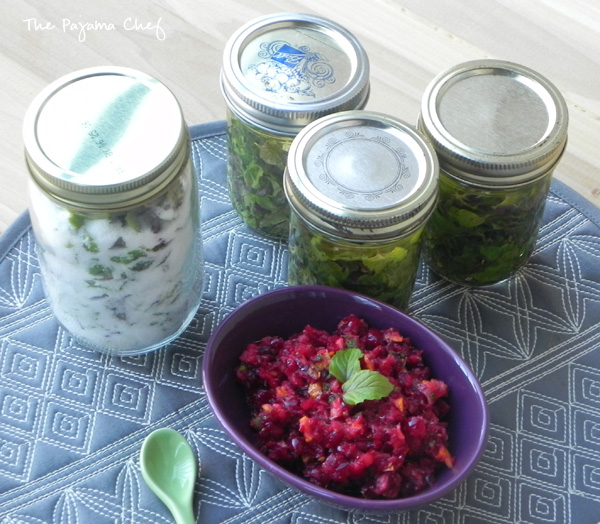 As for all the rest of that mint plant… quite a bit went into that jar of mint sugar on the left and those jars of mint extract on the right. There are tons of tutorials online for both delicacies, but I just layered fresh mint with sugar in one jar and have been shaking it once a day since Sunday. In about a week it’s supposed to be ready to enjoy. I can’t wait! And to make the mint extract I added vodka [eeeekkkkk] to mint that had been gently mashed in a mason jar. There’s a technical term for “mashed” but it’s escaping me at the moment. 🙂 Easy easy! My husband looked at me like I was crazy when I told him I needed some cheap alcohol for cooking. Hahaha. COOKING not drinking, haha don’t worry. That’s how you do things in homemade-everything-land. We’ll see how they turn out. I’ll have to give you guys an update, k? In the meantime, this cranberry mint relish is FAB so don’t wait til Thanksgiving to enjoy. I can’t wait to taste it on turkey!