Cookies, Desserts, Recipes

Avalanche Cookies #bookclubcookbookCC

These addictive creamy peanut butter-based no bake cookies are full of fluffy marshmallows, decadent white chocolate, and crunchy Rice Krispies cereal. Believe the hype–these are fabulous!

These addictive creamy peanut butter-based no bake cookies are full of fluffy marshmallows, decadent white chocolate, and crunchy Rice Krispies cereal. Believe the hype--these are fabulous!

Have you ever had Avalanche Cookies before? Or the original Avalanche Bark from Rocky Mountain Chocolate Factory? If you haven’t, you are missing out! But good thing–these cookies are super simple to make and they are no bake, so perfect for the current heat wave of summer! It’s been about a zillion degrees in Nashville lately, so I haven’t wanted to turn my oven on to bake. And with a newborn, it’s not like I have much time anyways. 🙂 But what I DO have time for is super easy no bake treats like these… or these chocolate peanut butter granola bars. Mmmm!

These addictive creamy peanut butter-based no bake cookies are full of fluffy marshmallows, decadent white chocolate, and crunchy Rice Krispies cereal. Believe the hype--these are fabulous!

I really shouldn’t make these treats very often though, because they are so addictive. Whether you’re eating the “batter” or the cookies themselves, you will want to keep going back for more and more. They have such a rich, distinctive flavor–the perfect blend of caramel-y, butterscotch-y, chocolate-y goodness that arises when you mix together peanut butter and white chocolate. Originally I wasn’t going to share this recipe as my contribution to #BookClubCookbookCC for our June selection, Chocolat, because these treats don’t seem as sophisticated enough to be French… but then I decided, what the heck. They have chocolate in them and they are tasty treats. Who can say no to that? Certainly not the French, haha. I haven’t actually read the book Chocolat or seen the film [yikes] but I would like to, so I will request them from my local library soon. 🙂 Thanks for hosting this month and for pushing me to make something AND write a blog post this week, Sarah! If you would like to win a copy of The Book Club Cook Book, the cookbook that this event is based off of, scroll to the end of this post. This month we are giving away TWO copies so you have a great chance to win! 🙂

These addictive creamy peanut butter-based no bake cookies are full of fluffy marshmallows, decadent white chocolate, and crunchy Rice Krispies cereal. Believe the hype--these are fabulous!

There are many versions of these cookies online–even a few bar cookies variations–but what I did differently was to add additional cereal to the peanut butter/white chocolate mixture. This adds a little bit of extra crunch [and stretches the number of cookies you can make, which is always a plus in my book]. But if you want a richer treat, you can reduce the cereal down to 1 1/2 or 2 cups. We thought they were plenty rich though… and plenty delicious. I added mini chocolate chips to a few and boy was that great! I think sprinkles on top would be wonderful too, but certainly not necessary. No matter how you make these, everyone will love them. Enjoy!

one year ago: Strawberry Ginger Smoothie
two years ago: Tabbouleh 
three years ago: Italian Chicken & Veggie Couscous Bowls
four years ago: Banana Crumb Muffins
five years ago: Creamy Taco Mac
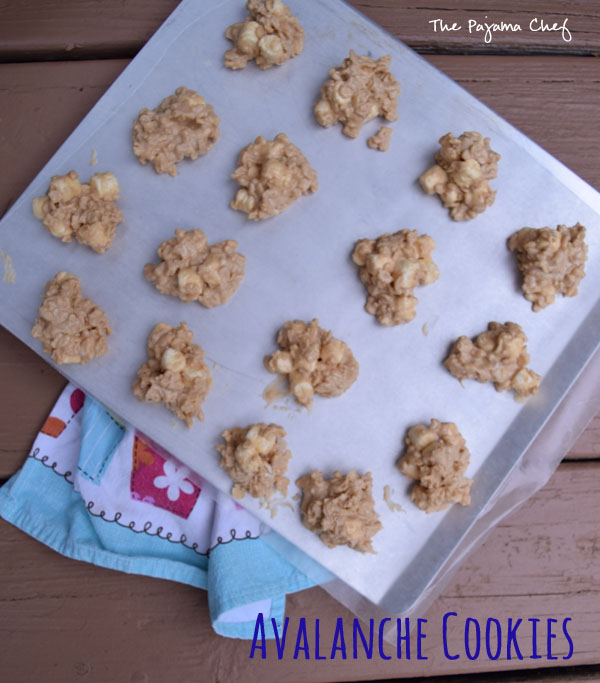
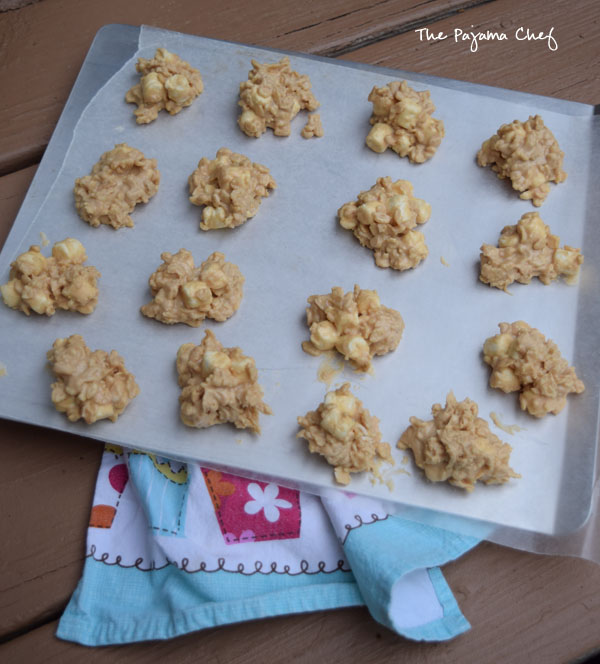
Avalanche Cookies

  • Servings: 4 dozen
  • Print

slightly adapted from Cookies & Cups

Ingredients:

  • 3 cups crispy rice cereal [like Rice Krispies]
  • 2 cups mini marshmallows
  • 16 ounces white chocolate [chips or candy coating]
  • 1 cup creamy peanut butter

Directions:

In a large bowl, stir together cereal and mini marshmallows. Line two baking sheets with silicone liners or wax/parchment paper.

Melt white chocolate and peanut butter together using your desired method. I used the white chocolate candy coating and melted that for 1 minute in the microwave, then added the peanut butter and melted everything together for about 20 seconds, but your results may vary. You can use a double boiler if you prefer.

Immediately pour white chocolate mixture over cereal mixture, then stir together. Scoop out onto prepared baking sheets in about 1 tablespoon rounded scoops. Refrigerate to for about 20 minutes or so to set, then enjoy!

These are pretty stable at room temperature but if it’s really hot or humid you may want to refrigerate until serving if possible.

Mix ins like mini chocolate chips or sprinkles are always good, but not necessary. 🙂


Giveaway
This month Sarah at Thing I Make (for Dinner), this month’s host, is giving away two copies of the book.* Enter to win a copy of the cookbook so you can join us in future months, if you wish!
TWO of our lucky readers – US and Canada only! – can enter to win a copy of The Book Club Cookbook, Revised Edition: Recipes and Food for Thought from Your Book Club’s Favorite Books and Authors by Judy Gelman and Vicki Levy Krupp, courtesy of Tarcher-Penguin. Giveaway runs from June 1st till June 30th at 6 o’clock PM, Pacific time. Please see terms and conditions in the rafflecopter widget below. Many thanks to Tarcher Books. You may find Tarcher: on the web, on Facebook, on Twitter, and on Pinterest.

a Rafflecopter giveaway
https://widget-prime.rafflecopter.com/launch.js

*Disclosure: Sarah received a complimentary copy of The Book Club Cookbook, Revised Edition: Recipes and Food for Thought from Your Book Club’s Favorite Books and Authors by Judy Gelman and Vicki Levy Krupp as an opportunity to give a copy away. Opinions are our own. We received no further compensation for our posts.


Desserts, Other, Recipes

Chocolate Peanut Butter Oreo Dream

Like chocolate? Peanut butter? Oreos? Cool whip? Who doesn’t?!? This Chocolate Peanut Butter Oreo Dream is a celebration of all things delicious! Better gather some friends to share, because this is one dreamy dessert you won’t be able to eat all on your own. 🙂

Like chocolate? Peanut butter? Oreos? Cool whip? Who doesn't?!? This Chocolate Peanut Butter Oreo Dream is a celebration of all things delicious! Better gather some friends to share, because this is one dessert you won't be able to eat all on your own. :)

Hey everyone! It’s my birthday! Woohoo! And to celebrate, I made you an awesome dessert that you should definitely try ASAP! I know the stereotypes with pregnant women are that we love our dessert or our salty snacks or whatever the craving of the moment is… but truthfully I have a hard time relating to that. I don’t feel like my eating habits have changed all that much during pregnancy, and think my husband would agree. Yes, maybe I’ve been a little more open to the idea of [almost weekly] trips to Dunkin’ Donuts after church for coffee and a doughnut… and I think I’ve wanted to eat burgers a little more than usual, but overall, things have been pretty normal on the food front. I have wanted to try to continue to eat healthy, wholesome food for our little guy. 🙂 And hopefully to influence his tastebuds to be open to our normal eating habits. Unless allergies are an issue, I have no plans to become a short order cook or suddenly start buying lots of kid-friendly food because that’s “easier.” Seasoned parents might be laughing a little now, but I figure that this way of thinking was probably the norm for many, many centuries and it’s only in the past 100 years [or less!] that things like this have been an issue. I remember my grandpa always telling me a story of his love for ketchup as a kid in the 1920s or 30s… one time he got in trouble for indulging on ketchup and his dad made him eat like the whole bottle or something. So anyways, I’m not sure how to transition from ketchup to this wonderful Chocolate Peanut Butter Oreo Dream but let’s go!

Like chocolate? Peanut butter? Oreos? Cool whip? Who doesn't?!? This Chocolate Peanut Butter Oreo Dream is a celebration of all things delicious! Better gather some friends to share, because this is one dessert you won't be able to eat all on your own. :)

I’ve always been a huge fan of chocolate and peanut butter together so when I saw the recipe for this layered pudding pie, I was smitten. Let’s explore all those layers of deliciousness, shall we? I have to admit my layers didn’t quite set as well as I would have liked [I’ll explain why in a bit] but each bite still had all the yummy elements so no one complained. 🙂 First, we start with an Oreo crust. Mhmm, just like you think. I believe you can buy premade Oreo crusts but it was pretty simple to make one with crushed Oreos and melted butter [I even used the generic Oreso but you do you!]. Next was my favorite layer–the peanut butter cream cheese mixture. Ohh yes, creamy peanut butter whipped with cream cheese, Cool Whip, and powdered sugar [not that this pie needed any more sugar, but it’s a treat so that’s okay!]. On top of that was a layer of chocolate pudding. I used a box mix for ease but homemade would be even better I’m sure. Finally, we have straight up Cool Whip and a candy topping. I used Reese’s because, duh, but the original recipe called for Butterfinger which is also great. Nut lovers might choose Snickers… or dark chocolate chunks? Anything goes here, my friends! Each layer would be a dessert in and of itself, but together it’s like dessert on steroids! Can you tell how much I love this pie??!

Like chocolate? Peanut butter? Oreos? Cool whip? Who doesn't?!? This Chocolate Peanut Butter Oreo Dream is a celebration of all things delicious! Better gather some friends to share, because this is one dessert you won't be able to eat all on your own. :)

Part of the reason I think my layers didn’t quite stay separate as much as I would have liked was that the original recipe called for making this dessert in a 9×13 inch pan, not two pie pans like I did. I think my brother in law summed it up pretty well when he said that he couldn’t quite visualize a 9×13 inch pan of this dessert. He’s a smart guy, so I’ll just leave it at that. Ha!

Like chocolate? Peanut butter? Oreos? Cool whip? Who doesn't?!? This Chocolate Peanut Butter Oreo Dream is a celebration of all things delicious! Better gather some friends to share, because this is one dessert you won't be able to eat all on your own. :)

I actually decided to divide the recipe into two pies because I wanted to eat some pretty much the second I saw the recipe in March but also wanted to save some for my family’s [then upcoming] visit for my baby shower in early April. And I didn’t think Ben and I could eat a 9×13 pan of this stuff on our own…so I made two pies and froze one, with great results. 🙂 The layers didn’t separate very well because the pie pans were slightly different sizes and I didn’t do a great job dividing the mixture accordingly, so I had to improvise a bit on the smaller one pictured above. Regardless, this dessert is the absolute DREAM of anyone who loves peanut butter and chocolate… and it’s a guaranteed hit! I don’t have any left for my birthday today [cue the tears] but it’s definitely worth making for a birthday or other special occasion… like a Wednesday night. 🙂 Enjoy!

one year ago: Spicy Chickpea Bacon Burgers
two years ago: Easy Homemade New York Bagels
three years ago: Banana Chocolate Chip Cake with Chocolate Cream Cheese Frosting
four years ago: Royal Berry Coffee Cake
five years ago: Oreo Truffles

Chocolate Peanut Butter Oreo Dream

  • Servings: 12+
  • Print

from Seeded at the Table

Ingredients:

  • 1 package Oreo cookies [14.3 ounces]
  • 6 tablespoons unsalted butter, melted
  • 3/4 cup creamy peanut butter [I used Peter Pan Natural]
  • 1 cup powdered sugar
  • 8 ounces 1/3 less fat cream cheese, softened
  • 16 ounces Cool Whip, softened and divided
  • 1 large package instant chocolate pudding mix [5.9 ounces]
  • 2 cups milk
  • 8 mini [or 4 regular] Reese’s, chopped OR 2 regular Butterfinger candy bars, chopped

Directions:

Grease a 9×13 inch pan OR two 8-10 inch pie pans with cooking spray.

Crush Oreos into fine crumbs [I used my food processor], then stir in melted butter. Press into prepared pan, on the bottom of the 9×13 inch pan or along the bottom and sides of the pie pans.

Next, with an electric mixer, blend together peanut butter, powdered sugar, and cream cheese until smooth. Fold in half of the Cool Whip.

In a medium mixing bowl, whisk together pudding mix and milk [this will be less milk than the package calls for] and let rest for 2-3 minutes to set.

Meanwhile, spread peanut butter mixture on top of Oreo crust. When the pudding has firmed up a bit, spread evenly on top of peanut butter mixture. Top with remaining Cool Whip, then sprinkle with candy. Cover gently and refrigerate for at least 1 hour to set.

This dessert is best the day it is made, but will keep in the fridge for up to a week. You can also freeze it and defrost in the refrigerator for about 24 hours before serving. It tastes as good as new, though the layers don’t look as pretty. Enjoy!


Bars, Desserts, Recipes

Chocolate Chip Butterscotch Bars

These gooey and quick from-scratch cookie bars are filled with lots of chocolate and butterscotch. They’re perfect for when you wanted dessert an hour ago. 🙂

These gooey and quick from-scratch cookie bars are filled with lots of chocolate and butterscotch. They're perfect for when you wanted dessert an hour ago. :)

There’s nothing worse than wanting dessert an hour ago and not getting it, right? My problem always is that I talk myself out of making something, and then a couple hours have gone by and I still want that yummy treat I didn’t make! Ugh, I hate when I do that to myself! In those cases, you have two choices. You can go out and get something [but I’m so frugal and such a homebody that option doesn’t appeal to me very often] OR you can make something quickly. In the latter scenario, you need recipes that do not require softened butter. Because softening butter in the microwave never works. At least not for me!

In the past, my go-to solution for this was these brownies. They’re chocolatey, they’re delicious, and they have you melt the butter on the stove. Perfecto! [And you can make them sans mint too, btw.] Sometimes though, you want something that isn’t quite so intensely chocolatey. Enter these Chocolate Chip Butterscotch Bars! They are cookie bars through and through–crisp tops and chewy middles. Not quite a blondie, not quite a cookie. Cookie bars are their own entity, and they are pretty darn delicious, if I do say so myself. 🙂

These gooey and quick from-scratch cookie bars are filled with lots of chocolate and butterscotch. They're perfect for when you wanted dessert an hour ago. :)

These cookie bars are bursting with tons of butterscotch flavor… from the brown sugar to the butterscotch chips, their flavor has the best sweet butter/molasses/sugar notes you can ask for. And the chocolate chips? Well, they’re just a bonus. A delicious bonus! Enjoy! 🙂

one year ago: Butternut Squash and Mushroom Tart
two years ago: Oatmeal Fudge Bars
three years ago: Neely’s Lemon Pasta Salad
four years ago: Pineapple-Apricot Teriyaki Chicken
five years ago: Sweet and Tangy Pork Chops with Pineapple with Coconut Toasted Rice

Chocolate Chip Butterscotch Bars

  • Servings: 24
  • Print

from Just a Little Bit of Bacon

Ingredients:

  • 1/2 cup unsalted butter
  • 1 1/2 cups light brown sugar, 12 ounces
  • 2 large eggs
  • 1 teaspoon vanilla
  • pinch of salt
  • 1 teaspoon baking powder
  • 1 1/2 cups all purpose flour, 6.5 ounces
  • 1 cup semisweet chocolate chips
  • 1 cup butterscotch chips

Directions:

Preheat oven to 350 degrees. Grease a 9×13 inch pan with cooking spray, or line with parchment paper. Set aside.

In a medium bowl or saucepan, melt butter in the microwave or on the stove. When butter is melted, add brown sugar and whisk until smooth. Bonus–you can use the same bowl or saucepan! Just move the saucepan off the heat.

One at a time, add in the eggs and stir until incorporated. Then add the vanilla, salt, and baking powder and stir to combine. Add flour and stir until almost combined, then fold in chocolate chips and butterscotch chips.

Pour batter into prepared pan and spread evenly. Bake for 20-25 minutes. Do not overbake! The bars are done when the tops are set and a little shiny, golden brown in color, and pulling away from the side of the pan. Cool completely [or most of the way] before cutting into bars if you want them to look pretty. Otherwise, they can be cut pretty soon; they just might be messy. Enjoy!

Cakes, Desserts, Recipes

SRC: S’mores Bundt Cake

This incredible S’mores Bundt Cake is made with graham cracker crumbs–no flour–and is so delicious you won’t be able to stop at just one slice! You’ll always want “s’more!” Hahaha. But seriously, even though it’s super rich, you will. 🙂

This incredible S'mores Bundt Cake is made with graham cracker crumbs--no flour--and is so delicious you won't be able to stop at just one slice! You'll always want "s'more!" Hahaha. But seriously, even though it's super rich, you will. :) #secretrecipeclub

Heyyyy it’s another Secret Recipe Club Monday! Yay! And it’s Presidents’ Day so Ben has a three day weekend. I decided to take the day off too… what fun 🙂 This month I was assigned to Margaret’s blog, Tea and Scones. She has lots of great recipes, which is no surprise because with a food blog, who doesn’t? Hahaha lame, sorry. Anyway, Margaret loves to bake and cook and share her culinary adventures with the world. 🙂 Her favorite thing to bake is scones, preferably if they can be enjoyed with tea, so I should have baked scones from her blog. Instead I made an AMAZING s’mores bundt cake. Seriously, this cake can’t be missed! But in case you do want to miss it, or eat something else besides sugary sweet cake that you can’t get enough of, maybe one of her other recipes suits your fancy. Swedish Meatballs, Baked Carbonara, Sweet Potato Muffins, Cantaloupe Pie, Cinnamon Graham Cracker Ice Cream… the list can go on… seriously, this blog is FULL of deliciousness, and sweetness too because Margaret just sounds wonderful! 🙂

This incredible S'mores Bundt Cake is made with graham cracker crumbs--no flour--and is so delicious you won't be able to stop at just one slice! You'll always want "s'more!" Hahaha. But seriously, even though it's super rich, you will. :) #secretrecipeclub

Speaking of sweet, if you don’t like sweet, this cake isn’t for you. Good thing I don’t know too many people like this, because this cake is insanely good! It may just be my new go-to party dessert. I don’t think anyone would mind. 🙂 This cake has SO much deliciousness in it. And on it. 🙂 I normally don’t do all the fancy toppings but I’m so glad I did this time!

This incredible S'mores Bundt Cake is made with graham cracker crumbs--no flour--and is so delicious you won't be able to stop at just one slice! You'll always want "s'more!" Hahaha. But seriously, even though it's super rich, you will. :) #secretrecipeclub

First, you have yourself a graham cracker bundt cake. Sounds pretty good right? What if I told you that there’s NO flour in the cake, except what’s in the graham cracker crumbs? Sounds pretty weird, but it works! There are five eggs, butter, and sour cream all coming together to make truly delicious and moist [sorry! It is though.] cake. Next, inside the cake is a layer [Margaret calls it a hidden surprise!] of chocolate chips and marshmallow fluff. Yum! My fluff puffed up through the batter and actually became a little caramelized in the oven, so it was more s’mores like. #nocomplaintshere On top, you have not just one but TWO toppings–a rich chocolate ganache AND a silky smooth marshmallow glaze AND some extra graham cracker crumbs. Ohhh man. This cake just got real, folks. Double of each ingredient. Graham crackers, marshmallows, and chocolate. What a great combination!

This incredible S'mores Bundt Cake is made with graham cracker crumbs--no flour--and is so delicious you won't be able to stop at just one slice! You'll always want "s'more!" Hahaha. But seriously, even though it's super rich, you will. :) #secretrecipeclub

This s’mores bundt cake is intense, and almost better than the real deal because you don’t have to stand over a fire to make it. 🙂 I recommend making it for a special occasion because it is rich and a wee bit time consuming and kinda sorta messy. You should have seen my kitchen explode after I made it. I just made it because it sounded yummy… is that special enough? Hope so! And I hope you give this cake a try soon! My recommendations for this recipe are sky high! Thanks, Margaret, for a great recipe! 🙂

This incredible S'mores Bundt Cake is made with graham cracker crumbs--no flour--and is so delicious you won't be able to stop at just one slice! You'll always want "s'more!" Hahaha. But seriously, even though it's super rich, you will. :) #secretrecipeclub

one year ago: Crumb Topped Apple Pie
two years ago: Fresh Cranberry Coffee Cake
three years ago: Go-To Pancakes
four years ago: Mexican Chicken Alfredo
five years ago: Chocolate Chip Cookie Bars

S'mores Bundt Cake

  • Servings: 12
  • Print

from Tea and Scones

Ingredients:

  • 2 2/3 cups finely crushed graham cracker crumbs [about 8 ounces]
  • 2/3 cup coconut flakes [I omitted]
  • 2/3 cup chopped nuts, either pecans or walnuts [I omitted]
  • 1 1/2 teaspoons baking soda
  • 2/3 cup granulated sugar
  • 2/3 cup light brown sugar, packed
  • 5 tablespoons butter, softened and divided
  • 1/2 teaspoon vanilla
  • 5 eggs, separated
  • 1 1/3 cup sour cream
  • 8 ounces chocolate chips, divided
  • 13 ounces marshmallow fluff, divided
  • 1/4 cup half and half or heavy cream
  • additional graham cracker crumbs, for topping

Directions:

Preheat oven to 325 degrees F. Grease and flour a 10 or 12 cup bundt pan and set aside.

In a small bowl, stir together graham cracker crumbs, coconut, nuts, and baking soda.

With an electric mixer, beat together sugar, brown sugar, and 3 tablespoons butter until light and fluffy. Add vanilla and egg yolks, then beat until combined. Next, alternate between adding graham cracker crumb mixture and sour cream, scraping the sides of the bowl as needed. Do not overmix.

Place egg whites in a separate bowl, and beat with a whisk until stiff peaks form. Fold into cake batter.

Spoon about 1/3 to 1/2 of the batter into prepared bundt pan. Sprinkle with half of the chocolate chips and top with half of the marshmallow fluff. You’ll want to press down gently to better incorporate the marshmallow fluff in the batter. Top with the remaining batter.

Bake for 60-65 minutes, or until a toothpick inserted in the center comes out clean.

Cool cake in the pan for about 20 minutes, then turn out onto a wire rack to cool completely.

When cake is cooled, place on a serving platter, then make chocolate ganache and marshmallow glaze.

To make ganache, add remaining chocolate chips and half and half/heavy cream to a small saucepan set over low heat. Constantly whisk until chocolate has melted and cream has been incorporated into the chocolate. Mixture will thicken slightly. Let cool off heat for a few minutes before drizzling on cake.

While cool, place 2 tablespoons butter with remaining marshmallow fluff in another saucepan over medium-low heat. Whisk continually until melted and smooth. Pour over top of ganache, then top with additional graham cracker crumbs, if desired.

Enjoy!

Be sure to check out all the other recipes for SRC today at the link below!

Cakes, Desserts, Recipes

Grapefruit-Walnut Sheet Cake #FreshTastyValentines

Brighten up your Valentine’s Day celebration with this refreshing Grapefruit-Walnut Sheet Cake! It’s even frosted too!

Brighten up your Valentine's Day celebration with this refreshing Grapefruit-Walnut Sheet Cake! You won't want to miss the grapefruit cream cheese frosting! :) #FreshTastyValentines

Winter is made for citrus, is it not? Or citrus is made for winter… no matter how you put it, citrus brings warmth and energy to otherwise dull, cold, dreary days. I know a lot of people associate citrus flavors–lemon, lime, orange, grapefruit–with summer [lemonade sure helps there!] but I’ve always been in the winter=citrus camp. In junior high and high school, we sold citrus fruits in the winter to raise money for orchestra [yup, I was an orch-dork! #Violin #ThenViola]. And, how many classic books talk about children reaching into their stockings on Christmas and being THRILLED to receive an orange? Yup. Winter=citrus. So it was only fitting that my snow day baking last week involved this refreshing Grapefruit-Walnut Sheet Cake.

Brighten up your Valentine's Day celebration with this refreshing Grapefruit-Walnut Sheet Cake! You won't want to miss the grapefruit cream cheese frosting! :) #FreshTastyValentines

This cake reminds me, a little bit, of a classic lemon cake… tangy and sweet all at once, but remixed with the unique floral notes of a grapefruit so you know it’s something special! Since grapefruits have a certain degree of tartness to them, you definitely need the sugar and cinnamon in this recipe to balance out the flavors. This cake uses all of the grapefruit–zest AND juice–to make the grapefruit flavor really stand out.

Brighten up your Valentine's Day celebration with this refreshing Grapefruit-Walnut Sheet Cake! You won't want to miss the grapefruit cream cheese frosting! :) #FreshTastyValentines

At first, I wasn’t sure if this would be a good recipe to contribute as part of #FreshTastyValentines [read all about it here–and be sure to enter the giveaway!]. After all, it’s a snack cake–made in a sheet pan–and doesn’t look all that fancy. But then I realized that Ben and I don’t really do fancy. Cozy nights at home are our thing. We’ve been together for eight years, married for nearly seven of them. I’m sure once baby boy comes in May we will look forward to date nights out more than we currently do, but for now, sheet cake in the fridge [that we can snack on all week] is perfectly fine with us! Plus, grapefruit is pink soooo it’s festive enough, right? Another point that tipped the scale towards “recipe for #FreshTastyValentines” was the fact that I used one of our sponsor goodies in the making of this recipe! Duh, better include it. 🙂

https://www.instagram.com/p/BAx6fMpsCPR/

KitchenIQ is one of our fabulous sponsors, and generously sent the bloggers involved in this event a Strawberry Tool [can’t wait to find some good looking strawberries to test out this strawberry slicer!!] and a wonderful Better Zester! This zester was wonderfully easy to use and was so sharp that it hardly took any effort to zest a whole grapefruit. Love it! Thanks for your support in #FreshTastyValentines, KitchenIQ! You can find Kitchen IQ on Facebook, Twitter, and Pinterest… and be sure to enter the giveaway by February 8, 2016 for a chance to win some of their great products. 🙂 I hope you win so you can make this festive grapefruit-walnut snack cake! The grapefruit cream cheese frosting is NOT to be missed. Enjoy!

one year ago: Caesar Salad with Fried Chickpeas
two years ago: Chili Relleno Casserole
three years ago: Baked Jalapeno Popper-Ranch Dip
four years ago: Fried Eggs on Pesto Parmesan Toast
five years ago: Mini Meatloaf

Grapefruit-Walnut Sheet Cake

  • Servings: 18
  • Print

from a magazine… I think Southern Living 🙂

Ingredients:

for cake

  • 1 Ruby Red grapefruit – zest and juice, divided
  • 1 cup butter, melted and slightly cooled
  • 2 cups all-purpose flour
  • 2 cups sugar
  • 1 teaspoon baking soda
  • 1/2 teaspoon cinnamon
  • 1 cup walnuts, coarsely chopped
  • 1/2 cup buttermilk
  • 2 eggs, beaten
  • 1 teaspoon vanilla

for grapefruit cream cheese frosting

  • 1 – 8 ounce package cream cheese, softened [I used the 1/3 less fat variety – Neufchâtel]
  • 4 tablespoons butter, softened
  • reserved grapefruit zest and juice [from cake, above]
  • 1 teaspoon vanilla
  • 12-16 ounces powdered sugar

Directions:

Preheat oven to 375 degrees F. Grease a 9×13 inch pan with cooking spray and set aside.

Begin by zesting and juicing the grapefruit. You’ll need 3 tablespoons zest [this was about 3/4 of the grapefruit zested for me] and 10 tablespoons of juice [the whole grapefruit–I was actually a wee bit short so I added about a teaspoon or two of water and zested the whole grapefruit to make up for it].

In a small bowl, stir together 8 tablespoons of the grapefruit juice with the melted butter and 1/2 cup water. In a large bowl, whisk together flour, sugar, baking soda, and cinnamon. Add butter mixture, 2 tablespoons zest, walnuts, buttermilk, eggs, and vanilla. Stir until just combined. Pour into prepared pan, then bake for 20-30 minutes, or until a wooden toothpick inserted in the center comes out clean. [Original recipe suggested 20-25 minutes bake time; mine took a full 30.]

Cool completely before frosting, at least 1 hour.

When ready to frost, beat cream cheese and butter with an electric mixer for 1-2 minutes until creamy. Add vanilla, 1 tablespoon zest, and 2 tablespoons juice and beat for 30 seconds to blend. Gradually add powdered sugar until desired consistency is reached, beating on low until blended. Frost cooled cake and enjoy! Store covered in the refrigerator.

Be sure to check out all of the other recipes that are part of #FreshTastyValentines today at the linky below! 🙂

Disclosure: I received a complimentary Better Zester! and Strawberry Tool from Kitchen IQ for my participation in #FreshTastyValentines. However, I was not required to write a positive review and I was not otherwise compensated for this post. The thoughts expressed above are entirely my own. Thanks to KitchenIQ for their sponsorship of this event!