Cakes, Desserts, Recipes

Grapefruit-Walnut Sheet Cake #FreshTastyValentines

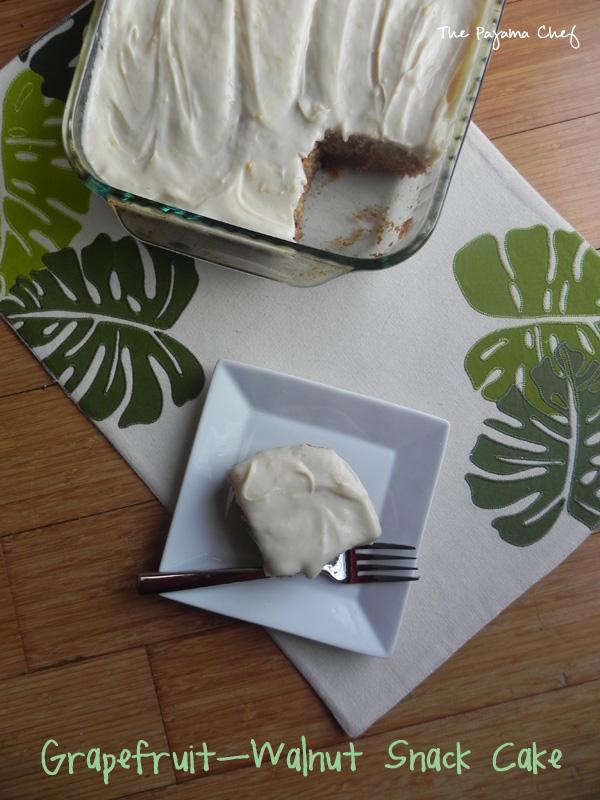
Brighten up your Valentine’s Day celebration with this refreshing Grapefruit-Walnut Sheet Cake! It’s even frosted too!

Brighten up your Valentine's Day celebration with this refreshing Grapefruit-Walnut Sheet Cake! You won't want to miss the grapefruit cream cheese frosting! :) #FreshTastyValentines

Winter is made for citrus, is it not? Or citrus is made for winter… no matter how you put it, citrus brings warmth and energy to otherwise dull, cold, dreary days. I know a lot of people associate citrus flavors–lemon, lime, orange, grapefruit–with summer [lemonade sure helps there!] but I’ve always been in the winter=citrus camp. In junior high and high school, we sold citrus fruits in the winter to raise money for orchestra [yup, I was an orch-dork! #Violin #ThenViola]. And, how many classic books talk about children reaching into their stockings on Christmas and being THRILLED to receive an orange? Yup. Winter=citrus. So it was only fitting that my snow day baking last week involved this refreshing Grapefruit-Walnut Sheet Cake.

Brighten up your Valentine's Day celebration with this refreshing Grapefruit-Walnut Sheet Cake! You won't want to miss the grapefruit cream cheese frosting! :) #FreshTastyValentines

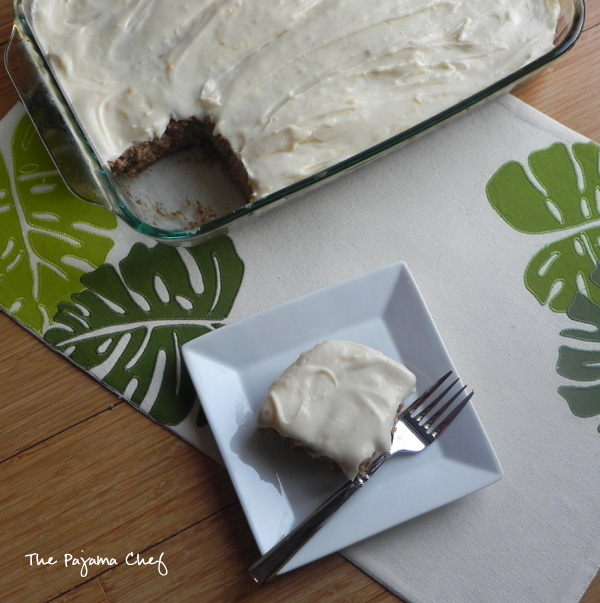
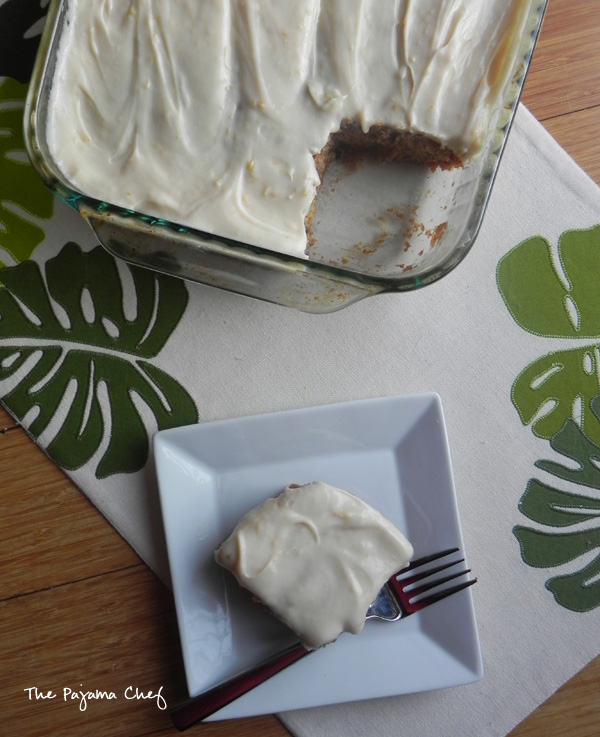
This cake reminds me, a little bit, of a classic lemon cake… tangy and sweet all at once, but remixed with the unique floral notes of a grapefruit so you know it’s something special! Since grapefruits have a certain degree of tartness to them, you definitely need the sugar and cinnamon in this recipe to balance out the flavors. This cake uses all of the grapefruit–zest AND juice–to make the grapefruit flavor really stand out.

Brighten up your Valentine's Day celebration with this refreshing Grapefruit-Walnut Sheet Cake! You won't want to miss the grapefruit cream cheese frosting! :) #FreshTastyValentines

At first, I wasn’t sure if this would be a good recipe to contribute as part of #FreshTastyValentines [read all about it here–and be sure to enter the giveaway!]. After all, it’s a snack cake–made in a sheet pan–and doesn’t look all that fancy. But then I realized that Ben and I don’t really do fancy. Cozy nights at home are our thing. We’ve been together for eight years, married for nearly seven of them. I’m sure once baby boy comes in May we will look forward to date nights out more than we currently do, but for now, sheet cake in the fridge [that we can snack on all week] is perfectly fine with us! Plus, grapefruit is pink soooo it’s festive enough, right? Another point that tipped the scale towards “recipe for #FreshTastyValentines” was the fact that I used one of our sponsor goodies in the making of this recipe! Duh, better include it. 🙂

https://www.instagram.com/p/BAx6fMpsCPR/

KitchenIQ is one of our fabulous sponsors, and generously sent the bloggers involved in this event a Strawberry Tool [can’t wait to find some good looking strawberries to test out this strawberry slicer!!] and a wonderful Better Zester! This zester was wonderfully easy to use and was so sharp that it hardly took any effort to zest a whole grapefruit. Love it! Thanks for your support in #FreshTastyValentines, KitchenIQ! You can find Kitchen IQ on Facebook, Twitter, and Pinterest… and be sure to enter the giveaway by February 8, 2016 for a chance to win some of their great products. 🙂 I hope you win so you can make this festive grapefruit-walnut snack cake! The grapefruit cream cheese frosting is NOT to be missed. Enjoy!

one year ago: Caesar Salad with Fried Chickpeas
two years ago: Chili Relleno Casserole
three years ago: Baked Jalapeno Popper-Ranch Dip
four years ago: Fried Eggs on Pesto Parmesan Toast
five years ago: Mini Meatloaf

Grapefruit-Walnut Sheet Cake

  • Servings: 18
  • Print

from a magazine… I think Southern Living 🙂

Ingredients:

for cake

  • 1 Ruby Red grapefruit – zest and juice, divided
  • 1 cup butter, melted and slightly cooled
  • 2 cups all-purpose flour
  • 2 cups sugar
  • 1 teaspoon baking soda
  • 1/2 teaspoon cinnamon
  • 1 cup walnuts, coarsely chopped
  • 1/2 cup buttermilk
  • 2 eggs, beaten
  • 1 teaspoon vanilla

for grapefruit cream cheese frosting

  • 1 – 8 ounce package cream cheese, softened [I used the 1/3 less fat variety – Neufchâtel]
  • 4 tablespoons butter, softened
  • reserved grapefruit zest and juice [from cake, above]
  • 1 teaspoon vanilla
  • 12-16 ounces powdered sugar

Directions:

Preheat oven to 375 degrees F. Grease a 9×13 inch pan with cooking spray and set aside.

Begin by zesting and juicing the grapefruit. You’ll need 3 tablespoons zest [this was about 3/4 of the grapefruit zested for me] and 10 tablespoons of juice [the whole grapefruit–I was actually a wee bit short so I added about a teaspoon or two of water and zested the whole grapefruit to make up for it].

In a small bowl, stir together 8 tablespoons of the grapefruit juice with the melted butter and 1/2 cup water. In a large bowl, whisk together flour, sugar, baking soda, and cinnamon. Add butter mixture, 2 tablespoons zest, walnuts, buttermilk, eggs, and vanilla. Stir until just combined. Pour into prepared pan, then bake for 20-30 minutes, or until a wooden toothpick inserted in the center comes out clean. [Original recipe suggested 20-25 minutes bake time; mine took a full 30.]

Cool completely before frosting, at least 1 hour.

When ready to frost, beat cream cheese and butter with an electric mixer for 1-2 minutes until creamy. Add vanilla, 1 tablespoon zest, and 2 tablespoons juice and beat for 30 seconds to blend. Gradually add powdered sugar until desired consistency is reached, beating on low until blended. Frost cooled cake and enjoy! Store covered in the refrigerator.

Be sure to check out all of the other recipes that are part of #FreshTastyValentines today at the linky below! 🙂

Disclosure: I received a complimentary Better Zester! and Strawberry Tool from Kitchen IQ for my participation in #FreshTastyValentines. However, I was not required to write a positive review and I was not otherwise compensated for this post. The thoughts expressed above are entirely my own. Thanks to KitchenIQ for their sponsorship of this event!

Breakfast, Muffins, Recipes

SRC: Zucchini Apple Walnut Muffins

Take zucchini muffins up a notch with some sweet bits of apple and crunchy walnuts. You’ll always be coming back for just one more muffin, I promise. 

Zucchini Apple Walnut Muffins for #secretrecipeclub | find the recipe for these  healthy 'n delicious muffins on thepajamachef.com

This month for Secret Recipe Club I was assigned Chelsy’s blog, Mangia. Mangia means “eat” in Italian and boy does Chelsy make some good things to eat! She lives in Texas where she is a personal trainer, prefers pjs/workout clothes to jeans [ME TOO!], and loves sharing her food with family and friends. Fun fact: Chelsy started her blog in July 2010 just like me. We’re practically twins. 🙂 Since she’s been blogging for SOOOO long, there were so many great recipes to choose from. Eventually I settled on these muffins but first I was sidetracked by other deliciousness–Tahini Chickpea Salad, Ultimate Mushroom Soup,  Lemon Sweet Potato Muffins, and Toasted Coconut Espresso Mini Muffins. NOM! I’m going to have to try allll those recipes, asap.

But in the meantime, I’ll be over here munching on these Zucchini Apple Walnut Muffins. They are amazing, you guys! Where do I start? For one, like most muffins I make, they’re really fairly healthy and as such, a great snack or breakfast [though let’s be real: one muffin is not my idea of a filling breakfast, but I digress]. Agave is the only added sweetener in these muffins. I have mixed feelings about agave, so you could always use honey if you prefer. I just had a bottle that I’m trying to use up! :/ They’re also made with white whole wheat flour, coconut oil, and walnuts for some crunch! I’m normally not a fan of nuts in baked goods, but they work here for sure!

Zucchini Apple Walnut Muffins for #secretrecipeclub | find the recipe for these  healthy 'n delicious muffins on thepajamachef.com

Zucchini and apple combine to make a super moist, super flavorful, super delicious muffin. Though they don’t really need anything else to make them yummy [besides the aforementioned walnuts], some pumpkin pie spice [because I can’t wait for pumpkin season and didn’t want to use just cinnamon] and coconut emulsion really spiced these babies up a notch! Speaking of babies, I made them over the weekend when my mom, sister, brother-in-law, and my cute nephew were here. Let me just say everyone inhaled these. So they’re family approved and ready for making in your kitchen! 🙂 Enjoy!

P.S. I forgot to mention that Chelsy’s original recipe used coconut flour and as such, are gluten free. I just used ingredients I had but check out her original recipe if GF is your thing!

Zucchini Apple Walnut Muffins

  • Servings: 20-24 muffins
  • Print

adapted from Mangia

Ingredients:

  • 2 cups white whole wheat flour [240 grams in weight]
  • 1 teaspoon baking soda
  • 1 teaspoon baking powder
  • 2 teaspoons pumpkin pie spice –> or an equivalent amount of cinnamon with a bit of nutmeg would work too
  • ~2 cups grated zucchini, with water gently squeezed out in a dishcloth –> from 2 small/medium zucchinis
  • 1 large Granny Smith apple, diced
  • 2 large eggs, beaten
  • 1/2 cup agave nectar
  • 1/2 cup coconut oil, melted
  • 1 teaspoon coconut emulsion/flavoring/extract –> I’ve seen it sold all three ways
  • 1/2 cup walnuts, chopped

Directions:

Preheat oven to 350 degrees F. Line a muffin tin with paper liners or grease with cooking spray.

In a large bowl, stir together flour, baking soda, baking powder, and pumpkin pie spice. In a medium bowl, whisk together zucchini, apple, eggs, agave, oil, and coconut emulsion. Gently add wet ingredients to dry ingredients, then stir until just combined. Fold in walnuts.

Divide batter between muffin cups, filling 2/3 of the way full. Bake for 20-22 minutes or until golden brown and a toothpick inserted in the middle comes out clean. Enjoy immediately, or cool on a wire rack for later. Muffins freeze well!

Check out the other SRC recipes below!

Desserts, Pies, Recipes

#TripleSBites: Crumb Top Apple Pie

This walnut-laced crumb topped apple pie is a perfect dessert for the pie lover in your life!

#TripleSBites Crumb Top Apple Pie | thepajamachef.com

Ben loves all desserts, but his two favorites are pie and cheesecake. Often for his birthdays I’ll make one or the other instead of a traditional cake. So this Crumb Topped Apple Pie, while not a traditional Valentine’s Day dessert, is certainly appreciated in my house!

#TripleSBites Crumb Top Apple Pie | thepajamachef.com

I’ve made plenty of apple pies in my day, but with this recipe, I have found my new go-to. The apple filling is sweet and perfectly spiced, but the crumb topping takes the cake [hahaha]. I’m usually not a nut-in-desserts girl, but the walnuts in the crumb topping are absolutely DIVINE! I can see other nuts, like pecans or almonds or even hazelnuts working really well in the topping too.

Crumb Top Apple Pie | thepajamachef.com #TripleSBitesThis pie is great on its own, or a la mode. Maybe with yogurt it could be an acceptable breakfast?! 🙂 But if you’re looking for more Valentine’s desserts, read on!

Spicely Chocolates for #TripleSBites | thepajamachef.com

As part of #TripleSBites we were all sent some fancy chocolates from Spicely Organics. These chocolates were EXCELLENT! I got to try Honeybush Caramel Milk Chocolate and Green Earl Grey Dark Chocolate. Both were delicious and part of their tea-infused line of chocolates. The Honeybush Caramel tasted like cinnamon and spice, along with sweet caramel, while the Green Earl Grey tasted like earl grey tea and citrus. Normally I like dark chocolate better than milk chocolate, but the milk chocolate option was my favorite. On their website, Spicely also has some other flavors and you can win them through our giveaway, which ends today! These chocolates remind me of some specialty ones I purchased in France when I spent a summer in Nice during college. So you know they have to be good! You can find Spicely on Twitter and Facebook too, if you want to learn more. 🙂

Kitchen IQ for #TripleSBites | thepajamachef.com

We were also sent a handy spice grater from Kitchen IQ. It’s great to use for grating cheese or cinnamon or chocolate… the essentials, really! I love the design–it’s very easy to use and feels safe for your hands unlike my large grater. I know I will use it often! I hope to share a new recipe soon where I use it…. so stay tuned! 🙂 You can check them out on Facebook, Twitter, and Pinterest, and also check out our giveaway for their prize! I’ve had such a great time being part of #TripleSBites over the past week or so, and hope you’ve enjoyed it too! Have a great Monday, guys!

three years ago: Mexican Chicken Alfredo
four years ago: Chocolate Chip Cookie Bars

Crumb Top Apple Pie

  • Servings: 8
  • Print

crust and pie from Life as Mom

Ingredients:

for crust

  • 1 cup flour
  • 1/2 cup butter, chunked
  • 1/2 teaspoon salt
  • 1-2 tablespoons cold water

for pie

  • 6 apples, peeled, cored, and sliced – I used a combination of Granny Smith and Golden Delicious
  • 1/2 cup sugar
  • 1 tablespoon cinnamon
  • 1 tablespoon lemon juice
  • 1/2 cup flour
  • 2 tablespoons butter
  • 1/4 cup brown sugar
  • 1/2 cup walnuts
  • 1 teaspoon cinnamon
  • 1/2 teaspoon almond or vanilla extract

Directions:
Begin by making the crust. In a mixing bowl, combine flour, butter, and salt with a pastry blender or two knives. Mix until the mixture forms pea-sized pieces. Stir in cold water until dough comes together. Transfer to a pie pan, spreading the dough along the bottom and sides of the pan. Set aside.

When pie crust has come together, preheat oven to 375 degrees.

In a large mixing bowl, stir together apples, sugar, cinnamon, and lemon juice. Transfer to unbaked pie crust.

Place flour, butter, brown sugar, walnuts, cinnamon, and almond/vanilla extract in a food processor. Pulse until mixture forms coarse crumbs. Spread evenly over apples.

Bake for 1 hour or until filling is bubbly. Check pie after about 40 minutes and cover with foil to prevent burning, if necessary.

Note:

Pie can be frozen, unbaked, for up to 2 months. Just wrap in two layers of foil and do not thaw before baking–just add 15 minutes extra to the baking time.

Disclosure: I received chocolates from Spicely Organics and a spice grater from Kitchen IQ as part of my participation in #TripleSBites. I was not compensated in any way–for my time, to create a recipe, or to publish positive comments. I was not required to use these products as part of my recipe. My opinions are my own. 

#TripleSBites | thepajamachef.com

Be sure to check out other yummy recipes whipped up by my friends below:

Breads, Breakfast, Recipes

Healthy Crumb Topped Zucchini Bread

This soft, tender zucchini bread is my master recipe! It comes out perfect every time and is simply the best.

Healthy Crumb Topped Zucchini Bread | thepajamachef.com

Everybody has their favorite zucchini bread recipe, and this is mine. I’ve been making it for 5 years now and it comes out perfect every SINGLE time. Before Ben and I starting dating in 2008, I hadn’t ever had zucchini bread. It sounded so weird to me, but Ben grew up eating it in the summers and introduced it to me at one of our favorite coffee shops. And the rest, as they say, is history. My love for Ben and my love for zucchini bread will never die! 🙂 Anyways…. this is a pretty simple recipe with walnuts and just a bit of cinnamon and nutmeg to spice things up, but the crumb topping makes it extra special.

Healthy Crumb Topped Zucchini Bread | thepajamachef.com

If you look at this loaf of bread, and compare it to my recipe below, you’ll notice that A) there are no nuts [I was out] and B) there’s no oats in the crumb topping. Oops. Just disregard that, and make as written below. It’ll be awesome, I promise. When I made this I had some leftover crumb topping from a pie in the freezer, so I used that topping instead. OH! Speaking of pie, I almost forgot to tell you what makes this bread healthy. Well, I’ve healthified the original recipe by cutting the sugar wayyyy back from 1 cup of each white and brown sugars, and using some whole wheat flour instead of all-purpose. It’s crazy to me how tender this zucchini bread is even when using whole wheat flour. I hope you give this bread a try to use up zucchini over the last few weeks of summer! Enjoy!

two years ago: Chocolate Mousse 
four years ago: Bestest Pizza Sauce Ever

Healthy Crumb Topped Zucchini Bread

  • Servings: 12
  • Print

adapted from Allrecipes.com

Ingredients:

  • 1 cup whole wheat flour
  • 1/2 cup all-purpose flour
  • 1/2 teaspoon baking soda
  • 1/2 teaspoon baking powder
  • 1 1/2 teaspoon cinnamon
  • 1/4 teaspoon nutmeg
  • 2 eggs
  • 1/2 cup oil – canola or coconut, melted to liquify
  • 2 teaspoons vanilla
  • 1/3 cup sugar
  • 1/3 cup brown sugar
  • 2-3 cups grated zucchini, about 1 medium – do not drain, the excess water adds the moisture that this recipe requires
  • 1/2 cup walnuts, chopped – optional

for crumb topping

  • 1/4 cup old fashioned oats
  • 1/4 cup brown sugar
  • 2 tablespoons flour
  • 1/4 teaspoon cinnamon
  • 1/4 cup butter, melted

Directions:

Grease and flour an 8×4 or 9×5 loaf pan. Preheat oven to 325 degrees F.

In a medium bowl, stir together flours, baking soda, baking powder, cinnamon, and nutmeg. In a large bowl, whisk together eggs, oil, vanilla, and sugars. Gradually add dry ingredients to wet and stir to combine. Fold in zucchini and nuts gently.

Spoon batter into prepared pan.

To prepare crumb topping, stir together oats, sugar, flour, and cinnamon. Pour in melted butter and stir with a fork until coarse crumbs form. Spread over batter. Bake for 40-60 minutes, or until toothpick inserted in the center comes out clean. 55 minutes is perfect for my oven. Cool in pan on rack for 20 minutes, then remove bread from pan and cool completely before slicing.

Linked up with: Foodie Friends Friday, Weekend Potluck.

Breakfast, Granola, Recipes

Chewy Coconut Oil Granola Bars

Chewy Coconut Oil Granola Bars are an easy no-bake afternoon snack or lunch box addition. Plus, they last nearly a month in the fridge and even longer in the freezer, so make a batch today and be set for awhile if you can restrain yourself. 🙂

Chewy Coconut Oil Granola Bars | thepajamachef.com

I am so excited about these chewy granola bars, you guys! They are simply the best. I’ve shared other granola bar recipes on my blog before, but these take the cake. Literally. I think I’d have one before I had a piece of cake, if only because they are healthy AND chocolately at the same time. Win win, I say!

Chewy Coconut Oil Granola Bars | thepajamachef.com

In the past, homemade chewy granola bars just haven’t cut it for me because they’ve included ingredients I want to avoid on a normal basis [corn syrup] or because they’ve been so full of liquid sweeteners like honey or maple syrup that they’ve just been sticky and hard to eat on the go. So one day I was thinking about what could make chewy granola bars better [I’m in the car alot… this is what I do when I’m not paying attention to my book on CD–ha!] and it dawned on me. Coconut oil! Duh. Everyone’s favorite trendy all-purpose health/beauty/cooking product of choice these days.  So I gave it a whirl and was SO pleased with the results. These granola bars hold together well, are easy to cut, and just taste amazing. For those who are curious… they don’t really taste much like coconut, for better or worse–it’s just a hint, and it’s almost more the smell than anything.

Chewy Coconut Oil Granola Bars | thepajamachef.com

When you make them–note that I said “when,” not “if”–be sure to follow the instructions to a T in regard to boiling the honey, brown sugar, and salt. It’s similar to making candy in that you need the mixture to come to a boil so that it gets to the soft ball stage to set. Then you just mix everything up, add your mix-ins, and spread it in the pan. Simple! For this batch, my mix-ins were chopped walnuts, dried cranberries, and dark chocolate chunks. There’s just something about dark chocolate chunks that makes everything better, righttt?! It practically goes without saying, but you can obviously use whatever dried fruit or nuts or chocolate suits your fancy. I think I might make a batch this weekend and have some white chocolate chips burning a hole in my pantry! 🙂

Chewy Coconut Oil Granola Bars | thepajamachef.com

When you take these yummy chewy granola bars to work or your kids take them to school, I guarantee that they’ll be the talk of the lunchroom. They look pretty similar to the storebought kind, but just have a homemade appeal that will make people super jealous. Ben’s even shared some with his colleagues to spread the love… the granola bar love, that is! Enjoy, friends! Happy Friday! 🙂

one year ago: Oreo Popcorn
two years ago: Cilantro Lime Hummus
three years ago: Tangy Chicken Pasta

Chewy Coconut Oil Granola Bars

  • Servings: 24
  • Print

[adapted slightly from Money Saving Mom]
Chewy Coconut Oil Granola Bars | thepajamachef.com

  • 2 1/2 cups Rice Krispies cereal
  • 1 3/4 cup rolled oats
  • 1/4 cup ground flaxseed [or wheat germ, wheat bran, or more rolled oats]
  • 1/2 cup mix-ins of your choice [I used 1/4 cup chopped dried cranberries and 1/4 cup chopped walnuts–you can use dried fruit, nuts, coconut, etc.]
  • 1/2 cup honey
  • 1/2 cup brown sugar
  • dash of salt
  • 1/3 cup coconut oil
  • 1/3 cup natural peanut butter
  • 1 teaspoon vanilla extract
  • 1/2 teaspoon ground cinnamon
  • 1/2 cup dark chocolate chunks

Directions:

Line a 9×13 pan with aluminum foil or wax paper, and grease well with cooking spray.

In a large bowl, stir together cereal, oats, flaxseed, and mix-ins. In a saucepan, stir together honey, brown sugar, and salt. Turn heat onto medium-low, then stir constantly until mixture comes to a boil. Boil for 60 seconds, then remove from heat and gently mix in coconut oil and peanut butter [be careful of splashes!]. Stir in vanilla and cinnamon. Pour wet ingredients over the dry and mix to combine.

Press mixture into prepared pan, then evenly distribute chocolate chunks over top. If you mix the chocolate in, it will melt. Press into granola mixture with a spatula then cover and refrigerate for 2 hours to set. Cut into bars and wrap in aluminum foil or wax paper for easy transport. Granola bars freeze well and stay fresh in the refrigerator.

Linked up with: Weekend Potluck.