Main Dishes, Pasta, Recipes

Cheesy Veggie Pasta

This pasta is creamy and cheesy, and full of lots of summer veggies. What’s not to love?!?

Pasta bursting with all your farmer's market faves and some yummy cheese! Cheesy Veggie Pasta via thepajamachef.com

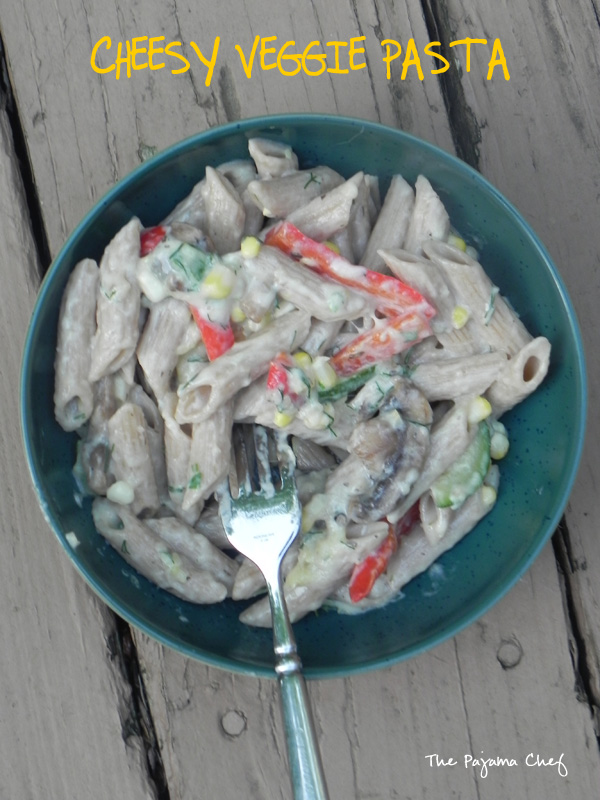
Ahhh, pasta. If you’re like me, you probably have it at least once a week in some form or another. No matter how you fix it, pasta is always a vehicle for something delicious. Though baked pastas are my FAVE, in the summer, sometimes that’s too much. So this time, I threw in everything from my local farmer’s market and called it a day. I think the combo of mushrooms, red and yellow bell peppers, zucchini, and corn was perfect. I thought about just tossing the veggies with an olive oil or butter-based sauce, but instead decided to try for a lighter creamy sauce. After cooking the veggies, I tossed in some flour and added some milk. After letting it cook down, I added cheese and herbs. I truly wasn’t sure how it would go, and was so happy with the results! In a word, or three… Flavorful, refreshing, and satisfying. Mmm!

Pasta bursting with all your farmer's market faves and some yummy cheese! Cheesy Veggie Pasta via thepajamachef.com

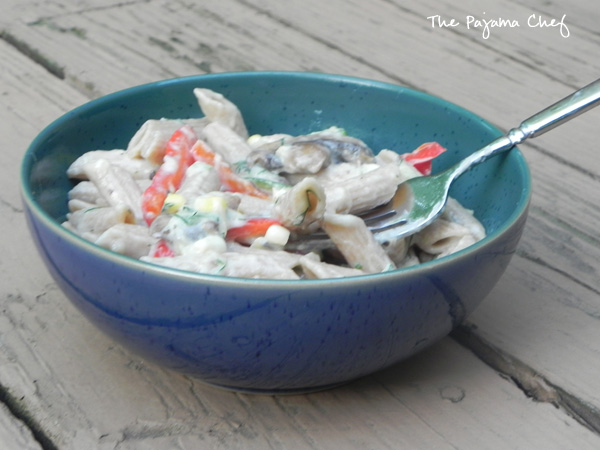
I absolutely inhaled this colorful and light pasta! It’s cheesy and creamy and super wonderful. Unlike some saucy pasta dishes, this one reheated well which was a pleasant surprise. You better believe I hoarded the leftovers and will be making this again soon. 🙂 Enjoy!

one year ago: Chocolate Cream Filled Cupcakes
two years ago: Double Chocolate Banana Muffins
three years ago: Chocolate Zucchini Muffins
four years ago: Salmon with Lemon, Tarragon, and Garlic Sauce

Cheesy Veggie Pasta

  • Servings: 4
  • Print

Ingredients:

  • 12 ounces whole wheat penne pasta
  • 2 tablespoons butter or olive oil
  • 4 ounces baby bella mushrooms, sliced
  • 1/2 red bell pepper, thinly sliced
  • 1/2 yellow bell pepper, thinly sliced
  • 1 medium zucchini, sliced
  • 1/2 cup corn, cut off the cob
  • freshly ground black pepper
  • 2 cloves garlic, minced
  • 3 tablespoons flour
  • 1 1/2 cups milk
  • 1/2 cup fresh herbs – I used dill, basil, lemon thyme, and a tiny bit of mint
  • 3 ounces shredded mozzarella

Directions:

Bring a large pot of water to boil and add pasta. Cook to al dente according to package directions.

In a large skillet, heat butter or olive oil over medium heat. When hot, add mushrooms, peppers, zucchini, and corn. Season with pepper and cook until crisp-tender, about 5 minutes, stirring occasionally. Add garlic and saute for 30 seconds until fragrant. Sprinkle flour over veggies and stir to coat. Pour in milk and stir. Constantly stir, cooking until thick–about 2 minutes. Remove from heat.

When pasta is cooked, fold pasta into sauce. Sprinkle with herbs and mozzarella. Stir until cheese melts, then season with pepper to taste.

Serve immediately, or toss in an oven safe baking dish and cook until cheese on top crisps up. I think some bread crumbs mixed with butter and lemon zest on top could be magnificent too!

Beans, Main Dishes, Recipes

Costa Rican Rice and Beans with Fried Eggs

Take an easy, frugal, staple meal up a notch with some new seasonings and a couple fried eggs. Great for dinner, lunch, OR breakfast!

Costa Rican Rice and Beans with Fried Eggs | thepajamachef.comBen and I eat rice and beans quite a bit. Usually white rice and black beans. Sometimes with a bit of butter, taco seasoning, salsa, veggies, and/or cheese. The combo varies quite a bit. It’s a great dinner that’s cheap, healthy, and fast. Win win win! Sometimes I like to mix it up though, so I’m always on the look out for new variations of this great meal. It seems every culture has their take on this meal… this is Costa Rica’s. I’ve never been there [but would love to go!] so I don’t know how authentic it is… but it is sure delicious!

Costa Rican Rice and Beans with Fried Eggs | thepajamachef.comWhat sets this version of beans and rice apart from the competition is two-fold.

  1. Instead of our usual “burrito bowl” style beans and rice mixture, after all the ingredients are prepped, everything cooks together on the stove for a little bit. This maximizes the flavor… namely the tomato-y sauce with cumin, garlic, and Worchestershire sauce [props to you if you have the authentic Salsa Lizano!]. It is so good, you guys!! This sauce makes the rice and bean mixture almost creamy, and very very flavorful.
  2. The fried egg on top. Ohhh man. Runny yolks + a creamy-esque mixture = heaven!

You’ve gotta try this! SO good. It’s not spicy or anything… just good, rich flavors. Worth the extra work for sure!

one year ago: Easy Crockpot French Dip Sandwiches
two years ago: Kale Pesto Pasta
three years ago: Fresh Tomato and Mozzarella Crostini
four years ago: Brown Sugar Fruit Dip
five years ago: Butterscotch and Chocolate Yellow Cake

Costa Rican Rice and Beans with Fried Eggs

  • Servings: 4
  • Print

from Fine Cooking

  • 1 cup long-grain white rice
  • 1 tablespoon canola oil
  • 1 small yellow onion, diced [about 1 cup]
  • 1/2 medium red bell pepper, diced [about 1/2 cup]
  • 2 large cloves garlic, minced
  • 1/2 teaspoon ground cumin
  • 1/4 cup tomato sauce
  • 15 ounce can black beans, rinsed and drained
  • 3 tablespoons Salsa Lizano; more to taste [or 3 tablespoons Worchestershire sauce + a dash of molasses if you can’t find Salsa Lizano]
  • freshly ground black pepper
  • 8 large eggs [2 per person]
  • 2 tablespoons chopped fresh cilantro

Directions:

Prepare rice according to package directions. You can use water or chicken/vegetable broth for the liquid, whatever you prefer. Keep covered after it is cooked.

While rice is cooking, heat oil in a large skillet over medium heat. Add onion and bell pepper, and cook until soft, about 3-4 minutes. Add the garlic and cook another 30 seconds until fragrant. Stir in cumin and cook another 30 seconds or so. Stir in tomato sauce, mixing until well incorporated. Add black beans and 1 cup of water or broth, stirring until combined. Reduce heat to medium-low then simmer until most of the liquid is reduced, about 4-5 minutes. Fold in rice and mix well, then add Salsa Lizano [or Worchestershire/molasses combo], and season to taste with freshly ground black pepper. Cover and reduce heat to low.

Heat another skillet over medium high heat. Grease with cooking spray, then fry eggs to desired doneness. I like mine over medium, so I crack the eggs in the hot pan, season with salt and pepper, and cook about 3-4 minutes until whites are set, and the edges of the yolks are just beginning to set.

To serve, place a spoonful of rice and beans mixture on a plate or bowl and top with two fried eggs. Sprinkle with cilantro and enjoy!

Chicken, Couscous, Main Dishes, Recipes, Sides, Vegetables

Indian-Style Chicken Curry with Chickpeas and Raisins over Spiced Couscous #bookclubcookbookCC

Fragrant, rich chicken and chickpea curry incorporates great flavors to make an amazing dish! Serve it over spiced couscous for a special treat. 

Indian-Style Chicken Curry with Chickpeas and Raisins over Spiced Couscous | thepajamachef.com #thebookclubcookbookCC

Happy Friday! I joined a new blogging group… the Book Club Cookbook Cooking Crew. And guess what! YOU can join us. Camilla of Culinary Adventures with Camilla organized a group of bloggers to read through some great books and make some great recipes inspired by them. We are using The Book Club Cookbook as our guide and inspiration… you can read more about the club on her blog, but here’s the gist. Each month, one blogger serves as hostess to choose a book and a recipe from the cookbook. From there, we can make the chosen recipes OR draw inspiration from the selected book to create a recipe. Camilla is our July hostess and she chose Jhumpa Lahir’s Interpreter of Maladies for our book of the month, and invited us to make curry and lassis with her. At the end of the month, you can win a copy of the cookbook so you can follow along! Go to Camilla’s blog to enter now! 🙂

On with the recipe though! Have you ever heard of Jhumpa Lahir’s Interpreter of Maladies? I had not, and was surprised when I picked up a copy at my local library. It’s actually a collection of short stories centering on the themes of family, home, marriage, belonging, and more. Many take place in America, but I thought some of the most interesting stories were set in India. You don’t think about adaptations to new life in your own country… this book is just lovely! The first and last stories were my favorites, but they are all good. Have you read this book before? If not, you should pick it up! I highly recommend it.

Food is an integral part to all of the stories, and nearly each one mentioned curry! An Indian classic for sure, with as many variations as there are people. One of the recipes Camilla chose for us to make this month was a hard boiled egg curry. It sounds SO interesting. But Ben hates hard boiled eggs with a passion, so that’s a no go for us [and I don’t think I could eat a whole batch alone]. Instead, chicken curry it is!

Indian-Style Chicken Curry with Chickpeas and Raisins over Spiced Couscous | thepajamachef.com #thebookclubcookbookCC

This is one of my very favorite curry recipes, and actually is the one that made me love Indian food! Ben and I have made this recipe a handful time over the past few years… it is absolutely delightful each time! Every bite is rich and flavorful, and your kitchen will smell absolutely wonderful while you’re cooking. Ginger! Garlic! Garam masala! Mmm, mmm, mmm. The tomato and coconut based curry sauce is fabulous over the chicken and chickpeas and plump, juicy raisins… and the flavors are magnified since it’s not just served over regular ‘ole rice, but instead over a spiced couscous that is just bursting with more raisins and rich spices. Yes, it’s a lengthy recipe with quite a few ingredients… BUT it is oh-so-good. A great dish for company, a great dish to make on a relaxing night at home. It’s just as fantastic as anything you could get at a restaurant, but easy to make at home with accessible ingredients too. Make it this weekend! 🙂 Enjoy!

Indian Spiced Peas | thepajamachef.com

And oh! If you’re looking for an easy side dish to serve with this, try these easy Indian-spiced peas. No real recipe… just mix together a teaspoon or two of coconut oil, a 10 ounce bag of frozen peas, and a teaspoon each of curry powder and garam masala in a skillet. Cook over low heat until hot, then mix in a about a 1/4 cup of coconut flakes. Ahhhmazing! Next time I might toast the coconut to make it even better. Yum!

one year ago: Ginger Ice Cream
two years ago: Mom’s Potato Salad

three years ago: Mediterranean Feta Dip
four years ago: Lemon Crinkle Cookies
five years ago: Big Thumbs Up Bite Size Soft Pretzels –> yes! my blog is FIVE! 🙂

Indian-Style Chicken Curry with Chickpeas and Raisins over Spiced Couscous

  • Servings: 6
  • Print

from Jenna’s Everything Blog – go to either post for great step by step photos if that’s your thing!

Ingredients:

for curry

  • 2 tablespoons curry powder [I used a sweet curry powder]
  • 1 teaspoon garam masala
  • 4 tablespoons canola oil
  • 2 onions, diced
  • 4 cloves garlic, minced
  • 1 tablespoon grated fresh ginger
  • 1 serrano chili, minced – remove seeds to reduce heat… or not, your call
  • 1 tablespoon tomato paste
  • 1 1/4 cups chicken broth
  • 1 – 15 ounce can crushed tomatoes
  • 1 – 15 ounce can chickpeas, drained and rinsed
  • 1 1/2 pounds boneless skinless chicken breasts [I’ve also used chicken thighs]
  • 1/2 cup raisins
  • 1/2 cup golden raisins
  • 1/3 cup coconut milk
  • 1 cup frozen peas
  • 1/4 cup cilantro, chopped

for couscous

  • 1 tablespoon canola oil
  • 1 onion, diced
  • 2 teaspoon garam masala
  • 3 1/2 cups chicken broth
  • 2 tablespoons butter
  • 1/2 cup golden raisins
  • 1/2 cup raisins
  • 1 package Trader Joe’s Harvest Grains Blend [I forget what size it is…about 18 or 20 ounces I think] — can also substitute 1 pound Israeli couscous plus a couple tablespoons quinoa and orzo — or an equivalent amount of rice [I’ve made it all three ways!!]

Directions:

Set a small skillet over medium heat. Pour in curry powder and garam masala, then stir constantly for about 1-2 minutes to toast spices, until fragrant. Remove from heat and transfer to a bowl.

In a Dutch oven or other large pot, heat 3 tablespoons oil over medium high heat. When hot, add onions and season with salt. Stirring occasionally, cook for about 15 minutes until onions are browned and caramelized. If you have you more time, cook the onions on medium-low heat for a longer amount of time to caramelize them more. But either way works!

After onions are cooked to your liking, add garlic, ginger, and chili pepper. Stir and cook for about a minute, then add in toasted spices and tomato paste. Pour in the chicken broth and crushed tomatoes, stirring to mix everything up. Add chickpeas, chicken, and raisins. Make sure the chicken is submerged as much as possible. Bring to a simmer, then cover and reduce heat to medium-low. Simmer for about 15 minutes, until chicken is just about done.

Meanwhile, prepare couscous while chicken is cooking.

In a saucepan, heat oil over medium heat. Add diced onion and cook for about 5-6 minutes, until soft. Stir in garam masala, cooking for about 30 seconds until fragrant. Add chicken broth, butter, and raisins. Stir and bring to a boil. Add couscous [or other grain], bring to a boil again, and cook for about 10-15 minutes until fully cooked. Liquid should be absorbed but exact time depends on what grains you use. Season to taste with salt or additional garam masala then set aside to serve with curry.

When chicken is fully cooked, remove to cutting board and chop it up into bite-sized pieces. If the chicken isn’t fully cooked, it will finish cooking in the sauce.

Return chicken to pot, then stir in coconut milk and peas [if using]. Cook for about 5 minutes, then add in half of the cilantro.

Serve curry over couscous, with additional cilantro on top. Enjoy!

Main Dishes, Pasta, Recipes

Baked Bacon-Blueberry Ricotta Pasta

A luscious, creamy baked pasta with crisp bacon, succulent fresh corn, a pop of sweet blueberries, and a crunchy topping made out of a surprise ingredient. Intrigued now?

Baked Bacon-Blueberry Ricotta Pasta | an easy, cheesy baked pasta with a surprise topping! Find the recipe on thepajamachef.comAt my house, you can’t go wrong with baked pasta. Ben and I can eat an embarrassingly large portion of baked pasta at a single meal. Then after it’s wrapped up for the fridge, we are constantly opening it up and using a fork [or our fingers, sorry Mom] for another bite. There’s just something about baked pasta. From looking at the title of this recipe, Baked Bacon-Blueberry Ricotta Pasta, you’ve probably surmised that there’s at least something a little unusual with this pasta dish. Bacon and ricotta… pretty standard fare for Italian food. Blueberries? Now that’s a little odd, but it’s summer so sometimes berries creep into weird places. But then you look at that photo and you’re like, wait… is that oats? On pasta? Ummm, what’s going on? Well, that my friends, is granola. Granola?!?! Well, yes. That’s what my husband said too. Ha!

Baked Bacon-Blueberry Ricotta Pasta | an easy, cheesy baked pasta with a surprise topping! Find the recipe on thepajamachef.comI developed this recipe as my entry in the Golden Girl Granola Blogger Recipe Challenge. When I first received the package of Bluesberry Granola I planned to use it in a breakfast dish, such as french toast or breakfast quesadillas, or the like. But it’s a contest, and I figured everyone would do that. So I did something different! And guess what? It worked!

Baked Bacon-Blueberry Ricotta Pasta | an easy, cheesy baked pasta with a surprise topping! Find the recipe on thepajamachef.comThe sweetness of the blueberry, almond, and coconut granola [which is SO delicious, btw] is cut by the salty bacon, creamy ricotta, and the freshly grated Parmesan cheese mixed into the topping. I also mixed in some fresh sweet corn since I can’t get enough of that in the summertime, and a handful of herbs from my garden. Perfection on a plate! This isn’t your average pasta dish… it’s even better! Hope you enjoy it as much as we do!

one year ago: Coffee Blondies
two years ago: Pineapple Cream Pie
three years ago: Grandma’s Blueberry Muffins
four years ago: Linda’s Caramel Ritz Bits Crackers

Baked Bacon-Blueberry Ricotta Pasta

  • Servings: 6
  • Print

Ingredients:

  • 8 ounces pasta* [I used Trottole, a curly, thick, corkscrew shape but any small pasta would do]
  • *1 cup reserved pasta water
  • 4 strips of bacon
  • 15 ounces part-skim ricotta cheese
  • 1/2 cup corn [frozen or fresh]
  • 1 cup blueberries
  • 3 sprigs fresh rosemary, minced
  • a small handful of fresh basil, minced
  • a small handful of fresh lemon thyme
  • white pepper
  • sea salt
  • 1 egg, lightly beaten
  • 2/3 cup Bluesberry Granola – from Golden Girl Granola
  • 5-6 tablespoons freshly grated Parmesan cheese

Directions:

Preheat oven to 350 degrees F. Grease a 10 inch round casserole dish with cooking spray and set aside.

Bring a large pot of water to boil and cook pasta to al dente according to package directions.

Meanwhile, cook bacon until crisp, then drain on a paper towel. Chop when cool.

Then, stir together ricotta cheese, corn, blueberries, rosemary, basil, and lemon thyme until combined. [If you don’t have these herbs, substitute about 1/4 cup fresh herbs of choice, or ~1 teaspoon dried herbs.] Season with white pepper and sea salt, then taste and adjust seasonings as necessary. Then add egg and bacon and stir again.

When pasta is finished cooking, reserve 1 cup pasta water, then drain pasta. Fold pasta into ricotta mixture, adding reserved pasta water in 1/4 cup increments until sauce evenly coats pasta. Spoon pasta into prepared casserole dish.

In a small bowl, gently crush granola with the back of a wooden spoon until just broken down. Mix in Parmesan cheese, then sprinkle mixture over pasta. Bake for 20-25 minutes, until heated through. Serve immediately.

Disclosure: Golden Girl Granola sent me one bag of granola of my choice for the purposes of participation in this recipe challenge. I received no further compensation and was not asked or paid to publish positive comments. Please check them out on Facebook and Twitter. You can also find their products in various stores on the east coast. Thank you for the chance to try your granola!

Main Dishes, Recipes, Turkey

Turkey Sloppy Joes

These turkey sloppy joes are full of great flavors and are super easy to throw together after a long day! Plus, this recipe freezes well so make a big batch to enjoy another time too!

Turkey Sloppy Joes | an easy, healthy meal that everyone will love! | thepajamachef.comSummertime makes me think of sloppy joes. I know they’re stereotypically a “kid food” that comes out of a can. However, I don’t really remember eating them until later in life. I always skipped over them in the lunch line in elementary school, so it wasn’t until I worked at a summer camp in college that I really ate them regularly. At camp, you eat what you get… or you eat PBJs. 🙂 And you’re hungry from being outdoors ALL day long, so you really DO want to eat, no matter what’s on the menu. Those were some of the best summers of my life and I wouldn’t trade them for anything. If you work at camp, you’ll understand I’m sure.

Turkey Sloppy Joes | an easy, healthy meal that everyone will love! | thepajamachef.comAround this time, my mom started making homemade sloppy joes using this recipe from the Neely’s. While I love that recipe, it isn’t quite as good with ground turkey so I started trying other recipes online. And this is a recent one I tried that we LOVED! So of course, I had to share it. 🙂 It’s BBQ sauce based, meaning it tastes like a million bucks with minimal effort [read: no measuring a zillion spices]. Just give this a quick 20 minute simmer after cooking the turkey and veggies, and you are golden! It’s not too sweet, not too tangy… absolutely perfect.

Turkey Sloppy Joes | an easy, healthy meal that everyone will love! | thepajamachef.comI’m not much of a “freezer cooking” kind of girl but I do like to make big batches of our favorite meals and freeze some of it for a future busy night. This recipe freezes great, and is a great one to double! I like to let it cool and pop half into a freezer bag for another time, but something else you could try is portioning it out into smaller tupperware containers that you could grab for a work lunch or single serving dinner. I think I’m too messy of an eater to eat sloppy joes in the middle of the work day, but I really like the idea now so I just might try it! 🙂 Enjoy!

one year ago: BBQ Baked Spaghetti
two years ago: Honey Lemon Thyme Iced Tea
three years ago: Chocolate Chip Banana Pancakes
four years ago: Spiced Waffles

Turkey Sloppy Joes

  • Servings: 6
  • Print

slightly adapted from Ambitious Kitchen

Ingredients:

  • 1 teaspoon olive oil
  • 1 cup sweet yellow onion, diced
  • 1 cup sweet bell peppers [I used red, yellow, and orange mini peppers]
  • 3 garlic cloves, minced
  • 1 pound ground turkey
  • 8 ounces tomato sauce
  • 1/2 cup BBQ sauce [I like Sweet Baby Ray’s]
  • 1 teaspoon Worcestershire sauce
  • 1 teaspoon chili powder
  • 3 tablespoons tomato paste
  • 1 teaspoon hot sauce
  • 1 tablespoon brown sugar
  • freshly ground black pepper
  • red pepper flakes, if desired
  • hamburger buns, for serving
Directions:
In a large skillet set over medium heat, heat olive oil. When it’s hot, add onion and peppers and cook until soft, about 5 minutes. Add the garlic at the end and cook an extra 30 seconds or so, until fragrant. Remove veggies from pan and place in a bowl.
Then, add the turkey to the skillet and cook until no longer pink, breaking it up with a wooden spoon as you go. Drain any grease if necessary. Then add veggies back to the pan, along with the tomato sauce, BBQ sauce, Worcestershire sauce, chili powder, tomato paste, hot sauce, and brown sugar. Stir to combine.
Reduce heat to medium-low, then simmer for 15-20 minutes. Taste and season with red pepper flakes and freshly ground black pepper as desired. Additional brown sugar or even ketchup can be used if the sauce is too tangy/tart. Serve on hamburger buns and enjoy!
This recipe also freezes well!