Pumpkin Spice Coffee Syrup + Cold Brew Coffee Method | thepajamachef.com
Beverages, Recipes

Pumpkin Spice Coffee Syrup + Cold Brew Coffee Method

My Pumpkin Spice Coffee Syrup recipe has been submitted for the Steviva Blogger Recipe Challenge. Product samples received in exchange for posting this recipe as part of the recipe challenge. #steviva #sweetandeasy

Pumpkin Spice Coffee Syrup + Cold Brew Coffee Method #steviva #sweetandeasy| thepajamachef.com

Pumpkin season. Just those two words make me superrr excited! I know, I know. Just like every other girl out there. #oops #sorrynotsorry But I’ve been a pumpkin (and pumpkin spice!) fan long before Starbucks made a fortune selling $6 sugar-laden pumpkin spice lattes. Though I love pumpkin spice lattes, iced coffees, and the like from a wide variety of chain and local coffee shops, I always have fun dabbling in similar coffee drinks at home. I don’t have an espresso maker (yet!) but my pumpkin spice creamer has been a fall staple the past few years. However, I think I’ve stumbled on something better.

Pumpkin Spice Coffee Syrup + Cold Brew Coffee Method #steviva #sweetandeasy | thepajamachef.com

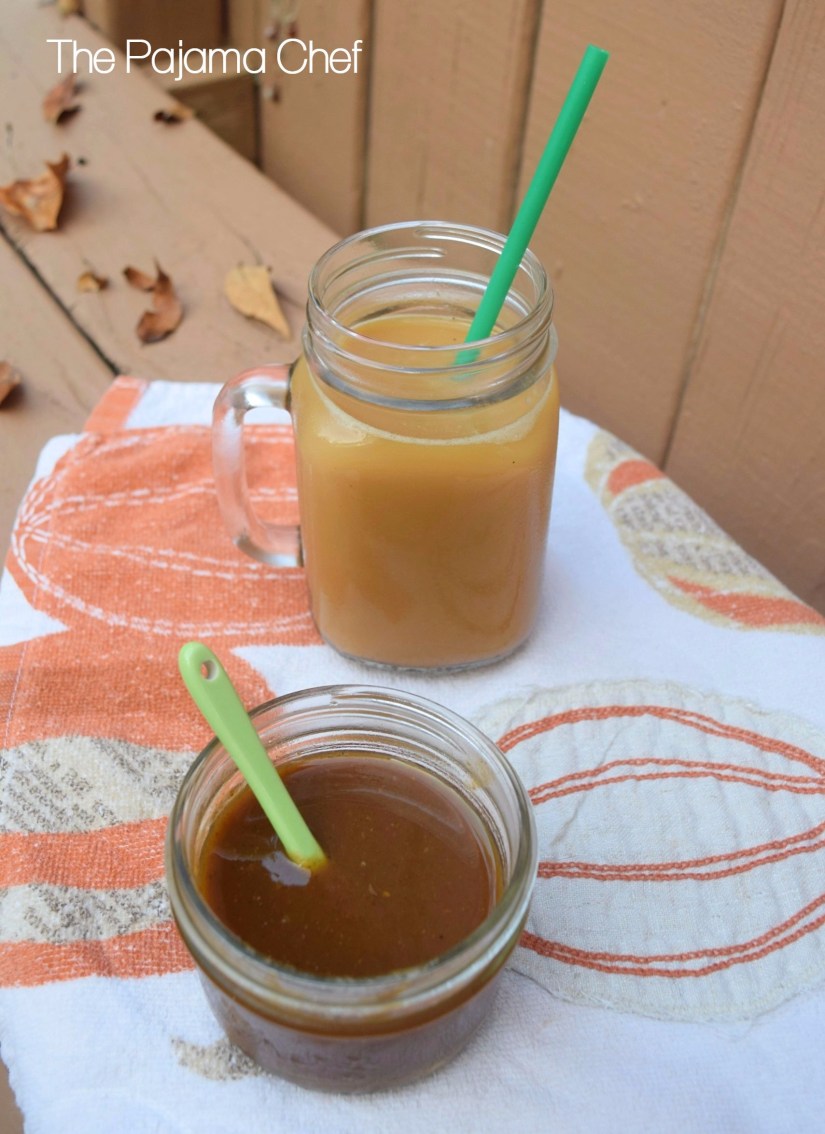
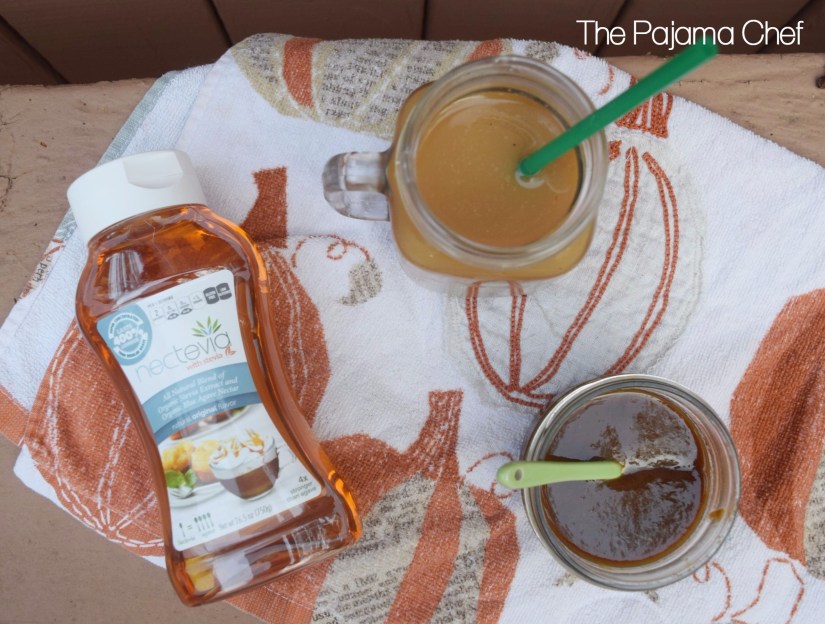
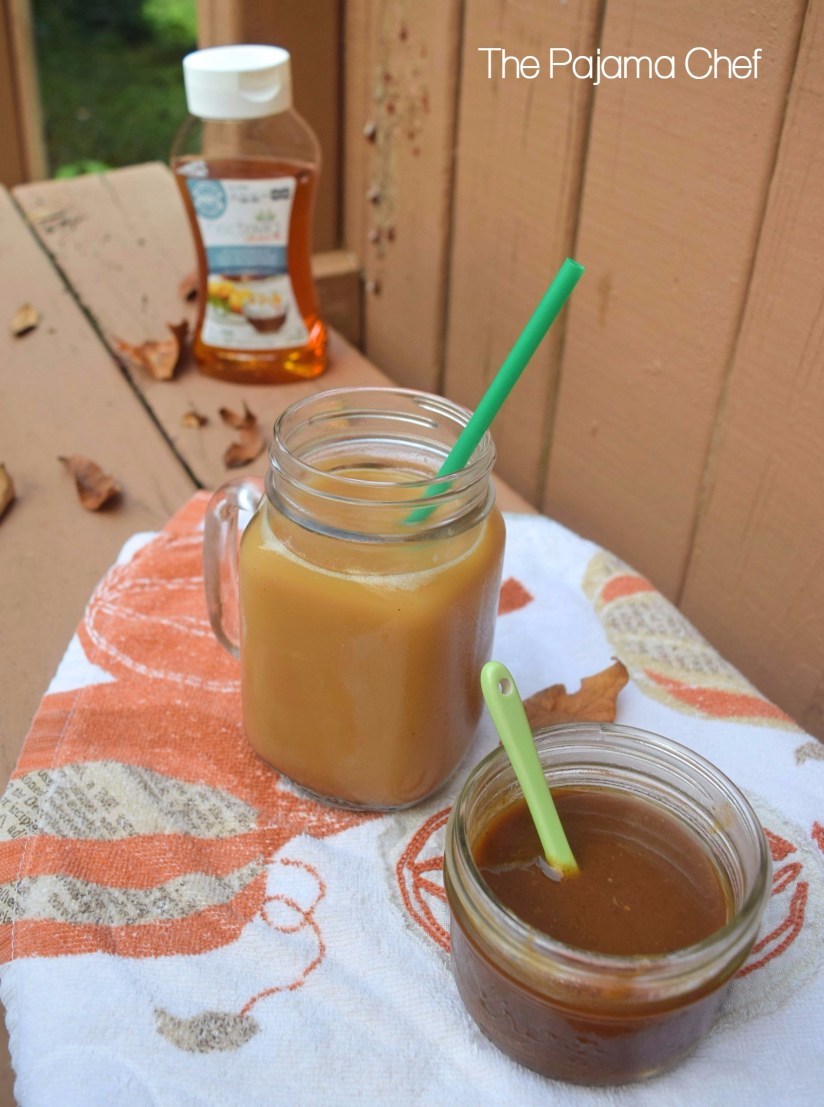
Enter: Pumpkin Spice Coffee Syrup. I’ve made a simple pumpkin spice syrup before but something was missing… oh, that’s right: enough pumpkin! Not so in this coffee syrup. There’s half a cup of pumpkin puree in this syrup! Don’t be scared, guys… the puree melts together perfectly with the Nectevia Original and water to make a delicious syrup to stir into your coffee. For the “spice” part I added a tablespoon of pumpkin pie spice and also infused some fresh rosemary in the syrup as it cooled. Perfection!

Pumpkin Spice Coffee Syrup + Cold Brew Coffee Method #steviva #sweetandeasy | thepajamachef.com

Serving possibilities for this syrup are endless! I enjoyed my Pumpkin Spice Coffee Syrup with cold brew coffee and almond milk (because the weather this fall in Nashville has been a little more reminiscent of summer, ahem…). But I think it would also be great with some espresso and cream if you can make that happen in your life, or just regular coffee. Or chai! Or heck, it could even be great drizzled over pancakes or ice cream. Pumpkin ice cream plus pumpkin spice coffee syrup?? Ohhhh yes, please! (Now I’m starting to question the name of this recipe.)

Pumpkin Spice Coffee Syrup + Cold Brew Coffee Method #steviva #sweetandeasy | thepajamachef.com

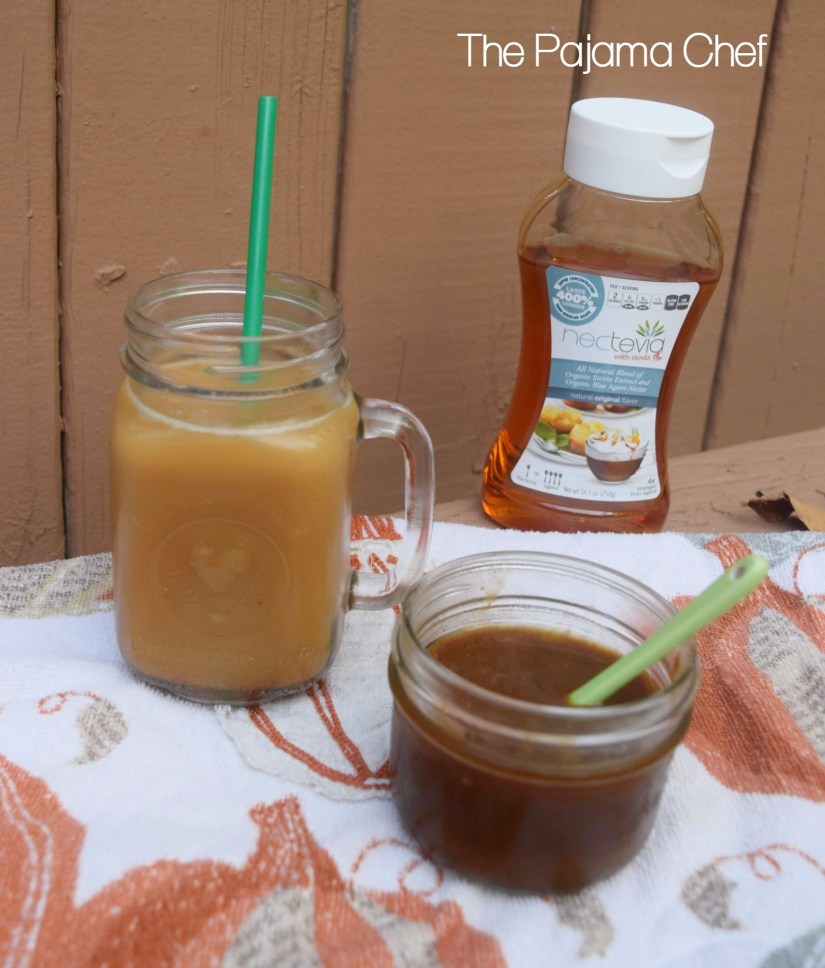
No matter how you serve it, this Pumpkin Spice Coffee Syrup is sure to make your fall a little tastier. Oh, and I did want to mention something real quick: I created this recipe as part of a recipe contest for Steviva. (If you want, you can find them on Facebook, Twitter, Google +Pinterest, and Instagram.) I don’t have much experience cooking and baking with stevia products but it has been so fun experimenting with them. I totally understand though that dietary needs and preferences can vary, so I did include some other sweetener options in the recipe below… but check out Nectevia Original if you can–it’s a great blend of stevia and blue agave and has 1/4 the calories, carbs and sugars of regular agave, or table sugar. I was impressed with it! Hope you enjoy!!

Pumpkin Spice Coffee Syrup + Cold Brew Coffee Method #steviva #sweetandeasy | thepajamachef.com

one year ago: Banana Espresso Chocolate Crumb Cake
two years ago: Coconut Oil Dark Chocolate Chip Cookies
three years ago: Asian Turkey Meatballs with Carrot Rice
four years ago: Cream of Broccoli Soup with Cheese
five years ago: No Bake Tropical Energy Bites
six years ago: Garlicky Pasta with Fresh Tomatoes and Basil
seven years ago: Pillow Cookies

Pumpkin Spice Coffee Syrup

  • Servings: approximately 8 ounces
  • Print

Ingredients:

  • 1/2 cup Nectevia Original
  • 1/2 cup water
  • 1/2 cup pumpkin puree
  • 1/2-1 tablespoon pumpkin pie spice (I used a full tablespoon but some may prefer the spice to be a little less intense.)
  • 2 sprigs rosemary

Directions:

Stir together Nectevia Original, water, pumpkin puree, and pumpkin pie spice in a small saucepan set over medium-high heat. Add rosemary, then continue to cook until mixture is bubbly but not quite boiling. Reduce heat to medium-low and cook for 4-5 minutes until mixture reduces and thickens. Remove from heat, and then let rest for 20 minutes to to continue to infuse rosemary. After 20 minutes, remove rosemary sprigs and discard.

Transfer syrup into a glass jar, cover, and store in the refrigerator. Syrup should keep one to two weeks.

I enjoy stirring a couple tablespoons of Pumpkin Spice Coffee Syrup stirred into cold brew coffee (method below!) and unsweetened almond milk. Adjust the amount of syrup to taste!

Notes: Nectevia Original is a liquid blend of stevia and blue agave. If you don’t have any on hand, feel free to substitute regular sugar or brown sugar, as well as other sweeteners like honey, agave, stevia, or maple syrup. I’ve made simple syrups with white sugar, brown sugar, and honey all with great results in the past. I’ve also done a combination of those sweeteners plus agave or maple syrup. Your choice!

Cold Brew Coffee

  • Servings: 32 ounces
  • Print

Ingredients:

  • 1/2 cup coffee, medium-grind is best
  • 4 cups cold water

Directions:

Stir together coffee and cold water. I like to do this in a large measuring cup, but a jar or French press would work too.

This ratio of coffee to water is not super concentrated but you can increase the amount of coffee while keeping the water amount constant if desired.

Cover and let rest at least overnight, but optimally 12-24 hours. This can be done at room temperature or in the refrigerator.

Strain mixture in one of the following ways:

  • pour into a French press and press as usual to strain.
  • a cheesecloth or coffee filter set inside a mesh sieve, with coffee draining into a measuring cup, jar, etc. You may need to strain coffee twice using this method to remove all grounds and silt.

I find it easiest to use my French press but either way works!

Store in a covered container in the refrigerator for up to one week. Serve with milk, half and half, sweetener, etc. as desired.


Advertisement
Main Dishes, Pork, Recipes

Hassleback Pork Tenderloin Stuffed with Cranberries, Pears, and Goat Cheese

Looking for a show-stopping dish for New Year’s? This Hassleback Pork Tenderloin Stuffed with Cranberries, Pears, and Goat Cheese is sure to impress… and it tastes even better! 

Disclaimer: This recipe was created for the Cape Cod Select Holiday Blogger Recipe Challenge. Please follow them on Facebook, Twitter, Instagram, and Pinterest. I was sent free cranberries for recipe development purposes, but was in any other way compensated for my time, ingredients, etc. 

Looking for a show-stopping dish for New Year's? This Hassleback Pork Tenderloin Stuffed with Cranberries, Pears, and Goat Cheese is sure to impress... and it tastes even better!

While I am not much of a “meat and potatoes” sort of girl, the one special cut of meat that I do appreciate is the pork tenderloin. Large hunks of meat tend to scare me a little bit. In college, my roomie and I always said that we would be “real adults” when we bought our own meat. We were joking around, but it’s sort of true… and then I married a man who loves his meat–so I had to get out of my comfort zone! Thankfully pork tenderloin, at least in my experience, is ridiculously simple and hard to mess up. Plus it tastes amazing! Pork tenderloin is incredibly versatile, and my recipe today combines lots of great winter flavors that the whole family is sure to love.

Looking for a show-stopping dish for New Year's? This Hassleback Pork Tenderloin Stuffed with Cranberries, Pears, and Goat Cheese is sure to impress... and it tastes even better!

Normally, I make my pork tenderloin with some sort of marinade or sauce. And that’s true here…but I ALSO stuffed it, hassleback style, with cranberries and pears and goat cheese. MMMM! The cranberries and pears get all roasted and yummy–the perfect combination of tart and sweet–and when you add in the melty goat cheese, it’s just like a party on your plate! There’s nothing better! 🙂 For this recipe, I used Cape Cod Select Premium Frozen Cranberries. These cranberries are utterly wonderful–and a great way to enjoy cranberries every season of the year. This was the first time I had used Cape Cod Select products and I was really impressed with their freshness and quality. Check ’em out at a store near you!

Looking for a show-stopping dish for New Year's? This Hassleback Pork Tenderloin Stuffed with Cranberries, Pears, and Goat Cheese is sure to impress... and it tastes even better!

After the pork is done cooking, all the excess cranberries, pears, and juices from the meat aren’t going to go to waste–you can make a quick, savory cranberry sauce by pulsing everything together with an immersion blender or food processor. Spoon the savory sauce with the pork to keep it moist with every bite or use it as a dipping sauce. It’s in this sauce that the flavors of the maple syrup, Dijon mustard, rosemary, and cinnamon that was poured over the pork before cooking really comes through! The double dose of cranberry goodness is sure to spice up your pork and your dinner!

one year ago: No-Bake Peanut Butter Marshmallow Bars
two years ago: Orange Spritz
three years ago: Cranberry-Pistachio Citrus Butter Cookies
four years ago: Cranberry Orange Pancakes with Cranberry Maple Syrup
five years ago: Chocolate Covered Cherry Cookies
six years ago: Cranberry Scones

Hassleback Pork Tenderloin Stuffed with Cranberries, Pears, and Goat Cheese

  • Servings: 4-6
  • Print

Ingredients:

  • 2 tablespoons olive oil
  • 1 medium sweet onion, diced
  • freshly ground pepper
  • sea salt
  • 2 pound pork tenderloin, trimmed of excess fat
  • 1 large pear, thinly sliced
  • 12 ounces Cape Cod Select Premium Frozen Cranberries
  • 1/3 cup maple syrup
  • 1 tablespoons whole grain Dijon mustard
  • 2 tablespoons chopped fresh rosemary
  • 1/2 teaspoon cinnamon
  • 2 ounces crumbled goat cheese

Directions:

Preheat oven to 425 degrees F.

Heat olive oil in a skillet set over medium heat. Add diced onion and cook for 5-6 minutes, or until soft. Season with pepper and salt to taste. Evenly scatter half of the onions in the bottom of a roasting pan or other oven-safe dish. Place rest of the onions in a medium bowl.

Slice pork tenderloin by cutting 3/4 of the way through, approximately 1/2-1 inch apart. Place in pan.

Stuff each opening with 1 slice of pear and 5-6 cranberries. Place remaining pear slices and cranberries around the pork tenderloin.

Pour maple syrup over the onions in the bowl, then add Dijon mustard, rosemary, and cinnamon. Stir together, then season with pepper and salt to taste. Pour mixture over pork, then sprinkle with goat cheese.

Cook for 35-50 minutes, or until the internal temperature reaches 145 degrees F and pork is no longer pink in the center [unless you prefer it rarer]. Pork takes about 15-20 minutes per pound to cook through, and I found it needed a little longer probably due to the pears and cranberries.

Transfer cooked pork to a serving platter and let rest for 10 minutes before slicing.

Pour drippings from pan, including excess fruit/onions, to a medium bowl. Use an immersion blender to puree everything together into a chunky, savory cranberry sauce. Add a little water to thin if desired. You can also use a regular food processor. Serve savory cranberry sauce on the side and enjoy!

Main Dishes, Pasta, Recipes

Baked Bacon-Blueberry Ricotta Pasta

A luscious, creamy baked pasta with crisp bacon, succulent fresh corn, a pop of sweet blueberries, and a crunchy topping made out of a surprise ingredient. Intrigued now?

Baked Bacon-Blueberry Ricotta Pasta | an easy, cheesy baked pasta with a surprise topping! Find the recipe on thepajamachef.comAt my house, you can’t go wrong with baked pasta. Ben and I can eat an embarrassingly large portion of baked pasta at a single meal. Then after it’s wrapped up for the fridge, we are constantly opening it up and using a fork [or our fingers, sorry Mom] for another bite. There’s just something about baked pasta. From looking at the title of this recipe, Baked Bacon-Blueberry Ricotta Pasta, you’ve probably surmised that there’s at least something a little unusual with this pasta dish. Bacon and ricotta… pretty standard fare for Italian food. Blueberries? Now that’s a little odd, but it’s summer so sometimes berries creep into weird places. But then you look at that photo and you’re like, wait… is that oats? On pasta? Ummm, what’s going on? Well, that my friends, is granola. Granola?!?! Well, yes. That’s what my husband said too. Ha!

Baked Bacon-Blueberry Ricotta Pasta | an easy, cheesy baked pasta with a surprise topping! Find the recipe on thepajamachef.comI developed this recipe as my entry in the Golden Girl Granola Blogger Recipe Challenge. When I first received the package of Bluesberry Granola I planned to use it in a breakfast dish, such as french toast or breakfast quesadillas, or the like. But it’s a contest, and I figured everyone would do that. So I did something different! And guess what? It worked!

Baked Bacon-Blueberry Ricotta Pasta | an easy, cheesy baked pasta with a surprise topping! Find the recipe on thepajamachef.comThe sweetness of the blueberry, almond, and coconut granola [which is SO delicious, btw] is cut by the salty bacon, creamy ricotta, and the freshly grated Parmesan cheese mixed into the topping. I also mixed in some fresh sweet corn since I can’t get enough of that in the summertime, and a handful of herbs from my garden. Perfection on a plate! This isn’t your average pasta dish… it’s even better! Hope you enjoy it as much as we do!

one year ago: Coffee Blondies
two years ago: Pineapple Cream Pie
three years ago: Grandma’s Blueberry Muffins
four years ago: Linda’s Caramel Ritz Bits Crackers

Baked Bacon-Blueberry Ricotta Pasta

  • Servings: 6
  • Print

Ingredients:

  • 8 ounces pasta* [I used Trottole, a curly, thick, corkscrew shape but any small pasta would do]
  • *1 cup reserved pasta water
  • 4 strips of bacon
  • 15 ounces part-skim ricotta cheese
  • 1/2 cup corn [frozen or fresh]
  • 1 cup blueberries
  • 3 sprigs fresh rosemary, minced
  • a small handful of fresh basil, minced
  • a small handful of fresh lemon thyme
  • white pepper
  • sea salt
  • 1 egg, lightly beaten
  • 2/3 cup Bluesberry Granola – from Golden Girl Granola
  • 5-6 tablespoons freshly grated Parmesan cheese

Directions:

Preheat oven to 350 degrees F. Grease a 10 inch round casserole dish with cooking spray and set aside.

Bring a large pot of water to boil and cook pasta to al dente according to package directions.

Meanwhile, cook bacon until crisp, then drain on a paper towel. Chop when cool.

Then, stir together ricotta cheese, corn, blueberries, rosemary, basil, and lemon thyme until combined. [If you don’t have these herbs, substitute about 1/4 cup fresh herbs of choice, or ~1 teaspoon dried herbs.] Season with white pepper and sea salt, then taste and adjust seasonings as necessary. Then add egg and bacon and stir again.

When pasta is finished cooking, reserve 1 cup pasta water, then drain pasta. Fold pasta into ricotta mixture, adding reserved pasta water in 1/4 cup increments until sauce evenly coats pasta. Spoon pasta into prepared casserole dish.

In a small bowl, gently crush granola with the back of a wooden spoon until just broken down. Mix in Parmesan cheese, then sprinkle mixture over pasta. Bake for 20-25 minutes, until heated through. Serve immediately.

Disclosure: Golden Girl Granola sent me one bag of granola of my choice for the purposes of participation in this recipe challenge. I received no further compensation and was not asked or paid to publish positive comments. Please check them out on Facebook and Twitter. You can also find their products in various stores on the east coast. Thank you for the chance to try your granola!

Potato Rosemary Knots | thepajamachef.com #TripleSBites
Breads, Recipes

#TripleSBites: Potato Rosemary Knots

These soft and doughy Potato Rosemary Knots have a fancy shape and are full of lots of fresh herb flavor! They’re a great compliment to any dinner.

Potato Rosemary Knots | thepajamachef.com #TripleSBites

Making fresh bread and rolls is something that I absolutely love to do. I love the process of kneading the dough and seeing it come together from a mess of flour and liquid and salt and yeast into something wonderful. Though I use my stand mixer to knead the dough more often than not, I still like seeing the magic happen. Of course, another perk of the bread making process is the eating process. 🙂 Can’t deny that! Having fresh bread to serve with dinner elevates the meal to the next level. Whenever I walk through the bakery at the grocery store, I’m always tempted to pick up a loaf of bakery bread or a package of rolls. They just look SO good, you know? And it’d be so easy. But then I remember that roll recipes like this one can be made in a matter of minutes as I’m making other components of dinner, and enjoyed for pennies on the dollar instead of dollars on the dollar like at the bakery. Baguettes and croissants are my exception to this rule though, but I’d love to try to make them both!

Potato Rosemary Knots | thepajamachef.com #TripleSBites

Before making these Potato Rosemary Knots on a recent lazy, home-from-work-early Friday afternoon, I had never baked with potato flakes, flour, or mashed potatoes. I’ve seen so many potato bread recipes, and have enjoyed many a slice before, but never had made it myself. In fact, when I was shopping for these potato flakes I ended up asking one of the Publix employees where the instant potatoes were in the store because I just could not find them! I don’t think I’ve ever bought them before. But I loved seeing how the potato flakes folded easily into the dough, giving it a hearty, nutty appearance and baking into something soft and wonderful. 🙂 For this recipe, I used the requisite dried rosemary but had it been summer, would have used fresh rosemary. I amped up the flavor with a bit of Gourmet Garden’s Italian herbs though! Gourmet Gardens is one of our sponsors for #TripleSBites so it was only appropriate, and it tasted SO good with the rosemary and the extra herbs. Mmm!

Potato Rosemary Knots | thepajamachef.com #TripleSBites

one year ago: Lindsay’s Chicken Noodle Soup
two years ago: 60 Minute Sandwich Buns
three years ago: Loaded Sweet Potato Fries
four years ago: Tomato Tortellini Soup

Potato Rosemary Knots

  • Servings: 12
  • Print

from Mazola Oil

Ingredients:

  • 2 3/4 to 3 1/4 cups all-purpose flour
  • 1 tablespoon yeast [or 1 package rapid rise yeast]
  • 1 tablespoon sugar
  • 2 teaspoons onion powder
  • 1 teaspoon salt
  • 1 teaspoon rosemary
  • 1 tablespoon Italian Herbs from Gourmet Garden, optional
  • 2 tablespoons olive oil
  • 1/2 cup instant potato flakes or buds
  • 3/4 cup milk
  • 1/2 cup water
  • poppy seeds or rosemary, for topping

Directions:

In a large bowl, combine 1 1/2 cups flour, yeast, sugar, onion powder, salt, rosemary, Italian Herbs, olive oil, and potato flakes. Heat milk and water until approximately 120-130 degrees F. Stir into dry ingredients. Stir in enough flour to make a soft dough, then knead until smooth and elastic, about 4-6 minutes. This can be done in a stand mixer or on a floured surface. Cover with a tea towel and let rise for 10 minutes.

Preheat oven to 375 degrees F. Grease a baking sheet with cooking spray or line with parchment or a silpat. Divide into 12 portions. Shape each piece into a long rope [10-12 inches], then tie into a loose knot. Place 2 inches apart on baking sheet, then cover and rise until doubled, about 20-30 minutes.

Brush each roll with olive oil, then top with poppy seeds or rosemary. Bake for 15-20 minutes or until golden brown.

#TripleSBites | thepajamachef.com

Be sure to check out other yummy recipes from #TripleSBites at the link below!

Disclosure: I received herbs and spices from Gourmet Garden as part of my participation in #TripleSBites. I was not compensated in any way–for my time, to create a recipe, or to publish positive comments. I was not required to use these products as part of my recipe. My opinions are my own. 

Recipes, Sides, Vegetables

Ginger-Rosemary Roasted Brussels Sprouts

Roasted brussels sprouts are dressed up with fresh ginger and rosemary for a bright and flavorful side dish.

Ginger-Rosemary Roasted Brussels Sprouts | thepajamachef.com

I guess this is Thanksgiving side dish week on the blog! Monday was Parmesan Butternut Squash Au Gratin. Today is Ginger-Rosemary Roasted Brussels Sprouts. And Friday? Well, you’ll just have to be surprised. But let’s focus on today, mmmkay? I know brussels sprouts are popular in the blogging world. How ’bout in the real world? Well, I have no idea. I don’t know many non-foodies who like them. My own mother doesn’t even like ’em! So sorry, brussels sprouts! Fortunately… Ben and I both do, much to my surprise.

Ginger-Rosemary Roasted Brussels Sprouts | thepajamachef.com

Roasting brussels sprouts is the ONLY way to go, in my opinion. It’s easy, delicious, and takes almost no work. Roasting veggies is a classic way to get a deep, sweet, caramelized flavor into your veggies. Then you can play around with your seasonings. The sky is the limit!

Ginger-Rosemary Roasted Brussels Sprouts | thepajamachef.com

This time, I chose to season my dish with fresh grated ginger and rosemary, mainly out of convenience. I had some fresh ginger leftover from another recipe and I thought the spicy, peppery sweetness of ginger would be awesome with the piney, fresh rosemary from my mom’s friend’s plant. Ooooh was that combo delicious! I know ginger and rosemary together might not sound super traditional, but it works. Hope you enjoy!

one year ago: Pumpkin Cloverleaf Rolls
three years ago: Pumpkin Chocolate Chip Energy Bars
four years ago: Hawaiian Chicken

Ginger-Rosemary Roasted Brussels Sprouts

  • Servings: 4-5
  • Print

Ingredients:

  • 1 pound brussels sprouts
  • 2 tablespoons olive oil
  • 1-2 inches fresh ginger, peeled
  • 2 sprigs fresh rosemary, chopped
  • freshly ground black pepper
  • sea salt

Directions:

Preheat the oven to 400 degrees. Spray a large rimmed baking sheet with cooking spray.

Slice brussels sprouts in half, trimming edges as necessary. Place in a large bowl, then drizzle with olive oil. Grate ginger over top, then add chopped rosemary. Season with pepper and salt, then toss. Spread in an even layer on baking sheet. Don’t worry if some slivers fall off–they can be roasted and are great when crispy.

Roast for 30 minutes, flipping halfway through.

Serve immediately, seasoning with more pepper as necessary.