Roasted parsnips make a great soup... with white chocolate as an accent flavor! This soup is surprising and delicious, thanks to the rich, quality chocolates from Forte Artisan Chocolates, a sponsor for this year's #Choctoberfest.
Main Dishes, Recipes, Soups

#Choctoberfest: White Chocolate Parsnip Soup

Roasted parsnips make a great soup… with white chocolate as an amazing accent flavor! This soup is surprising and delicious, thanks to the rich, quality chocolates from Forte Artisan Chocolates, a sponsor for this year’s #Choctoberfest. 

Roasted parsnips make a great soup... with white chocolate as an accent flavor! This soup is surprising and delicious, thanks to the rich, quality chocolates from Forte Artisan Chocolates, a sponsor for this year's #Choctoberfest.

Announcement, announcement, announcement! Guess what!? Today is the last day of #Choctoberfest 2018… but you can still enter the giveaway (over $400 of prizes!) so get to it! 🙂 And then get back here for a yummy SAVORY chocolate recipe! Today’s recipe was inspired by the amazing and versatile chocolates made by Forte Artisan Chocolates, another one of our generous #Choctoberfest sponsors. I was fortunate enough to receive some samples of their chocolates–two varieties of white chocolate that I used in this recipe, one classic White Chocolate Cloud and the other an interesting Balsamic Vinegar in White Chocolate, as well as some amazingly rich 71% Dark Chocolate Brute. While all of them were incredible on their own, it was so fun using both varieties of white chocolate in a savory dish.

Roasted parsnips make a great soup... with white chocolate as an accent flavor! This soup is surprising and delicious, thanks to the rich, quality chocolates from Forte Artisan Chocolates, a sponsor for this year's #Choctoberfest.

Truth be told, on my own I probably wouldn’t take the initiative to make something savory with chocolate. But Forte challenged us to at least try it… so try it I did! And this soup is the amazing result. It’s hard to describe this savory White Chocolate Parsnip Soup without having you over for a bowl, but it is very similar to a good butternut squash bisque or pumpkin soup. A little sweet, but not too overpowering. The white chocolate is a perfect compliment to the veggie goodness of this soup.

Roasted parsnips make a great soup... with white chocolate as an accent flavor! This soup is surprising and delicious, thanks to the rich, quality chocolates from Forte Artisan Chocolates, a sponsor for this year's #Choctoberfest.

One of the most surprising things about making this soup was the fact that it definitely did not need any herbs or spices for flavor. The parsnips, when roasted, almost have a spiced flavor profile. I swear I smelled cinnamon! But alas, I just roasted them with olive oil, salt, and pepper. It was crazytown, but turned out to be the perfect compliment to sweet, rich white chocolate when they were blended with chicken broth, cream, garlic, and onion. This is a must try soup, especially if you can get your hands on some Forte Artisan Chocolate. This is the best white chocolate I have ever had, and lucky for you, you can use the code “CHOCTOBERFEST2018” on their website now to get a special buy 3 get 1 free sale. They have so many unique flavors… and a whole line of savory chocolate bars in their Gusto line. I can’t wait to try them all!

Roasted parsnips make a great soup... with white chocolate as an accent flavor! This soup is surprising and delicious, thanks to the rich, quality chocolates from Forte Artisan Chocolates, a sponsor for this year's #Choctoberfest.

All in all, I love this White Chocolate Parsnip Soup, even though it was a total experiment. My family enjoyed it too. It’s great with crusty bread and a side salad, but I can also envision it being a great first or second course for a fancy meal with some filet mignon. Or maybe at Thanksgiving! Yesss! How fun would it be to surprise your guests with soup, that includes white chocolate? Yes, please! Enjoy, friends!

one year ago: Double Chocolate Pumpkin Energy Bites
two years ago: Pumpkin & Sausage Pizza

four years ago: Banana Chocolate Chip Mini Muffins
five years ago: Funfetti Cookies
six years ago: Chicken Enchiladas with Green Chili Sour Cream Sauce
seven years ago: Roasted Vegetable Soup
eight years ago: Pumpkin Chocolate Chip Mini Muffins

Please check out more chocolate recipes here!!

White Chocolate Parsnip Soup

  • Servings: 8
  • Print

adapted from Chocolate for Dinner, An Italian Tradition by Francine Segan

Ingredients:

  • 2 pounds parsnips (about 4-5 large parsnips)
  • 2 tablespoons extra virgin oil
  • freshly ground black pepper and salt
  • 4 tablespoons unsalted butter
  • 1 large Vidalia onion, minced
  • 3 cloves garlic, minced
  • 2 quarts chicken stock
  • 1 tablespoon vanilla extract
  • freshly ground black pepper and salt
  • 45 gram White Chocolate Cloud bar by Forte Artisan Chocolates, chopped
  • 45 gram Balsamic Vinegar in White Chocolate bar by Forte Artisan Chocolates, chopped
  • 1 cup heavy cream or half and half
  • Juice of 1 lemon or lime
  • minced fresh rosemary or dill

Directions:

Preheat oven to 400 degrees F. Line a baking sheet with parchment paper or a silicone mat. Peel and cut parsnips into one inch slices, then toss with olive oil. Season with a generous amount of salt and pepper. Roast for 40 minutes, tossing halfway through, until softened.

When parsnips are almost done, melt butter in a large dutch oven or stockpot. Add onion and cook over medium heat until softened, about 6-7 minutes. Add garlic and saute another 30 seconds until fragrant.

Pour in chicken stock, vanilla, and roasted parsnips. Season with pepper and a little salt, then bring to a boil. Reduce to a simmer, then cover and cook for 20 minutes. Add chopped white chocolate, then stir until melted, about 2-3 minutes. Remove from heat.

Add in heavy cream and lemon juice, then use an immersion blender to puree until smooth. Serve with a touch of fresh herbs. Enjoy!

Disclosure: I received free product from Forte Artisan Chocolates to use in this recipe for #Choctoberfest. I was not required to review them or provide positive feedback. All opinions are my own. You can learn more about Forte Artisan Chocolates and get great recipe ideas from them on Facebook, Instagram, Twitter, and Pinterest.

Homemade Chicken Stock. Easy, frugal, and utterly delicious! 
Chicken, Main Dishes, Recipes, Soups

Homemade Chicken Stock

Homemade Chicken Stock. Easy, frugal, and utterly delicious!

Homemade Chicken Stock. Easy, frugal, and utterly delicious! 

There’s something magical about making homemade chicken stock. Or broth. Turns out they are actually different things. For better or for worse, I use broth and stock interchangeably. At the end of the day, it probably doesn’t matter. It might just look like some liquid in a jar, but guys…? It’s much, much, more than that. You’re making SOMETHING out of (practically) nothing. Or nothing edible anymore, anyways.

Homemade Chicken Stock. Easy, frugal, and utterly delicious! 

In my opinion, homemade chicken stock is one of the easiest things you can make. All it takes is chicken bones and/or a carcass, vegetables and/or vegetable scraps, water, and a crock pot. And time! Let this simmer for as long as you can. Everything used for this homemade chicken stock is something I would otherwise be throwing away so this recipe is also crazy frugal. That’s all well and good, but the deliciousness of this homemade stock is something that cannot be understated. It’s wayyy better than anything you could buy at the store. It’s absolutely delicious. Whether you use it as the base for soup, for adding flavor to rice, in sauces, or even just sipping by itself (yup!), this homemade chicken stock is the BEST.

Homemade Chicken Stock. Easy, frugal, and utterly delicious! 

Please start saving your veggie scraps (I just save mine in a gallon size ziptop bag in the freezer) so you can try this recipe asap! Then, when your bag is full, just roast a chicken or buy a rotisserie chicken so you can make your own homemade chicken stock. It’s one of my freezer essentials and I use it alllll the time. Enjoy!!

one year ago: Simple Sheet Pan Chicken Fajitas
two years ago: Apple Cranberry Relish Salad
three years ago: Chewy Ginger Cookies
four years ago: Sweet Potato Chorizo Chile Mac
five years ago: Chicken Tinga Tacos
six years ago: Crock Pot Cran-Apple Sauce
seven years ago: Chicken and Wild Rice Soup

Easy Homemade Chicken Stock

  • Servings: 12-13 cups stock
  • Print

Ingredients:

  • bones and carcass from 1 roasted chicken (homemade or store-bought rotisserie)
    • note: for food safety reasons, carve the chicken before serving… do not use bones that have been on a plate in your stock
  • 1 gallon-sized bag full of vegetable scraps, saved over time in the freezer… basically the stuff you would otherwise throw away such as:
    • carrot ends and peels
    • onion ends and skins
    • garlic skin
    • celery ends and leaves
    • bell pepper pieces
    • stems or ends of herbs, green onions, or mushrooms
    • apple cores
    • citrus rinds
    • don’t include: lettuces/greens, cruciferous vegetables (broccoli, cauliflower, cabbage, brussels sprouts) or anything dirty or moldy… but veggies past their prime are totally fine!
  • water
  • splash of vinegar
  • freshly ground pepper and salt
  • dried herbs as desired: parsley, thyme, basil, oregano, bay leaves, etc.

Directions:

Place chicken bones and carcass at the bottom of a large crockpot. Cover with veggie scraps. Add a splash of vinegar, a generous amount of freshly ground pepper and salt, and some dried herbs if desired. Fill crockpot nearly to the top with water, then cover and cook on low for at least 8 hours, preferably 12 or more.

At the end of the cooking time, unplug and remove lid. Allow to cool briefly, then skim off any film or foam. Use a fine mesh strainer set over a bowl or liquid measuring cup to strain out solids to discard. You can strain again with cheesecloth for clearer stock, if desired.

At this point, you have two options:

  1. Divide into desired portion-sized containers – I like using half pint and pint mason jars – allow to cool completely, then refrigerate or freeze. If freezing stock, be sure to leave head space so the jars don’t break. With this method, each jar will have a layer of thickened chicken fat on top that you can use or discard when you use the stock. The jars may also have some residue or grittiness at the bottom of them, as well.
  2. Cover and refrigerate bowl(s) of stock overnight. Scrape the thickened chicken fat off the stock and discard/save as desired, then divide into desired portion-sized containers and freeze. This method eliminates most of the excess fat and residue or grittiness, as most of it rises or falls and can be discarded before freezing.

Notes:

Stock can be frozen indefinitely, but should be used within a week if refrigerated.

There are lots of ideas online for alternate freezing methods based on your cooking needs, freezer space, etc. such as: in plastic ziptop bags, ice cube trays, or muffin tins (maybe even try the silicone ones!).

To defrost half pint or pint sized glass jars of stock, it is easiest to defrost in the refrigerator for 8-12 hours before use. If you need it sooner, submerge in a bowl of cold water (hot can make frozen containers crack!) until you can defrost it enough to transfer to your pot to melt all the way. Or remove lid and microwave jar on 50% power until you can pour it out.

This stock is not concentrated per se, but I do find it to be more flavorful than store-bought broth or stock. So I often will use a little less in recipes and make up the difference with water. Experiment to find what works for you!

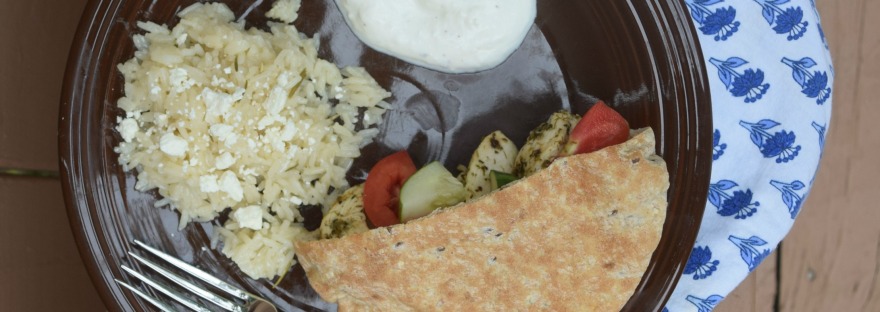
Chicken gyros--baked in the oven--are a wonderful weeknight dinner option! Lemony yogurt sauce makes these tender herbed chicken strips even more amazing. These gyros are great served with pita, rice, and lots of fresh veggies.
Chicken, Main Dishes, Recipes

Sheet Pan Chicken Gyros with Lemony Yogurt Sauce

Chicken gyros--baked in the oven--are a wonderful weeknight dinner option! Lemony yogurt sauce makes these tender herbed chicken strips even more amazing. These gyros are great served with pita, rice, and lots of fresh veggies.

Chicken gyros–baked in the oven–are a wonderful weeknight dinner option! Lemony yogurt sauce makes these tender herbed chicken strips even more amazing. These gyros are great served with pita, rice, and lots of fresh veggies.

Chicken gyros--baked in the oven--are a wonderful weeknight dinner option! Lemony yogurt sauce makes these tender herbed chicken strips even more amazing. These gyros are great served with pita, rice, and lots of fresh veggies.

Back to school is here! At my house, it has come and gone. This week marks my husband’s second full week teaching at his new school and things are going well. His schedule is a little more flexible than last year, which has been so nice. Ben gets home earlier–even when he picks up our little guy at daycare. This means dinner isn’t quite as rushed and we have a little more family time in the evening. I’m sure things will ebb and flow a little as the year goes along, but so far, I’m just trying to enjoy the reprieve while it lasts! Especially since it’s still summertime, technically.

Chicken gyros--baked in the oven--are a wonderful weeknight dinner option! Lemony yogurt sauce makes these tender herbed chicken strips even more amazing. These gyros are great served with pita, rice, and lots of fresh veggies.

One way I’ve been trying to make the most of these longer late summer nights is by keeping dinner simple. I’ve probably talked about that a gazillion times since I went back to work after baby was born, but it’s still true. I can’t tell you how many meal planning and prep schedules, systems, and calendars I’ve tried to get my life in order. I haven’t paid for any yet (and don’t think I will). At some point, I’d love to write a post detailing my meal planning system, as it is… because I ***think*** I finally have something down that works for us. YAY! But I don’t know if anyone is really interested in that sort of thing–are you?

Chicken gyros--baked in the oven--are a wonderful weeknight dinner option! Lemony yogurt sauce makes these tender herbed chicken strips even more amazing. These gyros are great served with pita, rice, and lots of fresh veggies.

But anyways, the meal I’m sharing today… Sheet Pan Chicken Gyros with Lemony Yogurt is completely a by-product of my simple weeknight dinner theme. I know these aren’t true chicken gyros BUT they are truly delicious! Slicing the chicken before baking allows for quicker cooking… and seasoning the chicken with olive oil, lemon juice, and plenty of herbs makes sure your chicken is moist (sorry) and not a gross dried out mess. To dress up the chicken, be sure to serve it with some fresh pita, chopped veggies, and a super delicious (and EASY) lemony yogurt sauce. Sometimes I’m tempted to skip sauces when making recipes… “oh, I’ll just use hummus instead.” But seriously guys… please don’t! This lemony yogurt sauce is just THREE ingredients–plain greek yogurt, lemon juice, pepper. That’s it. Whisk together and enjoyyyy! This dinner is the best.

one year ago: Baked Burritos with Pinto Beans and Kale
two years ago: Zucchini Apple Walnut Muffins
three years ago: Baked Honey Chicken Nuggets with Homemade Chick-Fil-A Sauce
four years ago: Churro Cheesecake Bars
five years ago: Pesto Potato Salad
six years ago: Salmon with Lemon, Tarragon, and Garlic Sauce
seven years ago: Summer Mexican Soup

Sheet Pan Chicken Gyros with Lemony Yogurt Sauce

  • Servings: 6
  • Print

Chicken gyros--baked in the oven--are a wonderful weeknight dinner option! Lemony yogurt sauce makes these tender herbed chicken strips even more amazing. These gyros are great served with pita, rice, and lots of fresh veggies.

inspired by my sheet pan chicken fajitas

Ingredients:

for gyros

  • 1 large yellow onion, sliced
  • 1 1/2 pounds chicken breast, thinly sliced
  • 1 1/2 teaspoons dried oregano
  • 1 tablespoon dried dill
  • 1/2 teaspoon garlic powder
  • freshly ground black pepper
  • pinch of kosher salt
  • juice of 2 lemons (approximately 1/2 cup)
  • 2 tablespoons olive oil

for lemon yogurt sauce

  • 1 cup plain greek yogurt (full fat!)
  • 4 tablespoons lemon juice
  • freshly ground black pepper

for serving: pita, romaine lettuce, chopped tomatoes, sliced red onions, feta, lemon yogurt sauce, hummus, greek lemon rice, etc.

Directions:

Preheat oven to 400 degrees F. Line a large baking sheet with foil, parchment, or a silpat for easy clean up. Alternatively, you could just spray with nonstick cooking spray. Spread sliced onion and chicken on the baking sheet. Season with oregano, dill, garlic powder, pepper, and salt. Drizzle with lemon juice and olive oil, then toss everything together with your hands. This could all be done in a bowl if you prefer… but I prefer fewer dishes! Spread in an even layer.

Bake for 20-25 minutes or until chicken is fully cooked.

While chicken is cooking, prepare lemon yogurt sauce by whisking together greek yogurt with lemon juice. Season with pepper as desired. Chill until ready to serve.

Serve chicken in a pita with romaine lettuce, chopped tomatoes, sliced red onions, feta, lemon yogurt sauce, hummus, greek lemon rice, or any other desired toppings. Enjoy!

Beans, Main Dishes, Recipes

Black Bean Burgers #CookoutWeek

The BEST black bean burgers you will ever have! Promise. These burgers are a great addition to your next cookout… even if you aren’t a vegetarian. (And let me say… your vegetarian friends will love you for having these on hand too!)

The BEST black bean burgers you will ever have! Promise. These burgers are a great addition to your next cookout... even if you aren't a vegetarian. (And let me say... your vegetarian friends will love you for having these on hand too!) #CookoutWeek 2017

I’m not vegetarian, but I still love me some black bean burgers! I have been making this recipe for many years now and they’re always a huge success. My meat lover husband (and carnivore son… seriously, that kid enjoys his protein. Usually. Except last night when he threw his turkey sloppy joes all over the floor until we let him feed himself with a fork. Yup.) enjoys these burgers every time I make them, much to his surprise.

Back in my grad school days we got into eating more vegetarian food as a way to save money, save the earth (Meatless Monday and all), and to experiment in the kitchen. I made various bean burgers. Most were edible, some were good, some were complicated, some were dry, some fell apart, and some went in the trash (when I didn’t use my husband’s lunch to finish them *ahem sweet potato burgers ahem*). But these… these black bean burgers have stuck around. They’re made with quinoa, sauteed carrots and onions, and a few standard pantry spices/seasonings like paprika, cumin, cinnamon, oregano, ketchup, soy sauce, and Sriracha. Even though you won’t find any meat in them, they still have a hearty, burger-like texture with a ton of flavor that you are sure to love. You can top these burgers with all your fave burger toppings–cheese, avocado, tomato… the possibilities are endless!

The BEST black bean burgers you will ever have! Promise. These burgers are a great addition to your next cookout... even if you aren't a vegetarian. (And let me say... your vegetarian friends will love you for having these on hand too!) #CookoutWeek 2017

One of my favorite aspects of these burgers is that they freeze SO WELL. I’m not just saying that; they really do. I love making a double batch of these burgers on the weekend. After eating one fresh, I like to freeze the rest on a baking sheet for a few hours, then transfer them to a zip-top bag. They can last up to two months in the freezer and still taste great, but I usually find that we’ve eaten them much faster than that! They’re wonderful to pull out of the freezer for a quick weekday lunch. Even if I don’t have burger buns on hand, they’re great with a lettuce wrap, on a salad, or even just eaten alone. Plus, if you have a bag of these in the freezer, you’ll be set when vegetarian friends and family come over for a cookout. There’s nothing worse than realizing you don’t have anything on hand for them to eat… and these black bean burgers taste way better than the frozen kind you can buy at the grocery store. Your vegetarian friends are sure to appreciate you after that… and your meat-eating pals may even be swayed with how tasty these burgers are! 🙂 Enjoy!

Don’t forget to enter the #CookoutWeek 2017 giveaway, happening NOW! Lots of great prizes and an easy entry!

Tell me: what’s your favorite vegetarian dish for a cookout?

Check out some other delicious cookout recipes shared today for #CookoutWeek here!

one year ago: Avalanche Cookies
two years ago: Peach Cobbler Scones

three years ago: Hawaiian Macaroni Salad
four years ago: Double Chocolate Strawberry Shortcakes
five years ago: Cilantro Lime Hummus
six years ago: Rhubarb Muffins

Black Bean Burgers

  • Servings: 6
  • Print

The BEST black bean burgers you will ever have! Promise. These burgers are a great addition to your next cookout... even if you aren't a vegetarian. (And let me say... your vegetarian friends will love you for having these on hand too!) #CookoutWeek 2017

from Bake Your Day

Ingredients:

  • 1/2 cup uncooked quinoa
  • 1 cup vegetable broth (sometimes I use chicken broth instead)
  • 1 teaspoon olive oil
  • 2 medium carrots, finely diced
  • 1/4 cup onion, finely diced
  • 2 cloves garlic, minced
  • 1 1/2 teaspoon paprika
  • 1 1/2 teaspoon cumin
  • 1 teaspoon cinnamon
  • 1 teaspoon oregano
  • 1/2 teaspoon cayenne pepper
  • freshly ground black pepper
  • salt
  • 1 – 15 ounce can black beans, drained and rinsed (about 1 1/2 cups black beans)
  • 3 tablespoons ketchup
  • 1 teaspoon soy sauce (Worcestershire sauce works in a pinch too)
  • 1-2 teaspoons Sriracha
  • 1/2-1 cup Panko breadcrumbs
  • 1 large egg
  • olive oil, for cooking
  • to serve as desired: buns, lettuce, tomato, onions, cheese, avocado, mayonnaise, etc.

Directions:

Prepare quinoa as directed on package, using broth instead of water.

Meanwhile, heat olive oil in a medium skillet over medium heat. Saute carrots and onion until soft, about 7-8 minutes. Add garlic and saute until fragrant, another minute. Remove from heat and stir in spices: paprika, cumin, cinnamon, oregano, and cayenne. Season to taste with black pepper and salt.

In a food processor or large bowl, combine black beans and cooked carrot mixture. Pulse together a few times to break down the black beans. A potato masher is a great tool for this if you don’t have or don’t want to use a food processor. Beans still should have some substance to them, so don’t obliterate them completely.

Stir in ketchup, soy sauce, and Sriracha. Fold in quinoa, 1/2 cup panko, and egg. Mix well to combine. Shape into 1/2 cup patties. If the patties don’t hold together well, gradually add up to another 1/2 cup panko until they do. Place on a plate or baking sheet, then cover and refrigerate for at least 20 minutes or up to 48 hours before cooking.

When ready to cook, heat 2 teaspoons of olive oil in a large skillet set over medium heat. Cook patties for 4-5 minutes per side, until golden brown and heated through.

Serve on a bun or in a lettuce wrap with your favorite burger toppings and enjoy!

Notes:

These burgers freeze so well! Make a batch or two to keep on hand for busy nights, quick lunches, or vegetarian guests at your next cookout.

If you’re spice averse, you may be wary of the cayenne and the Sriracha. You can omit, of course, but they really aren’t spicy at all! Just FYI. 🙂

Other, Recipes, Sides

Mom’s Three Bean Salad #CookoutWeek

Three bean salad… a simple, classic cookout dish. I can’t get enough of this make-ahead salad!

Three bean salad... a simple, classic cookout dish. I can't get enough of this make-ahead salad! #CookoutWeek2017

I’m not sure when I switched from being a three bean salad hater to a three bean salad lover, but I’m glad I gave this classic cookout dish another try! My mom always makes her three bean salad with green beans, wax beans, and kidney beans, so naturally, that’s what I do too. What I love the most about this simple side dish is that you can make it ahead. In fact, I highly recommend doing so, as the flavor gets better over time.

Three bean salad... a simple, classic cookout dish. I can't get enough of this make-ahead salad! #CookoutWeek2017

This recipe is one of the few things I ever make with canned vegetables. There’s something about the texture of canned veggies that just isn’t my favorite. But I think the softness of the canned green beans and wax beans really make this dish. If canned veggies aren’t your thing, try frozen… or even cook your own green and wax beans and use them here. I use frozen veggies in this dish frequently. Just make sure to thaw them first!

Three bean salad... a simple, classic cookout dish. I can't get enough of this make-ahead salad! #CookoutWeek2017

As I’ve made this three bean salad more often over the years, I’ve slowly adapted it *just a bit* from my mom’s recipe. I go heavier on the pepper than she does (but that’s true with about anything I make… I heart black pepper!), usually make a little less dressing and reduce the sugar, AND (game changer) add fresh herbs when I have them on hand! Fresh dill is my FAVE in this dish, but parsley and chives are also excellent. A little bit of chopped fresh herbs adds a little extra pop that we love. Totally optional, but highly recommended.

Three bean salad... a simple, classic cookout dish. I can't get enough of this make-ahead salad! #CookoutWeek2017

Speaking of totally optional but highly recommended… be sure to enter the #CookoutWeek 2017 giveaway, happening NOW! Lots of great prizes and an easy entry!

one year ago: No Bake Chocolate Peanut Butter Granola Bars
two years ago: Cherry Chipotle Chicken Salad with Cherry Lime Salsa
three years ago: Tabbouleh
four years ago: Pretzel Rolls
five years ago: Strawberry Coconut Baked Oatmeal
six years ago: Strawberry Chocolate Coconut Pancakes

Check out other new and yummy cookout recipes here: An InLinkz Link-up

So tell me… are you a three bean salad hater or lover… and how do you make it??

Mom's Three Bean Salad

  • Servings: makes about 6 cups
  • Print

from my mom 🙂

Ingredients:

  • 1/2 cup apple cider vinegar
  • 1/2 cup oil (a light olive, canola, grapeseed, etc.)
  • 3/4 cup sugar (can also be cut down to 1/2 cup if desired)
  • 1 teaspoon freshly ground black pepper
  • 1 – 15 ounce can green beans, drained and rinsed (no salt added if possible) – frozen, thawed green beans are also great here too
  • 1 – 15 ounce can wax beans, drained and rinsed (no salt added if possible) – frozen, thawed wax beans also work well too
  • 1 – 15 ounce can kidney beans, drained and rinsed (no salt added if possible)
  • 1 small onion, minced (about 1 cup)
  • 1/2-1 cup green pepper, minced
  • 1/4-1/2 cup chopped fresh herbs, optional – try dill, parsley, or chives

Directions:

Whisk together vinegar, oil, sugar, and pepper in a medium bowl. Fold in green beans, wax beans, kidney beans, onion, and green pepper. Stir in chopped fresh herbs, if desired.

Cover and chill in the refrigerator for at least 30 minutes before serving to allow the flavors to marry.

In my opinion, this salad tastes best the next day. There will be extra liquid so you could reduce the vinegar and oil down to 1/3 cup if desired, or add an extra can of beans. Or just leave as-is… that’s what I always do! Enjoy!