Beans, Main Dishes, Recipes

Black Bean Burgers #CookoutWeek

The BEST black bean burgers you will ever have! Promise. These burgers are a great addition to your next cookout… even if you aren’t a vegetarian. (And let me say… your vegetarian friends will love you for having these on hand too!)

The BEST black bean burgers you will ever have! Promise. These burgers are a great addition to your next cookout... even if you aren't a vegetarian. (And let me say... your vegetarian friends will love you for having these on hand too!) #CookoutWeek 2017

I’m not vegetarian, but I still love me some black bean burgers! I have been making this recipe for many years now and they’re always a huge success. My meat lover husband (and carnivore son… seriously, that kid enjoys his protein. Usually. Except last night when he threw his turkey sloppy joes all over the floor until we let him feed himself with a fork. Yup.) enjoys these burgers every time I make them, much to his surprise.

Back in my grad school days we got into eating more vegetarian food as a way to save money, save the earth (Meatless Monday and all), and to experiment in the kitchen. I made various bean burgers. Most were edible, some were good, some were complicated, some were dry, some fell apart, and some went in the trash (when I didn’t use my husband’s lunch to finish them *ahem sweet potato burgers ahem*). But these… these black bean burgers have stuck around. They’re made with quinoa, sauteed carrots and onions, and a few standard pantry spices/seasonings like paprika, cumin, cinnamon, oregano, ketchup, soy sauce, and Sriracha. Even though you won’t find any meat in them, they still have a hearty, burger-like texture with a ton of flavor that you are sure to love. You can top these burgers with all your fave burger toppings–cheese, avocado, tomato… the possibilities are endless!

The BEST black bean burgers you will ever have! Promise. These burgers are a great addition to your next cookout... even if you aren't a vegetarian. (And let me say... your vegetarian friends will love you for having these on hand too!) #CookoutWeek 2017

One of my favorite aspects of these burgers is that they freeze SO WELL. I’m not just saying that; they really do. I love making a double batch of these burgers on the weekend. After eating one fresh, I like to freeze the rest on a baking sheet for a few hours, then transfer them to a zip-top bag. They can last up to two months in the freezer and still taste great, but I usually find that we’ve eaten them much faster than that! They’re wonderful to pull out of the freezer for a quick weekday lunch. Even if I don’t have burger buns on hand, they’re great with a lettuce wrap, on a salad, or even just eaten alone. Plus, if you have a bag of these in the freezer, you’ll be set when vegetarian friends and family come over for a cookout. There’s nothing worse than realizing you don’t have anything on hand for them to eat… and these black bean burgers taste way better than the frozen kind you can buy at the grocery store. Your vegetarian friends are sure to appreciate you after that… and your meat-eating pals may even be swayed with how tasty these burgers are! 🙂 Enjoy!

Don’t forget to enter the #CookoutWeek 2017 giveaway, happening NOW! Lots of great prizes and an easy entry!

Tell me: what’s your favorite vegetarian dish for a cookout?

Check out some other delicious cookout recipes shared today for #CookoutWeek here!

one year ago: Avalanche Cookies
two years ago: Peach Cobbler Scones

three years ago: Hawaiian Macaroni Salad
four years ago: Double Chocolate Strawberry Shortcakes
five years ago: Cilantro Lime Hummus
six years ago: Rhubarb Muffins

Black Bean Burgers

  • Servings: 6
  • Print

The BEST black bean burgers you will ever have! Promise. These burgers are a great addition to your next cookout... even if you aren't a vegetarian. (And let me say... your vegetarian friends will love you for having these on hand too!) #CookoutWeek 2017

from Bake Your Day

Ingredients:

  • 1/2 cup uncooked quinoa
  • 1 cup vegetable broth (sometimes I use chicken broth instead)
  • 1 teaspoon olive oil
  • 2 medium carrots, finely diced
  • 1/4 cup onion, finely diced
  • 2 cloves garlic, minced
  • 1 1/2 teaspoon paprika
  • 1 1/2 teaspoon cumin
  • 1 teaspoon cinnamon
  • 1 teaspoon oregano
  • 1/2 teaspoon cayenne pepper
  • freshly ground black pepper
  • salt
  • 1 – 15 ounce can black beans, drained and rinsed (about 1 1/2 cups black beans)
  • 3 tablespoons ketchup
  • 1 teaspoon soy sauce (Worcestershire sauce works in a pinch too)
  • 1-2 teaspoons Sriracha
  • 1/2-1 cup Panko breadcrumbs
  • 1 large egg
  • olive oil, for cooking
  • to serve as desired: buns, lettuce, tomato, onions, cheese, avocado, mayonnaise, etc.

Directions:

Prepare quinoa as directed on package, using broth instead of water.

Meanwhile, heat olive oil in a medium skillet over medium heat. Saute carrots and onion until soft, about 7-8 minutes. Add garlic and saute until fragrant, another minute. Remove from heat and stir in spices: paprika, cumin, cinnamon, oregano, and cayenne. Season to taste with black pepper and salt.

In a food processor or large bowl, combine black beans and cooked carrot mixture. Pulse together a few times to break down the black beans. A potato masher is a great tool for this if you don’t have or don’t want to use a food processor. Beans still should have some substance to them, so don’t obliterate them completely.

Stir in ketchup, soy sauce, and Sriracha. Fold in quinoa, 1/2 cup panko, and egg. Mix well to combine. Shape into 1/2 cup patties. If the patties don’t hold together well, gradually add up to another 1/2 cup panko until they do. Place on a plate or baking sheet, then cover and refrigerate for at least 20 minutes or up to 48 hours before cooking.

When ready to cook, heat 2 teaspoons of olive oil in a large skillet set over medium heat. Cook patties for 4-5 minutes per side, until golden brown and heated through.

Serve on a bun or in a lettuce wrap with your favorite burger toppings and enjoy!

Notes:

These burgers freeze so well! Make a batch or two to keep on hand for busy nights, quick lunches, or vegetarian guests at your next cookout.

If you’re spice averse, you may be wary of the cayenne and the Sriracha. You can omit, of course, but they really aren’t spicy at all! Just FYI. 🙂

Appetizers, Recipes

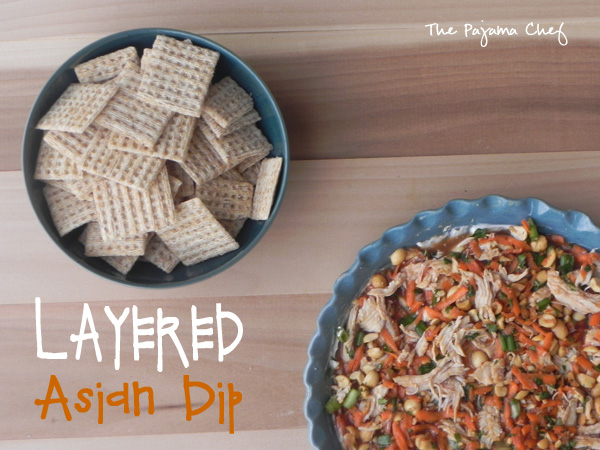
Layered Asian Dip

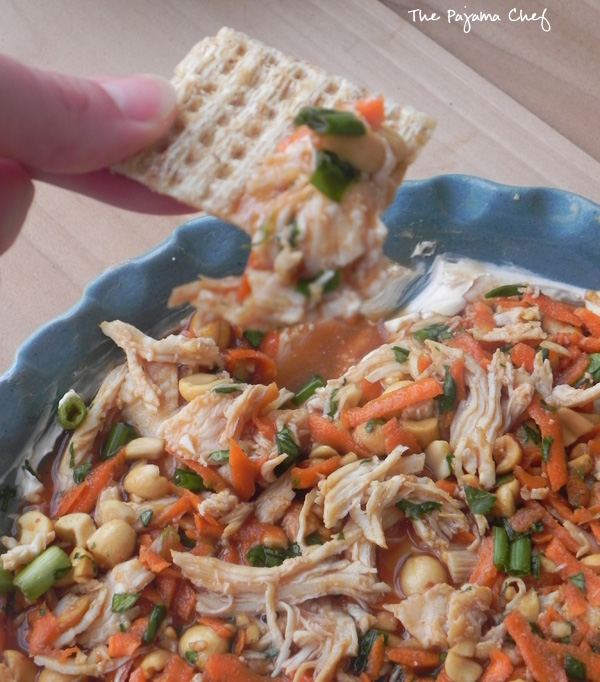
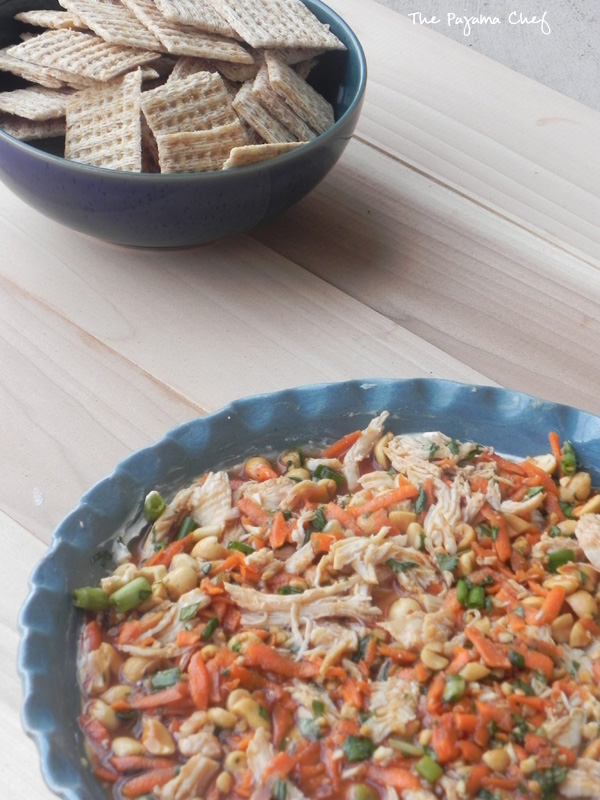
This layered dip is chock full of crunchy vegetables and chicken drenched in a yummy Asian-inspired sauce. The creamy peanut butter base adds a fun twist! Enjoy with crackers at your next party! 

Layered Asian Dip | thepajamachef.com

There’s nothing like a good appetizer to get the party started, right? I have a confession to make: I am terrible at appetizers. Most seem so finicky. If I’m hosting, I can totally make some hot little bites in the oven. But as things have it, in this stage of life, I rarely host [even though I’d love to]. We’re usually tasked with bringing x, y, or z to a gathering…and it’s just a pain to try to transport a hot dish, and sometimes those cute little bites just get gross if they sit for awhile. So cold dips are my go-to appetizers. Hummus, guacamole, salsa, I love them all. But they aren’t very fancy.

Layered Asian Dip | thepajamachef.com

This Layered Asian Dip takes a normal dip up a notch! It’s a play off of Mexican Seven Layer Dip, even though it’s only a three layer dip. But it’s three layers of awesome: a creamy base of peanut butter and cream cheese; a wonderful medley of chicken, carrots, peanuts, cilantro, scallions, and aromatics like ginger and garlic; and last but not least–a slightly sweet, slightly spicy Asian dressing on top. This dressing is really what makes the dip, imo. Sure, chicken and peanut butter are staples of my diet, but the sauce brings everything together in a nice package. It’s tangy and delicious!

Layered Asian Dip | thepajamachef.com

This dip is perfect for a party because you can make all the components ahead of time and chill them in the fridge, then go get ready, and then assemble at the last minute. I love it when things work out that way so I don’t have to worry about the dish losing its beauty while we’re waiting for things to get started. This dip is best enjoyed the day it is made, but the leftovers are still tasty the next day. By the way, you’ll have some extra sauce leftover–it’s perfect for tossing with some plain white rice and cooked veggies [I love those bags of frozen Asian vegetables] for a quick side dish during the week. Enjoy!

one year ago: Grandma’s Banana Nut Bread
two years ago: Jamaican Jerk Chicken & Pineapple Black Bean Rice
four years ago: Butterscotch and Chocolate Yellow Cake

Layered Asian Dip

  • Servings: 8
  • Print

from The Sweets Life

Ingredients:

for sauce

  • 1/4 cup brown sugar, packed
  • 2 teaspoons cornstarch
  • 1 cup water
  • 1/4 cup ketchup
  • 2 tablespoons rice wine or white vinegar
  • 1 tablespoon Worcestershire sauce
  • 3 drops hot sauce [like Sriracha]

for topping

  • 3/4 cup cooked chicken, shredded
  • 1/2 cup shredded carrot
  • 1/4 cup chopped unsalted peanuts
  • 2-3 sliced scallions
  • 1/4 cup chopped fresh cilantro
  • 1 tablespoon grated fresh ginger
  • 1 clove garlic, minced

for base

  • 8 ounces softened cream cheese
  • 2-4 ounces creamy peanut butter [depending on how strong of a peanut butter flavor you like]
  • 2-3 tablespoons milk
  • crackers for serving

Directions:

First, prepare sauce. Whisk brown sugar and cornstarch together in a small saucepan set over medium heat. Pour in water, ketchup, vinegar, Worcestershire, and hot sauce. Cook for 5 minutes or until mixture thickens. Transfer to a small bowl to cool. When cool, cover and refrigerate to further thicken for 30 minutes or up to 24 hours in advance.

Next, stir together all topping ingredients in a bowl. Cover and refrigerate for 2-4 hours.

Just before serving, beat together cream cheese, peanut butter, and just enough milk to make mixture smooth. Spread on the bottom of a 10 inch pie pan or serving dish. Sprinkle topping over cream cheese mixture, then drizzle 1/2 cup sauce [there will be leftovers] on top.

Serve with crackers immediately.

Linked up with: Weekend Potluck.

Chicken, Main Dishes, Recipes

Sweet and Sour Chicken {Repost}

So, I used to post once a month on a blog called Today’s Housewife. Last fall, the group decided together to stop posting due the busyness of life and families and such. Though sad, I enjoyed being part of the group. As of early January, the blog was officially taken down. But I don’t want to lose my recipes, so periodically I will be reposting them on here. Enjoy!

~

this post is originally from October 13, 2011


Sweet and Sour Chicken | The Pajama Chef

Chinese is Ben’s favorite ethnic food, so I’m constantly on the look out for ways I can surprise him with some special dinners at home. First it was Healthy Fried Rice, next it was Sweet and Sour Chicken. Before I tried any of these recipes, I expected them to be really difficult. But you know what? Making Chinese food at home really isn’t that hard. It’s actually pretty simple; all it takes is a bit of effort.

Sweet and Sour Chicken | The Pajama Chef

In almost no active preparation time at all, you can have restaurant-quality Sweet and Sour Chicken on your table for everyone to enjoy. We loved how sweet and tangy this dish was, as well as the freshness and healthiness factors. Because nothing beats the impressiveness of homemade!

Sweet and Sour Chicken [from Mrs. Schwartz’s Kitchen]
click to print

Ingredients:

  • 1-2 pounds boneless skinless chicken breasts, cut into chunks
  • salt and pepper
  • 1 cup cornstarch
  • 2 eggs
  • 2 tablespoons canola oil
  • 1 1/2 cups sugar
  • 1 cup pineapple chunks or tidbits
  • 1 cup ketchup
  • 1/2 cup white vinegar
  • 1/2 cup rice vinegar
  • 3 tablespoons soy sauce
  • 2 cloves garlic, minced
  • 1/2 teaspoon red pepper flakes
  • brown rice, for serving
  • stir fry vegetables, for serving
  • sesame seeds, for topping

Directions:

Preheat oven to 350 degrees.

Heat the oil over medium-high heat in a large skillet.

Put cornstarch in a shallow bowl. Crack eggs into another shallow bowl, and beat slightly with a fork. Season chicken with salt and pepper then dip in cornstarch and egg.

Working in two batches, brown the chicken, tossing every so often so that all sides crisp. Remove chicken to a large baking dish and arrange in a single layer, using a paper towel to degrease if necessary.

In a medium bowl, stir the sugar, pineapple, ketchup, vinegars, soy sauce, garlic, and red pepper together until sugar dissolves and sauce is fully mixed. Taste and adjust seasonings if desired. Then pour half of the sauce over the chicken and toss to fully coat.

Bake the chicken for 60 minutes, turning every 15 minutes. [This would be a good time to start your brown rice, if you haven’t already.]

Meanwhile, pour remaining sauce in a small saucepan and bring to a boil over medium-high heat. Turn heat to low and simmer to reduce, about 20 minutes.

Serve chicken over rice and vegetables and top with additional sauce and sesame seeds.

Yield: 5-6 servings.

Time: 90 minutes [30 minutes active].