Chicken, Main Dishes, Recipes

SRC: Chicken Tinga Tacos

Whoa, it’s been awhile since I’ve done a recipe post! Since before Christmas, in fact. Between Christmas, and my little sister’s wedding[!!!], and a quick trip to Chicago with my parents and Ben for New Years’… I’ve been busy. And got sick. 😦 But now it’s back to real life… and that means plenty of recipes! To start off the new year, it seems fitting to begin with a dose of the Secret Recipe Club! We took a break in December, but I’m so happy to be back in the swing of things. I absolutely love being part of the SRC. It’s a fun way to try new blogs and recipes and be part of a great community. If you’ve missed my past SRC posts, the premise is this: you’re assigned a different member’s blog every month. You visit their blog, choose any recipe you want, then make it and share it on your blog… all while keeping your assignment a secret! Everyone else posts about their secret blog the same day. It’s fabulously fun to try out new blogs. If you have a blog, definitely check it out and consider joining! I highly recommend it.

This month, my assignment was for Holly’s blog, PheMOMenon. Holly is a mom of three, and uses her blog as an outlet to “conquer [her] world, one recipe at a time.” Sounds like a good thing, if you ask me!! I had a hard time deciding which recipe to choose, because it’s no lie to say that everything I looked at sounded so amazing! If I had my act together and made this recipe in December, before I OD’d on sweets, I probably would have made these crepes or this Sugar Plum Puff Pastry. YUM. Definitely pinned.

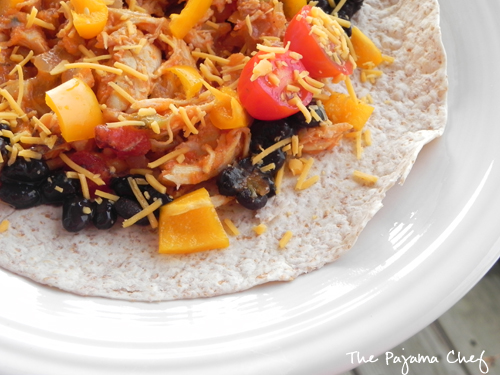
Instead of sweets, I decided to make a flavorful, spicy taco dish as our first home-cooked meal of 2013. Holly’s Chicken Tinga Tacos are absolutely incredible, and so super easy. I had never heard of chicken tinga before, but I had a suspicion that it was something legit, so I turned to the powers of Google to learn that it is a traditional Mexican dish of shredded chicken in a tomato and chili chipotle sauce. The source of that knowledge, Muy Bueno Cookbook, is definitely a site to check out too. But back to Holly.

Chicken Tinga Tacos | The Pajama Chef

Normally, to make a shredded/marinated chicken dish like this, I would throw these ingredients in the crockpot to marinate and cook all day long. In fact, I’ve made many similar Mexican-inspired shredded chicken recipes that way…and they are good. But sometimes the crockpot leaves everything tasting kinda the same, if you know what I mean. Or is that just me? Regardless, there’s just something to be gained by preparing this meal on the stove.

Chicken Tinga Tacos | The Pajama Chef

Instead of all day like a crockpot would take, the whole meal came together in less than an hour, most of which was idle simmer time. The taco meat was smoky, juicy, and pretty much perfect. And while our first-day tacos were super, I must say the leftovers may have been even better, as these flavors got better over time. As a special bonus, I’ll be sharing one of my leftover recipes on Wednesday… so be sure to come back for Mexican Cornbread Pot Pie. It is so good! Enjoy!

Chicken Tinga Tacos

  • Servings: 6-8
  • Print

from PheMOMenon as appearing on Smart Balance’s blogger recipe contest on Facebook

Ingredients:

  • 2 tablespoons butter
  • 1 medium yellow onion, diced
  • 3 cloves garlic, minced
  • 1/4 teaspoon freshly ground black pepper
  • 1 cup chipotle salsa or 2 chipotles in adobo, pureed with a 6 ounce can tomato paste
  • 1 cup low sodium chicken broth
  • 1 1/2 pounds boneless, skinless chicken breasts [Holly used thighs]
  • tortillas
  • lettuce, cheese, sour cream, salsa, pico de gallo, guacamole, etc. for serving as desired

Directions:

Melt butter in a large skillet or dutch oven set over medium heat. Then add onions and garlic, and season with black pepper before cooking until soft, about 5-6 minutes. Next, reduce heat to low and add salsa and chicken broth. Simmer for 10 minutes, then add chicken to the pan.

Spoon salsa mixture completely over the chicken, then cover pan with a lid. Simmer, covered, for 35 minutes or until chicken can be easily shredded with a fork.

Shred the chicken in the sauce with two forks, then simmer for another 5 minutes. Serve in warmed tortillas with toppings of your choice.


Be sure to check out the other fabulous recipes posted today [click below] for this week’s SRC reveal. Have a great day!


This recipe is also linked up with: Weekend Potluck.

Lemon Herb Eggs in Ciabatta | The Pajama Chef
Breakfast, Egg Dishes, Recipes

SRC: Lemon Herb Eggs in Ciabatta

For the month of November, my Secret Recipe Club assignment this month was Aly’s fun and fashionable blog, Cooking in Stilettos. As I say every month, I love being part of the SRC. It’s a fun way to try new blogs and recipes and be part of a great community. If you’ve missed my past SRC posts, the premise is this: you’re assigned a different member’s blog every month. You visit their blog, choose any recipe you want, then make it and share it on your blog… all while keeping your assignment a secret! Everyone else posts about their secret blog the same day. It’s fabulously fun to try out new blogs. If you have a blog, definitely check it out and consider joining! I highly recommend it.

Aly has an amazing collection of recipes on her blog. I had such a hard time just picking one! She is a self-taught cook and draws inspiration for her food from the people and places around her–most notably her grandfather, or as she lovingly called him, her Bampa. I just love Aly’s tribute to him on her blog–I feel the same way about my own grandpa. If I had planned ahead, it would have been fitting to make one of his recipes, but alas–I did not. Instead, I made pretty much the awesomest brunch dish EVER.

Lemon Herb Eggs in Ciabatta | The Pajama ChefThis impressive looking Lemon Herb Eggs in Ciabatta looks complicated, but is in fact quite simple to make. [Just don’t tell anyone!] And you know what? It’s as tasty as it looks [even if it sounds weird].

Despite any preconceived notions you might have about what should go with egg, you should definitely give this recipe a fair shot. It’s the most light and refreshing egg dish I have ever had. And eggs aren’t something I would consider to be heavy… but there’s just something about the lemon-herb combo that just squeals “refreshing!!!”

Lemon Herb Eggs in Ciabatta | The Pajama ChefSince lemon isn’t actually mixed with egg, this dish isn’t quite as bizarre as it sounds. The lemon flavor is baked into the crust, also known as the shell for a snappy herb egg bake. In order to achieve this, the ciabatta shell is brushed with a mixture of herb-infused olive oil, lemon juice, and lemon zest… then toasted, prior to adding the egg-herb-bread filling. This gives the bread maximum flavor for minimum effort… especially if you purchase the bread from a bakery, like I did.

Lemon Herb Eggs in Ciabatta | The Pajama ChefI infused my olive oil with an Italian seasoning that is actually intended for olive oil, you know, those gourmet food shop seasoning containers that you’re supposed to add to olive oil for bread dipping and whatnot? Well, that’s all I’ve used mine for actually. Then, for the herb-in-egg mixture, I used fresh parsley, since that pairs so well with lemon. We all know it’s more than that! Aly used chives, but I couldn’t find any fresh so I improvised.It’s not too often that a dish highlights parsley, and I didn’t want the parsley to feel like it was just a garnish. And here, it is so good.

Lemon Herb Eggs in Ciabatta | The Pajama ChefI just don’t have anything more to say about this dish except that it’s so beautiful and stunning and EASY that you should make it this weekend and impress everyone you know. Even those of the feline variety. I was just trying to impress Ben on a recent Saturday morning, but the kitty wanted in on the action too.

Lemon Herb Eggs in Ciabatta | The Pajama Chef

Lemon Herb Eggs in Ciabatta

  • Servings: 4-6
  • Print

from Cooking in Stilettos

Ingredients:

  • 1 loaf fresh ciabatta bread
  • 2 tablespoons herb-infused olive oil [I just mixed a bit of Italian seasoning with some good extra virgin olive oil]
  • 1 teaspoon lemon juice
  • zest of half a lemon
  • 4 large eggs
  • 1/4 cup parsley, chopped
  • 1/4 cup grated Parmesan
  • 1/2 teaspoon freshly ground black pepper
  • 1 cup milk

Directions:

Preheat oven to 350 degrees.

Using a paring knife, hollow out the loaf of bread. Reserve for later. Then, mix together olive oil, lemon juice, and lemon zest. Brush on inside of ciabatta, then place on a baking sheet. Toast for 10 minutes.

Meanwhile, cut reserved bread pieces into 1 inch pieces. Next, whisk the eggs, then stir in parsley, Parmesan, pepper, and milk. Add the bread cubes and stir gently to combine.

Remove toasted bread from oven, then pour in egg mixture.

Return to oven and bake for 35-45 minutes or until eggs are fully cooked. Cut into pieces and serve immediately.


Notes: This is best fresh, but leftovers aren’t bad. Just toast in the oven to reheat. Also, original baking time was listed as 35-40 minutes, but mine definitely took 45. If it starts to brown too much on top while baking, just cover with foil.

Be sure to check out the other fabulous recipes posted today [click below] for this week’s SRC reveal. Have a great day!


Breads, Recipes

SRC: Maple Cornmeal Drop Biscuits

My Secret Recipe Club assignment this month was Katrina’s fabulous blog, Baking and Boys! As I say every month, I love being part of the SRC. It’s a fun way to try new blogs and recipes and be part of a great community. If you’ve missed my past SRC posts, the premise is this: you’re assigned a different member’s blog every month. You visit their blog, choose any recipe you want, then make it and share it on your blog… all while keeping your assignment a secret! Everyone else posts about their secret blog the same day. It’s fabulously fun to try out new blogs. If you have a blog, definitely check it out and consider joining! I highly recommend it.

Katrina is a devoted wife and mom, always involved with the lives and activities of her husband and their four[!!!!] sons. I can’t imagine how she finds time to bake and blog so many goodies all the time, but she does. I guess it’s because you always make time for what’s important to you. And feeding your family with delicious food is typically a high priority for many, including Katrina.

When I was perusing Katrina’s blog for something to serve with some potato soup I was making for a dinner with friends, I came across this story on her blog about how she made these fabulous maple cornmeal drop biscuits only to have them meet a tragic ending in her oven. You should check out the story, it’s really sad and totally something I would do. So in honor of that event, I thought I would recreate these maple cornmeal drop biscuits. The recipe technically wasn’t on Katrina’s blog since it was made as part of the Tuesdays with Dorie blog group. I thought long and hard whether this was something that I should make for a SRC post in that case, but decided the story was just too good to not share. So I hope that is alright with the SRC-powers-that-be… because these maple cornmeal drop biscuits should definitely get some attention.

They are flaky, sweet, and so easy to make. Instead of regular yellow cornmeal, I used a stoneground local blue cornmeal that I got at our farmer’s market recently. It tastes really good, but I suspect that’s why my biscuits don’t look quite so pretty–browned blue turns a bit of a funny color. Maybe it’s my oven. Anyone have any tips for baking with blue cornmeal? Regardless of their appearance, these maple cornmeal drop biscuits will definitely be added to my rotation of quick breads to serve with soup. We ate them plain, dipped in soup [butternut squash apple and potato], and think they would have been great with pumpkin butter, but I forgot that at home so it wasn’t an option. Sad day.

Thankfully, these biscuits are a snap to make, so I can taste test them with pumpkin butter very, very soon. Hope you enjoy them as much as we did! And Katrina… thanks for the recipe. Hope you make them again soon!

Maple Cornmeal Drop Biscuits

  • Servings: 12
  • Print

from Baking with Boys! via A Little Something…..Sweet!

Ingredients:

  • 1 cup all-purpose flour
  • 1 cup yellow cornmeal, preferably stone-ground [I used blue]
  • 1 tablespoon baking powder
  • 1/4 teaspoon baking soda
  • 6 tablespoons cold, unsalted butter, cut into 12 pieces
  • 1/2 cup milk [I used skim]
  • 1/4 cup pure maple syrup

Directions:

Preheat oven to 425 degrees. Prepare a large baking sheet with parchment paper or a silpat.

In a large bowl, stir together flour, cornmeal, baking powder, and baking soda. Add butter and toss to coat using your fingers or a pastry blender until butter is mixed in well in pieces no bigger than a pea. Pour in milk and maple syrup and stir together gently until a very soft dough forms.

Spoon dough into 12 mounds on prepared baking sheet about 2 inches apart. Bake for 13-15 minutes [mine were done in about 13, but original recipe said 15] or until golden brown. Serve warm.

Be sure to check out the other fabulous recipes posted today (click below) for this week’s SRC reveal. Have a great day!


Desserts, Other, Recipes

SRC: Chocolate Mousse

First Monday in September! Even though it’s Labor Day, it’s still a Secret Recipe Club kind of day. 🙂 If you’ve missed past SRC posts, the premise is this: you’re assigned a different member’s blog every month. You visit their blog, choose any recipe you want, then make it and share it on your blog. Everyone else posts about their secret blog the same day. It’s fabulously fun to try out new blogs. If you have a blog, definitely check it out and consider joining! I highly recommend it.

This month I was assigned Veggie Grettie. This blog is written by Gretchen, who believes in food as the ultimate medicine. You can read her story here, and I suggest you do because her story is pretty inspiring, even though I don’t personally eat a completely plant-based or gluten-free diet. Gretchen has many awesome recipes, reviews, and educational posts on her site… it was so fun to peruse. Anyways, I must admit that I adapted the recipe I made from Gretchen’s blog… but simply because I already had regular milk, cocoa, chocolate, and sweetener at home and wanted to make this recipe right away. But do click over to the original to see her recommendations for ingredients. However, do not despair because [in my opinion] I did not change the biggest component of all from this vegan chocolate mousse recipe: TOFU!

Yes, that’s right. That smooth, creamy, chocolately mousse isn’t made with heavy cream or eggs, but rather a block of extra firm tofu. Whaaaat? And I promise you that you cannot taste any tofu at all. There is no tofu-y taste, no tofu-y texture, just a luscious chocolate dessert that can’t be beat. It’s fabulous!

Ben was a doubter when I told him about it. He thought it was weird, but since he’s such a great guy, he always is willing to try anything I make. 🙂 As I was dishing up this dessert last week, here are some of the names Ben came up with to call this dish rather than Chocolate Mousse:

  1. tofudding
  2. tofousse
  3. moufu

Which do you prefer? I actually like tofousse. Tofudding creeps me out, and moufu sounds like a character from a Disney movie.

But after a bite or two, here’s what I had on my hands…

He loved it! And when asked if he would have suspected tofu was in this dish had he not known, this was his reply: “when you put a chocolate dessert in front of me, the first thing that comes to mind is not tofu.” I think that about sums it up. I wish I had done a fake out test on him, but sadly I didn’t. However, you can! Because really, who would guess that this was a big bowl of anything but chocolate mousse?

It’s rich and creamy, while being fairly healthy and even vegan [if you want]. I’m so glad I got the chance to try this recipe from Gretchen… it is amazing and I hope you try it too! 🙂

Chocolate Mousse [adapted from Veggie Grettie]
click to print

Ingredients:

  • 8 ounces good-quality dark chocolate, chopped roughly
  • 14 ounce package of extra firm tofu
  • 1 1/2 to 2 cups skim milk
  • 6 tablespoons cocoa powder
  • 6 tablespoons sweetener [I used half honey, half sugar]

Directions:

Melt chocolate in a double boiler over medium-low heat, stirring occasionally.

Meanwhile, combine tofu, 1 1/2 cups milk, cocoa powder, and sweetener in a food processor or high powdered blender [like a Vitamix] and blend until very, very smooth. Be sure to stop and scrape down the sides as needed.

After chocolate has melted, stream in with other ingredients, and continue to blend until smooth. Mixture will be warm and not quite the consistency of pudding. If it seems too thick, add up to another 1/2 cup of milk.

Place in a covered container and refrigerate at least several hours to thicken completely.

When ready to serve, spoon or pipe into individual bowls. Top with berries, whipped cream, spinkles, or my personal favorite, Trader Joe’s Sugar, Chocolate, and Coffee Bean Grinder.

Time: 15 minutes preparation, plus time to chill.

Yield: 4 1/2 cups.

Be sure to check out other posts from today’s SRC reveal. Happy Labor Day!

Recipes, Sides, Vegetables

SRC: Pesto Potato Salad

Another Secret Recipe Club Monday! If you’ve missed past SRC posts, the premise is this: you’re assigned a different member’s blog every month. You visit their blog, choose any recipe you want, then make it and share it on your blog. Everyone else posts about their secret blog the same day. It’s fabulously fun to try out new blogs. If you have a blog, definitely check it out and consider joining! I highly recommend it.

For the month of August, I was assigned Cooking Rookie, who blogs over at Cook Book of Trial and Error. This blog is full of enticing recipes and beautiful photography so definitely check it out if you have a chance. I had a hard time deciding what recipe to try, but when I saw this scrumptious Pesto Potato Salad, I was sold. My herbs on the balcony are growing out of control, and this seemed like a delightful way to use some of them up. And let me tell you… it was as delicious as it was delightful!

Cooking Rookie’s original pesto was composed of cilantro, walnut, and lemon… but I decided to use some of my abundant pineapple sage instead of cilantro. I kept everything else the same, though… including the unique addition of plain yogurt to make this pesto potato salad both creamy and fresh. I usually make my potato salad with mayo, but might have to rethink that, because plain yogurt definitely produces a refreshing tang like mayo while being a little healthier. This isn’t to say in my normal potato salad I’ll replace the mayo entirely, but I can see a little half-and-half combo going on.

I was happy that I doubled the original recipe [which is reflected below], because Ben and I devoured this stuff in about 0.2 seconds. not quite a Phelps-inspired 1/100ths of a second but pretty darn close! [Yes, we’ve been watching the Olympics non-stop here… have you?] This Pesto Potato Salad is light, lemony fresh, and creamy. It was a fabulous choice for the August edition of the Secret Recipe Club, if I do say so myself, and I will be forever grateful to Cooking Rookie for the inspiration! I’ll definitely have to try the cilantro version one day. 🙂

Pesto Potato Salad [adapted from Cook Book of Trial and Error]
click to print

Ingredients:

  • 2 pounds new potatoes, chopped in quarters/eighths
  • 1 1/2 cups loosely chopped sage
  • 1/4 cup chopped walnuts
  • zest and juice of 1/2 a lemon
  • 3 cloves garlic, peeled
  • 6 ounces plain yogurt
  • freshly ground black pepper

Directions:

Bring a large pot of water to a boil and then add potatoes. Cook for about 20 minutes, or until potatoes can be easily pierced with a fork.

Meanwhile, place sage, walnuts, lemon zest and juice [or 1/2 a lemon if you’re lazy like me], and garlic in a food processor. Pulse until everything is well combined, then add yogurt, as well as freshly ground black pepper to taste.

After potatoes are prepared, place in a bowl. Toss pesto with potatoes and serve warm or cold.

Time: 30 minutes.

Yield: 4-6 servings.

Enjoy your day by checking out other great SRC recipes! 🙂 I know I will be!