Appetizers, Main Dishes, Recipes, Sauces

Guacamole Salsa

I found the recipe for Guacamole Salsa through Pinterest a long time ago. And I don’t know why I waited so long to make it. Maybe it’s because regular guac is so phenomenal? Idk. But what I do know is that this salsa is pretty much the best thing that has ever happened to me. Well, maybe that’s a wee bit of an exaggeration–knowing Jesus and meeting/loving/marrying Ben rank a little higher up there… but this is a close third. It’s just. so. good!!!

Guacamole Salsa | The Pajama Chef

It’s like guacamole meets salsa [duh] made with tart, bright tomatillos, avocado, and cilantro, as well as a bunch of other fresh veggies. It has the consistency of salsa with the creaminess of guacamole–the best of both worlds… am I right? It’s fresh, garlicky, and a bit spicy… but you can tone it up/down with the jalapeno as desired–so don’t shy away if spice isn’t your thing.

Guacamole Salsa | The Pajama Chef

Basically… this salsa is the best thing ever. Once you make a batch, you’ll always keep a jar in the fridge. You’ll be pouring it on absolutely everything, from wraps to burrito bowls to eggs to salads… that is, if you don’t eat it all with a spoon!

Guacamole Salsa | The Pajama Chef

And be sure to come back on Wednesday for the enchiladas I made with this salsa. OH my goodness, if those aren’t reason enough to make some of this salsa, I don’t know what is! Enjoy your day! 🙂

Guacamole Salsa [from Frosted Bake Shop]

click to print

Ingredients:

  • 16 ounces tomatillos, husks removed and washed
  • 1 jalapeno pepper, washed and deseeded [if desired]
  • 1 avocado
  • 1 thick slice of onion
  • 2 garlic cloves
  • 1/3 bunch cilantro
  • 2 tablespoons lime juice
  • salt
  • crushed red pepper

Directions:

Place tomatillos in bowl of a food processor or blender. Pulse to puree until smooth. Then add jalapeno, avocado, onion, garlic, cilantro, and lime juice. Pulse until smooth, then add salt and crushed red pepper to taste.

Store covered in the refrigerator for up to 1 week.

Time: 5 minutes.

Yield: 4 cups.

Linked up with Weekend Potluck.

Main Dishes, Pork, Quinoa, Recipes, Sides, Vegetables

Pork Chops with Quinoa, Kale, and Blood Orange

I’ll be totally honest: before this spring, I had never tasted a blood orange. Of course I’d heard them hyped up online and in food mags, but for some reason had never had them in real life. Crazy, huh? So I picked up some during the same shopping trip where I found some majorly discounted pork chops nearing their expiration date [no problemo, just throw them in the freezer]. I came home and this dinner promptly appeared on our plates. Cool, huh?

Pork Chops with Quinoa, Kale, and Blood Orange | The Pajama Chef

Well, it wasn’t QUITE that simple. I had to mix some things up and do a little work, but other than that, this dinner was a cinch to throw together. And quite tasty too. So after we devoured it, I quickly wrote down what I did so I could share it here with you!

Pork Chops with Quinoa, Kale, and Blood Orange | The Pajama Chef

I’m not sure what the best part of this dinner was: the sweet, garlicky, vinegary pork chop? The tender sauteed kale? The nutty ‘n citrusy quinoa? I don’t know, but what I do know was that each bite was just so darn good! And it’s pretty fabulous that this dinner comes together in about 30 minutes. You gotta try it! If you don’t get around to til after blood orange season has passed, then try it with regular navel oranges, or grapefruit, or even clementines. The more I think about it, the citrusy freshness was definitely my favorite part. Enjoy! 🙂

Pork Chops with Quinoa, Kale, and Blood Orange [a The Pajama Chef original]
click to print

Ingredients:

  • 2 pork chops
  • 2 tablespoons extra virgin olive oil
  • 1 tablespoon balsamic vinegar
  • 2 cloves garlic, minced
  • pinch crushed red pepper flakes
  • 1/2 cup quinoa, rinsed
  • 1 blood orange: zest all of it, juice half of it, and slice the other half of it
  • 1/2 cup walnuts
  • 1/2 bunch kale, washed, dried, stems removed, and chopped
  • freshly ground black pepper
  • salt
  • garlic powder

Directions:

Place pork chops in a shallow bowl. Whisk together oil, vinegar, garlic, red pepper, and half the blood orange zest. Pour over pork chops and marinate for 10 minutes as you start preparations for the quinoa and walnuts.

Prepare quinoa according to package directions–but instead of just using 1 cup water, use juice of 1/2 the orange and make up the difference with water. Also add the remaining half of the blood orange zest.

Meanwhile, toast the walnuts in a small skillet set over medium heat. Cook for 7-8 minutes until fragrant, stirring occasionally. When toasted, chop walnuts.

Now, heat a large skillet over medium heat. Add pork chops and marinade to the pan and saute for 4-5 minutes per side until cooked through. [Don’t forget to watch the walnuts!] Remove pork chops from pan to a plate; cover to keep warm.

Add kale to hot skillet, stir to coat with pan juices. Saute until kale is tender, and season with pepper, salt, and garlic powder as desired.

Serve pork chops on top of kale and quinoa, dressing with pan juices, chopped walnuts, and blood orange slices.

Time: 30 minutes.

Yield: 2 servings.

Linked up with: Weekend Potluck.

Main Dishes, Pasta, Recipes

Baked Pizza Pasta

So, when I made this awesome Baked Pizza Pasta on Sunday, this was my view outside:

Snowy Day | The Pajama Chef

Snowy Day | The Pajama Chef

So, so gross. I don’t like this second winter thing. But it certainly was a great backdrop for this comfy, cozy baked pasta dish, don’t ya think? And even now, when the forecast for today is in the 50s, I’d still eat this. It just might even be my lunch!

Baked Pizza Pasta | The Pajama Chef

I know there are a million recipes out there for pizza pastas, but since I really think it’s the sauce that makes a pizza, I decided to concentrate on the sauce and let the rest come to me. Instead of using a bottled spaghetti sauce, I whipped up a quick and easy pantry pasta sauce out of canned crushed tomatoes, tomato paste, and load of herbs and seasonings. Feel free to add and subtract from my choices as you see fit–this is very adaptable. I’ve made many homemade pasta and pizza sauces, and find that we like using dried herbs instead of fresh here, but again, do what suits you. Then, I tossed in some hot Italian sausage, salty pepperoni [Ben’s fav!], some bell peppers [that I LOVE!], and a little onion. Add in curly rotini pasta and lots of mozzarella cheese, and you have yourself one heck of a pasta dinner! Very adaptable, very forgiving, very delicious.

Baked Pizza Pasta | The Pajama Chef

We’ve been eating this all week long, so I can testify to the fact that it heats up beautifully and even tastes better the next [and the next next next next] day. Yum-o! Next time I make this, I might increase the amount of sauce [or use a little less pasta], so keep that in mind if you wanna make this saucier, but really, we thought this was perfect as is. Fresh and flavorful like pizza, just in a more comfort food friendly form. Enjoy!

P.S. You have my permission to serve this at Easter dinner. I totally think that would be great. 🙂

Baked Pizza Pasta [TPC original]
click to print

Ingredients:

  • 28 ounce can crushed tomatoes
  • 6 ounce can tomato paste
  • 1 tablespoon balsamic vinegar
  • 1 tablespoon extra virgin olive oil
  • 1 teaspoon dried garlic
  • 1 teaspoon dried onion
  • 1 teaspoon dried marjoram
  • 1 teaspoon dried parsley
  • 1 teaspoon dried basil
  • 1/2 teaspoon dried sage
  • 1/2 teaspoon dried oregano
  • 1/4 teaspoon crushed red pepper
  • 1 pound rotini
  • 8 ounces hot Italian sausage
  • 1 medium onion, diced
  • 4 ounces pepperoni [reserve 5-10 slices for topping]
  • 1 cup diced bell peppers [I used red, yellow, and orange]
  • 8 ounces mozzarella cheese, shredded [reserve about 2 ounces for topping]

Directions:

Preheat oven to 350 degrees, then begin by bringing a large pot of water to boil to cook the pasta.

In a saucepan set over medium heat, combine crushed tomatoes, tomato paste, vinegar, and oil with all dried herbs and seasonings. Stir sauce occasionally and heat thoroughly.

Meanwhile, begin browning the sausage in a small skillet, breaking up with a wooden spoon as it cooks. When sausage is fully cooked, remove to a plate and use a paper towel to blot up some of the grease from the pan. Add onions to the hot skillet and cook over medium-low heat about 7 minutes or until soft.

When pasta water is boiling, add rotini and cook to al dente. Drain and return to pan, then add sauce, sausage, onion, pepperoni [minus reserved pepperoni], peppers, and about 6 ounces shredded cheese. Stir together then transfer to a 9×13 baking dish. Top with reserved cheese and pepperoni.

Bake for 20 minutes or until hot.

Time: 50 minutes.

Yield: 10-12 servings.

Linked up with: Weekend Potluck.

Chicken, Main Dishes, Recipes

Sweet and Sour Chicken {Repost}

So, I used to post once a month on a blog called Today’s Housewife. Last fall, the group decided together to stop posting due the busyness of life and families and such. Though sad, I enjoyed being part of the group. As of early January, the blog was officially taken down. But I don’t want to lose my recipes, so periodically I will be reposting them on here. Enjoy!

~

this post is originally from October 13, 2011


Sweet and Sour Chicken | The Pajama Chef

Chinese is Ben’s favorite ethnic food, so I’m constantly on the look out for ways I can surprise him with some special dinners at home. First it was Healthy Fried Rice, next it was Sweet and Sour Chicken. Before I tried any of these recipes, I expected them to be really difficult. But you know what? Making Chinese food at home really isn’t that hard. It’s actually pretty simple; all it takes is a bit of effort.

Sweet and Sour Chicken | The Pajama Chef

In almost no active preparation time at all, you can have restaurant-quality Sweet and Sour Chicken on your table for everyone to enjoy. We loved how sweet and tangy this dish was, as well as the freshness and healthiness factors. Because nothing beats the impressiveness of homemade!

Sweet and Sour Chicken [from Mrs. Schwartz’s Kitchen]
click to print

Ingredients:

  • 1-2 pounds boneless skinless chicken breasts, cut into chunks
  • salt and pepper
  • 1 cup cornstarch
  • 2 eggs
  • 2 tablespoons canola oil
  • 1 1/2 cups sugar
  • 1 cup pineapple chunks or tidbits
  • 1 cup ketchup
  • 1/2 cup white vinegar
  • 1/2 cup rice vinegar
  • 3 tablespoons soy sauce
  • 2 cloves garlic, minced
  • 1/2 teaspoon red pepper flakes
  • brown rice, for serving
  • stir fry vegetables, for serving
  • sesame seeds, for topping

Directions:

Preheat oven to 350 degrees.

Heat the oil over medium-high heat in a large skillet.

Put cornstarch in a shallow bowl. Crack eggs into another shallow bowl, and beat slightly with a fork. Season chicken with salt and pepper then dip in cornstarch and egg.

Working in two batches, brown the chicken, tossing every so often so that all sides crisp. Remove chicken to a large baking dish and arrange in a single layer, using a paper towel to degrease if necessary.

In a medium bowl, stir the sugar, pineapple, ketchup, vinegars, soy sauce, garlic, and red pepper together until sugar dissolves and sauce is fully mixed. Taste and adjust seasonings if desired. Then pour half of the sauce over the chicken and toss to fully coat.

Bake the chicken for 60 minutes, turning every 15 minutes. [This would be a good time to start your brown rice, if you haven’t already.]

Meanwhile, pour remaining sauce in a small saucepan and bring to a boil over medium-high heat. Turn heat to low and simmer to reduce, about 20 minutes.

Serve chicken over rice and vegetables and top with additional sauce and sesame seeds.

Yield: 5-6 servings.

Time: 90 minutes [30 minutes active].


Main Dishes, Recipes, Salads, Sides, Vegetables

Roasted Chickpea, Carrot, & Radish Salad with Lemon-Dijon Dressing

Last week was my spring break, and Ben and I took a quick four-day/three-night trip down to Cumberland Gap, TN.

Cumberland Gap Trip | The Pajama Chef

It’s just a short five hour drive from Bloomington, and if you’re not familiar with this area, three states come together in the park–Tennessee, Virginia, and Kentucky. We had never been before but had a blast. Even though winter is still lingering, hiking up in the woods and trails was just beautiful. The toughest hike was a 7 mile round trip hike up to White Rocks, a site that was a landmark to pioneers making the westward trek demonstrating that the Cumberland Gap pass was just a day’s walk ahead. Up top in the White Rocks area it was frosty, snowy, and terribly cold. I was so glad I chose to wear my vest instead of leaving it in the car!!

Cumberland Gap Trip | The Pajama Chef

Aside from hiking, we had fun just hanging out together… reading, relaxing, and exploring a few of the nearby towns. We stayed at the Olde Mille Inn Bed & Breakfast, which I highly recommend if you’re ever in the area. It is so cute, and even though it was built in the 1800s, everything was very modern and comfortable inside. I never wanted to leave our room! It was so nice, and the breakfast everyday was amazing. Upside down pancakes, sausage gravy & biscuits, french toast, and the best steel cut oats I have ever had! We were the youngest guests by a longshot [at least 30 years] but breakfasts were served together, and it was really fun to chat with the other guests. Can I just say that I love southern accents? 🙂

Cumberland Gap Trip | The Pajama Chef

We ate lunch everyday at this adorable cottage turned coffeshop–Gap Creek Coffee. My favorite drink was their Peanut Butter Cup. PB in coffee sounds a lil weird, but you can bet I’ll be looking for that on coffeshop menus in the future. Our dinners were nothing compared to the other meals of the day, but we did enjoy some good Tennessee BBQ! This area of the country definitely wasn’t gourmet restaurant central, but the area’s natural beauty sure made up for it!! Be sure to visit Cumberland Gap if you can! We’d love to go back someday.

Cumberland Gap Trip | The Pajama Chef

Before we left, I made this wonderful salad as an excuse to use up as much of my produce as I could before going out of town. But seriously, you shouldn’t wait til you need to use things up… adding hot roasted, crisp veggies and chickpeas on cold salad greens is my new favorite thing!

Roasted Chickpea, Carrot, & Radish Salad with Lemon-Dijon Dressing | The Pajama Chef

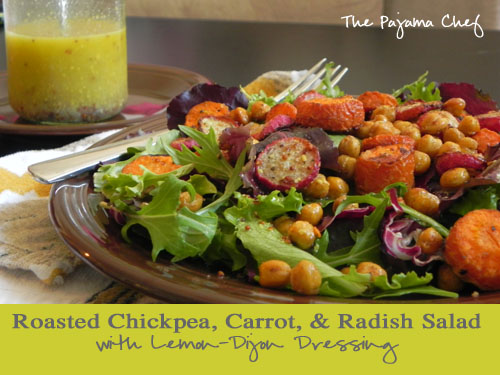
The contrasting temperatures are just perfect! I didn’t really measure the seasonings used to roast the chickpeas, carrots, and radishes but just used a little cumin, garlic powder, black pepper, ginger, and allspice to make a spicy-sweet spice mixture to rub on with EVOO.

Roasted Chickpea, Carrot, & Radish Salad with Lemon-Dijon Dressing | The Pajama Chef

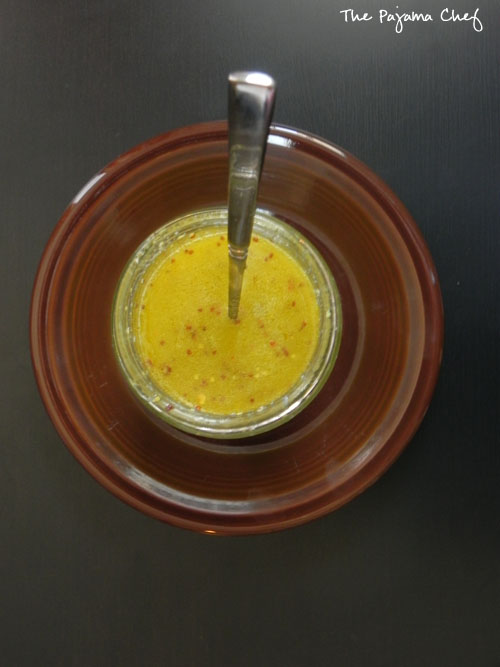
The dressing is a very basic lemon-olive oil-dijon mustard mixture, which paired so well with the light greens and crispy toppings. I thought about adding some vinegar to make more of a vinaigrette, but decided against it. You certainly could if you wanted, though–I just liked the tartness of the lemony dressing with the vinegary tang.

Roasted Chickpea, Carrot, & Radish Salad with Lemon-Dijon Dressing | The Pajama Chef

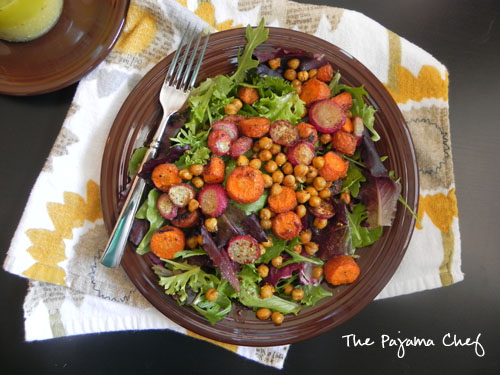
This is just a great salad! I meant to add some cheese, nuts, or avocado as my inspiration recipe suggested… but I forgot about the cheese and nuts after the roasted veggies came out of the oven, and my avocado was nasty inside. Sad day. But the good news is that none of those things are needed for this awesome salad. It’s a crunchy, hearty, flavorful salad that I am sure you will just adore!! Enjoy! 🙂

Roasted Chickpea, Carrot, & Radish Salad with Lemon-Dijon Dressing | The Pajama Chef

Roasted Chickpea, Carrot, & Radish Salad with Lemon-Dijon Dressing [adapted from Baker by Nature]
click to print

Ingredients:

  • 1 15 ounce can chickpeas, rinsed, drained, and patted dry
  • 3 large carrots, scrubbed and chopped into 2-inch pieces
  • 8 radishes, scrubbed and sliced into thirds
  • 3 tablespoons extra virgin olive oil
  • cumin
  • garlic powder
  • freshly ground black pepper
  • ginger
  • allspice
  • baby spring mix

for Lemon-Dijon Dressing

  • 1/2 cup freshly squeezed lemon juice
  • 1/4 cup extra virgin olive oil
  • 1 tablespoon whole grain Dijon mustard
  • 1/2 teaspoon garlic powder
  • crushed red pepper

for topping, optional

  • avocado
  • feta or parmesan cheese
  • nuts

Directions:

Preheat oven to 400 degrees. On a large baking sheet, combine chickpeas, carrots, and radishes. Pour olive oil over top, then season with cumin, garlic, black pepper, ginger, and allspice. I didn’t measure these, but was heavy on the cumin, garlic, and black pepper, and a little lighter on ginger and allspice. Use your hands to mix oil and seasoning on chickpeas, carrots, and radishes. Bake for 30 minutes, turning once or twice.

Meanwhile, make the dressing. Whisk lemon juice, oil, mustard, and garlic powder together in a bowl or shake together in a jar. Season to taste with crushed red pepper.

After everything is roasted, combine baby spring mix with roasted chickpeas, carrots, and radishes as desired. Drizzle with Lemon-Dijon Dressing, and top with feta or parmesan cheese, nuts, and avocado if desired. Serve immediately.

Time: 40 minutes [10 minutes active].

Yield: 2 large salads or 4 side salads.

Linked up with: Weekend Potluck.