30 Before 30, Breakfast, Pastries, Recipes

Apple Fritters

Apple fritters at home. Easy, no fuss, and absolutely amazing! 

Apple Fritters | thepajamachef.com

I LOVE apple fritters. Absolutely love them. When they’re among my doughnut choices, I’ll almost always take one. Cake doughnuts with chocolate glaze and sprinkles are a close second, as are those fake-blueberry doughnuts. [Doughnuts are so yum, doncha think?] I’m not sure what it is about apple fritters that I adore the most–probably those soft pieces of sweet fall apples stuffed inside. Or the combination of soft, pillowy doughnut with a crunchy, spiced glaze. Mmmm!

Apple Fritters | thepajamachef.com

Since I love apple fritters so much, I decided to put them on my 30 before 30 list. I shy away from making doughnuts at home because using my baked doughnut pan is such a pain and frying scares me. But growing older means getting over fears, so I decided that I had to fry these babies at home. Because apple fritters equal yum. I made them the night I got home from a fall trip to Hilton Head Island with my family last month. Weird, I know. I mean, who doesn’t make doughnuts after an eight hour drive?!? 🙂 Well, I had to, because they were my payment to my sister and brother-in-law for driving me back to Nashville after Ben had to leave early to get back to school.

Apple Fritters | thepajamachef.com

Well, I’m really glad I faced my fears because guess what! Frying isn’t as hard as it seems. It’s kinda messy and not that great for you, so I don’t think I’ll be doing it alllll the time, but once in awhile it’s fun. You just have to go slowly and carefully to avoid scalding yourself with the hot oil. Other than that, no problem. These fritters are so darn good and so easy that you’ll want to make them every weekend.

Apple Fritters | thepajamachef.com

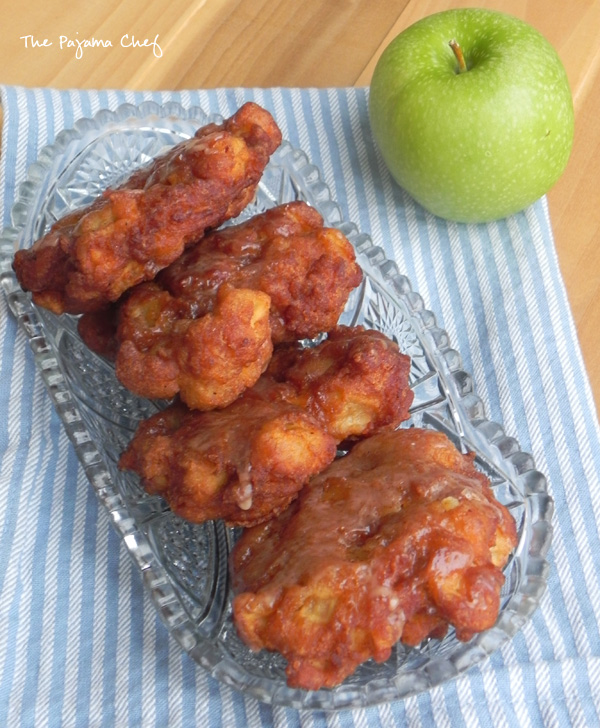
The fritters are extra apple-y since they’re made with apple cider AND fresh apples. And extra spicy [not spicy-hot but warm spicy with cinnamon/nutmeg/cloves alongside the aforementioned apple cider]. But that’s just in the fritter! The spiced apple glaze is simple [powdered sugar + apple cider + spices] and absolutely wonderful! I think I’ll be using this glaze on muffins and cakes and everything else imaginable from now on. It is just the perfect compliment to the fluffy doughnut. Each bite of these fritters is better than the last. You know you can just get over some sweets after the first few bites? Like it’s just too much after a bit? Well, these fritters are not that. Each bite is better than the last. I hope you love these fritters as much as we did. They’re relatively quick to make and don’t require the oven, so wouldn’t they be perfect for Thanksgiving breakfast? Enjoy!

one year ago: Chipotle-Cilantro Mashed Potatoes
two years ago: Pumpkin Oatmeal Cookies
three years ago: Dilled Carrots
four years ago: Apple City BBQ Sauce

Apple Fritters

  • Servings: 12
  • Print

from Cook’s Country via We Are Not Martha

Ingredients:

  • 2 granny smith apples, peeled, cored, + chopped into 1/4-inch pieces
  • 2 cups all purpose flour
  • 1/3 cup sugar
  • 1 tablespoons baking powder
  • pinch salt
  • 1 teaspoon  ground cinnamon
  • 1/4 teaspoon ground nutmeg
  • pinch ground cloves
  • 3/4 cup apple cider
  • 2 large eggs, lightly beaten
  • 2 tablespoons unsalted butter, melted
  • 1 teaspoon vanilla
  • 3 cups oil [I used canola, vegetable or peanut are also recommended]

for glaze

  • 2 cups powdered sugar
  • 1/4 cup apple cider
  • 1/2 teaspoon ground cinnamon
  • 1/4 teaspoon ground nutmeg

Directions:

Place chopped apples in a single layer on a clean tea towel. Top with another clean tea towel and pat dry, gently rolling to dry all sides of the apples. Remove top towel and pat dry with a paper towel to make sure you got it all. Alternatively, you can use paper towels on a baking sheet.

Next, whisk together flour, sugar, baking powder, salt, cinnamon, nutmeg, and cloves. In large measuring cup, whisk together cider, eggs, butter, and vanilla. Add apples to the flour mixture and toss together. Then gradually pour cider mixture over apples, stirring to form a thick batter.

In a dutch oven, heat oil over medium-high heat until it reaches a temperature of 350 degrees F. I think you could also use a deep skillet but you’d need additional oil to fill it up. A deep skillet would allow you to cook more at once, but the dutch oven approach works well too.

When oil is hot, scoop batter by the 1/3 cup-fulls into the hot oil. Immediately use a wooden spoon to press and flatten the batter. I fried 3 fritters at once; if I had used a skillet I think I could have done 4-5 at once. Fry for 2-3 minutes per side, being careful not to let the oil temperature go above 350 or your fritters will burn. Ask me how I know. :-/ Adjust heat as necessary to keep temperature between 325-350.

When fritters are golden brown, remove with a slotted spoon or tongs and allow to cool on a wire rack set over a rimmed baking sheet to catch dripping grease. Repeat until batter is finished. Recipe should yield 12 fritters.

When fritters have cooled slightly, make the icing. I did this after all fritters were done frying and the timing worked well. Whisk powdered sugar together with cider, then add cinnamon and nutmeg. Whisk until smooth, then drizzle 1 tablespoon over each fritter. I had extra glaze so I waited for the glaze to set for 10 minutes and then glazed them again to use it up.

Fritters are best enjoyed within 3 days. After the first day, they should be refrigerated.

Pumpkin Pie Peanut Butter Cups | thepajamachef.com
Candy, Desserts, Recipes

Pumpkin Pie Peanut Butter Cups

Pumpkin Pie Peanut Butter Cups combine my most favoritest flavors in a perfectly addictive, rich candy treat! 

Pumpkin Pie Peanut Butter Cups | thepajamachef.com

If you like pumpkin pie, or chocolate, or peanut butter, you will LOVE these little bites. They are the absolute perfect blend of pumpkin and everyone’s favorite chocolate-peanut butter treats. I just can’t get enough of them! Except that I can. They are so rich and full of delicious [and SIMPLE] ingredients that one is more than enough. Until a couple hours later. 🙂

Pumpkin Pie Peanut Butter Cups | thepajamachef.com

Whenever I can, I love to keep these no-bake peanut butter cup bars in the freezer. One day I was stressed and REALLY needed one of those bars. They’re good, but they’re uber sweet. Plus, it’s pumpkin season. Soooo, I chose one of the many recipes on Pinterest and hoped for the best. I love pumpkin but I just wasn’t sure how it’d go with peanut butter, ya know? Turns out… pumpkin + peanut butter + chocolate = LOVE x a zillion. 🙂 The filling tastes like a creamy, nutty pumpkin pie. I’ve never had pumpkin pie with chocolate, but now I’m tempted to add peanut butter to my pumpkin pie filling and drizzle it with chocolate syrup. It’s crazy talk, I know, but these are just SO good. You’ve gotta try them… they’d be a great secondary dessert for Thanksgiving or a great weeknight snack. 🙂 Enjoyyy!

Pumpkin Pie Peanut Butter Cups | thepajamachef.com

one year ago: Mixed Vegetable Mornay 
three years ago: Crockpot Saucy Italian Chicken
four years ago: Monster Cookies

Pumpkin Pie Peanut Butter Cups

  • Servings: 10
  • Print

from The Lean Green Bean

Ingredients:

  • 4 tablespoons pumpkin puree
  • 4 tablespoons peanut butter [I used natural creamy but anything would work]
  • 1 1/2 tablespoons maple syrup [or other liquid sweetener like honey or agave]
  • 1 teaspoon chia seeds
  • pinch of pumpkin pie spice
  • 1+ cup chocolate chips [I used milk chocolate but semi sweet or dark or white would work too]

Directions:

On a small baking sheet, place 10 silicone muffin liners. Alternatively, you could line a muffin tin with 10 paper liners – but I think silicone works better for candy if you have it.

Stir together pumpkin, peanut butter, maple syrup, chia seeds, and pumpkin pie spice in a small bowl. In another small bowl, melt 1/2 cup chocolate chips for the base in the microwave. I always melt chocolate on 50% power in 20 second bursts, stirring in between, and always stop when some of the chips are still separated so as to not burn it. When you stir vigorously it melts them in.

Place 1/2 tablespoon of the chocolate in the base of each cup. Scoop 1 tablespoon of the pumpkin mixture on top of chocolate in each cup,  gently pressing down with a spoon to create a disk.

Melt remaining chocolate, then cover pumpkin layer with chocolate. If you run out of chocolate feel free to use more–I just barely had enough.

Freeze the cups for 30-40 minutes, then store in the refrigerator until ready to serve.

Recipes, Sides, Vegetables

Ginger-Rosemary Roasted Brussels Sprouts

Roasted brussels sprouts are dressed up with fresh ginger and rosemary for a bright and flavorful side dish.

Ginger-Rosemary Roasted Brussels Sprouts | thepajamachef.com

I guess this is Thanksgiving side dish week on the blog! Monday was Parmesan Butternut Squash Au Gratin. Today is Ginger-Rosemary Roasted Brussels Sprouts. And Friday? Well, you’ll just have to be surprised. But let’s focus on today, mmmkay? I know brussels sprouts are popular in the blogging world. How ’bout in the real world? Well, I have no idea. I don’t know many non-foodies who like them. My own mother doesn’t even like ’em! So sorry, brussels sprouts! Fortunately… Ben and I both do, much to my surprise.

Ginger-Rosemary Roasted Brussels Sprouts | thepajamachef.com

Roasting brussels sprouts is the ONLY way to go, in my opinion. It’s easy, delicious, and takes almost no work. Roasting veggies is a classic way to get a deep, sweet, caramelized flavor into your veggies. Then you can play around with your seasonings. The sky is the limit!

Ginger-Rosemary Roasted Brussels Sprouts | thepajamachef.com

This time, I chose to season my dish with fresh grated ginger and rosemary, mainly out of convenience. I had some fresh ginger leftover from another recipe and I thought the spicy, peppery sweetness of ginger would be awesome with the piney, fresh rosemary from my mom’s friend’s plant. Ooooh was that combo delicious! I know ginger and rosemary together might not sound super traditional, but it works. Hope you enjoy!

one year ago: Pumpkin Cloverleaf Rolls
three years ago: Pumpkin Chocolate Chip Energy Bars
four years ago: Hawaiian Chicken

Ginger-Rosemary Roasted Brussels Sprouts

  • Servings: 4-5
  • Print

Ingredients:

  • 1 pound brussels sprouts
  • 2 tablespoons olive oil
  • 1-2 inches fresh ginger, peeled
  • 2 sprigs fresh rosemary, chopped
  • freshly ground black pepper
  • sea salt

Directions:

Preheat the oven to 400 degrees. Spray a large rimmed baking sheet with cooking spray.

Slice brussels sprouts in half, trimming edges as necessary. Place in a large bowl, then drizzle with olive oil. Grate ginger over top, then add chopped rosemary. Season with pepper and salt, then toss. Spread in an even layer on baking sheet. Don’t worry if some slivers fall off–they can be roasted and are great when crispy.

Roast for 30 minutes, flipping halfway through.

Serve immediately, seasoning with more pepper as necessary.

Recipes, Sides, Vegetables

Parmesan Butternut Squash Au Gratin

An easy, cheesy butternut squash side dish… with an impressive presentation! The best new Thanksgiving side dish. 🙂

Parmesan Butternut Squash Au Gratin | thepajamachef.com #Thanksgiving

If you make ONE new Thanksgiving side dish this year, this totally should be the one! It is absolutely perfect, and a great way to introduce butternut squash to squash skeptics. I mean, isn’t it gorgeous… golden and beautiful?!? One of the fun things about butternut squash is it’s shape. It’s just so BIG for a vegetable! It’s always a shame to take the fun shape and puree it up into soup, mac and cheese, etc. Don’t get me wrong, those are delicious ways to enjoy this sweet ‘n nutty squash. But I always like to do something different! And this au gratin starring butternut squash is definitely different. Ben looked a picture and asked if it was potatoes. No, no, it’s not. But that doesn’t mean it’s not amazing!

Parmesan Butternut Squash Au Gratin | thepajamachef.com #Thanksgiving

With this Parmesan Butternut Squash Au Gratin you’ve got SO many layers of flavor. Sweet squash, garlic butter, crisp bread crumbs, Parmesan, and fresh herbs. Ohhh yum. It’s just so good. I’m not sure how anyone could resist. I couldn’t keep my fork outta the serving dish!

Parmesan Butternut Squash Au Gratin | thepajamachef.com #Thanksgiving

It’s the kind of side that’s perfect on its own–hearty, cheesy, and delicious with the perfect balance of flavors. However, I’m sitting here on my couch dreaming of ways to, shall we say, enhance the amazingness for Thanksgiving day. Isn’t Thanksgiving about going all over the top? Adding some chopped bacon to the topping, layering butternut squash with sliced apples, or even drizzling the whole dish with some pesto just sounds wonderful to me! But even without those enhancements, this butternut squash dish is such a winner! Hope it brings joy to your table this year. So sorry, so cheesy. 🙂

Parmesan Butternut Squash Au Gratin | thepajamachef.com #Thanksgiving

one year ago: Butternut Squash Quinoa Salad
two years ago: Pork, Apple, and Ginger Stir Fry
three years ago: Thai Seared Shrimp with Tomato, Basil, and Coconut
four years ago: Stovetop Mac & Cheese with Broccoli

Parmesan-Butternut Squash Au Gratin

  • Servings: 6
  • Print

from Betty Crocker

Ingredients:

  • 1 medium butternut squash [about 2 1/2 pounds]
  • 1/4 cup butter
  • 2 large cloves garlic, minced
  • 1/4 cup panko bread crumbs
  • 1/3 cup grated Parmesan
  • 1/8 teaspoon black pepper
  • 1/4 cup chopped herbs – like oregano or parsley

Directions:

Preheat oven to 375 degrees F. Grease a large baking dish [9×13 inch pan, or a 10 inch round baking dish] with cooking spray.

Poke butternut squash all over with a fork, then microwave for about 2 minutes. Remove and cool for a few minutes before peeling. This makes it much easier to peel and slice the squash. Peel butternut squash, then halve and deseed. Slice squash into 1/2 inch thick slices, then arrange in bottom of baking dish, overlapping as necessary.

In a small saucepan, melt butter over medium heat. Turn to low and add garlic. Stir constantly as butter cooks for 2-3 minutes. Don’t brown the butter, just cook until garlic softens.

In a small bowl, stir together panko, Parmesan, pepper, and 1 tablespoon garlic butter. Brush  remaining garlic butter over squash, then sprinkle with panko mixture.

Bake for 30-40 minutes, until squash is cooked through. Turn oven up to 425 degrees F and cook for another 5 minutes or so, or until topping turns golden brown. Top with herbs before serving.

Fruit, Recipes, Sides

Cranberry Mint Relish + What To Do With All That Mint

A refreshing take on a traditional cranberry relish!

Cranberry Mint Relish + Ideas for Preserving Fresh Mint | thepajamachef.com

My favorite part of any holiday meal is the cranberry sauce. I’m picky about it though–it can’t be canned, and it can’t have nuts. I used to be a purist and only liked the traditional cranberry orange relish. But these gingered cranberry-apricot sauce and cranberry-pineapple sauce have opened up the doors for some experimentation. So this weekend, when I had a bag of cranberries in one hand and a ginormously huge mint plant in the other that had to be used up before the weather goes whacko this week, I thought, what the heck, and threw some mint in the mix. And you know what? It was pretty awesome. Adding mint to traditional cranberry relish seems pretty novel [but I’m sure others have done it] and it lends a little pop to this sweet-tart side dish. You should totally try it this fall! And it only takes a few minutes to make so you’ve got nothing to lose. 🙂

Cranberry Mint Relish + Ideas for Preserving Fresh Mint | thepajamachef.comAs for all the rest of that mint plant… quite a bit went into that jar of mint sugar on the left and those jars of mint extract on the right. There are tons of tutorials online for both delicacies, but I just layered fresh mint with sugar in one jar and have been shaking it once a day since Sunday. In about a week it’s supposed to be ready to enjoy. I can’t wait! And to make the mint extract I added vodka [eeeekkkkk] to mint that had been gently mashed in a mason jar. There’s a technical term for “mashed” but it’s escaping me at the moment. 🙂 Easy easy! My husband looked at me like I was crazy when I told him I needed some cheap alcohol for cooking. Hahaha. COOKING not drinking, haha don’t worry. That’s how you do things in homemade-everything-land. We’ll see how they turn out. I’ll have to give you guys an update, k? In the meantime, this cranberry mint relish is FAB so don’t wait til Thanksgiving to enjoy. I can’t wait to taste it on turkey!

one year ago: Flourless Chocolate Cake with Strawberry Sauce
two years ago: Carnitas
three years ago: Best Pancakes Ever
four years ago: Pumpkin French Toast Sandwich

Cranberry Mint Relish

  • Servings: 6
  • Print

Ingredients:

  • 12 ounces fresh cranberries, washed and dried
  • 1 orange, scrubbed clean and cut into eighths
  • 1/2 cup fresh mint
  • 1/4-1/2 cup sugar

Directions:

Place cranberries, orange, mint, and 1/4 cup sugar in food processor. Pulse until processed to desired consistency. Taste and add more sugar if necessary. Transfer to a bowl, cover, and refrigerate for at least an hour before serving to set flavors.