Main Dishes, Pasta, Recipes

Fettuccine with Pistachio-Mint Pesto + Summer Vegetables

I’ve tried so many non-basil pestos this summer. It has been absolutely great! Though I love love love this kale pesto, I think I have found a new favorite… and it’s really fun. This pesto is made from two of my favorite herbs and my favorite nut. Already sounds like a winner, huh?

Fettuccine with Pistachio-Mint Pesto + Summer Vegetables | thepajamachef.com

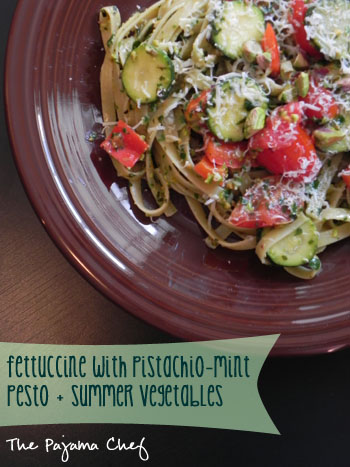
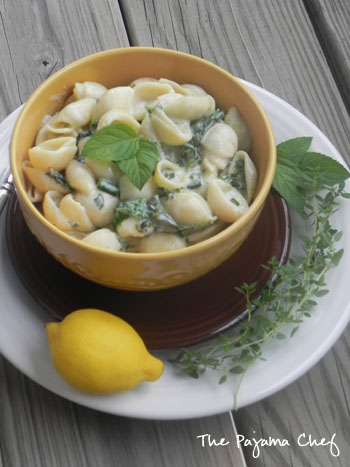
Mint, parsley, and pistachio. YUM! It’s pretty much the most awesome combination ever. Though I can’t take credit for it [Cooking Light wins here], I can take credit for the addition of some fun summer vegetables. Tossing tomatoes, zucchini, and red bell peppers in with a herby, nutty pesto make this dish SO filling and incredibly flavorful. Mint is an herb that I love to use in iced tea and the occasional fruit salad, but I loved how it worked in this fresh, savory pasta.

Fettuccine with Pistachio-Mint Pesto + Summer Vegetables | thepajamachef.com

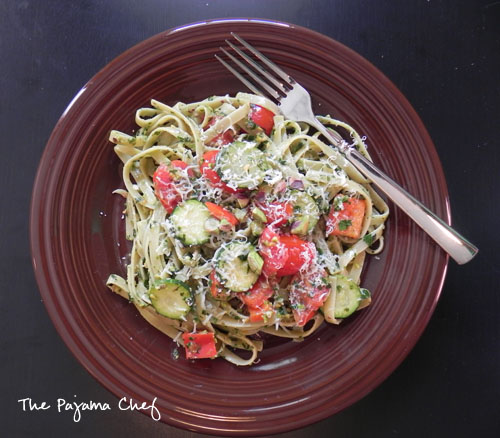
Topping everything off with some asiago cheese is highly recommended too, but I won’t cry if you use Parmesan instead. Asiago is just my ultimate cheese pick though! Normally I have a 50/50 track record with “topping” dishes off with whatever suggestion a recipe makes, but it’s essential to this dish since the pesto doesn’t include cheese. I almost added some but decided not to once I gave it a taste. Totally unnecessary with all the fresh flavor in that pesto. Hope you try this pasta out before the summer’s up. I know I’ll be making it again soon!

one year ago… Peaches and Cream Pancakes
two years ago… Roasted Tomato Sauce

three years ago… Cran-Oat Muffins

Fettuccine with Pistachio-Mint Pesto + Summer Vegetables [adapted from Cooking Light]
click to print

Ingredients:

  • 1/2 cup fresh mint leaves
  • 1/2 cup fresh parsley leaves
  • 1/4 cup unsalted, shelled dry-roast pistachios, plus 4 teaspoons for sprinkling [divided]
  • 1/4 teaspoon Kosher salt
  • 1/2 teaspoon freshly ground black pepper
  • 1 large clove garlic
  • 4 tablespoons extra virgin olive oil, divided
  • 6 ounces dried fettuccine [or 9 ounces fresh fettuccine]
  • 1 cup cherry tomatoes, halved
  • 1 small zucchini, sliced [about 1 cup]
  • 1 cup red bell pepper, chopped
  • 1 ounce freshly shredded Asiago or Parmesan cheese

Directions:

Bring a large pot of water to boil.

In a food processor, combine mint, parsley, 1/4 cup pistachios, salt, pepper, and garlic. Pulse several times to combine, then stream in 3 tablespoons olive oil, scraping the sides if necessary.

Cook pasta to al dente according to package directions.

While pasta is cooking, heat 1 tablespoon olive oil in a small saucepan over medium heat. Add zucchini and peppers and saute for 3-4 minutes until soft. Add tomatoes and heat until pasta is ready.

When pasta is fully cooked, return to pot and toss with pesto. Add vegetables and toss again, then serve with cheese and pistachios.

Time: 30 minutes.

Yield: 4 servings.

Linked up with: Tuesday Talent Show.

Cookies, Desserts, Recipes

Chocolate Chip Orange Cookies

I never make plain ‘ole Chocolate Chip Cookies. It’s rare that I’m craving a chocolate chip cookie in the first place, and if I absolutely had to make one, I normally add a bunch of other things like pumpkin, coconut, peanut butter, etc. But a few weeks ago I needed to make a dessert for our small group and these cookies just sounded good. I think it was the orange and chocolate combo. Even though it’s summer, and the citrus chocolate thing is so Christmasy, I had to have it. And I am so glad I did, because these cookies are out of this world!

Orange Chocolate Chip Cookies | thepajamachef.com

This may be my new go-to chocolate chip cookie altogether. The cookie itself is practically perfect–chewy on the inside, crispy on the outside. They stay soft for days–though I bet they won’t last long! When you add in orange zest and juice, the flavor gets even better!

And the best part of these cookies besides their incredible flavor and texture? The fun faces in a couple cookies as they baked. See below. 🙂 Yes, I’m a dork.

Orange Chocolate Chip Cookies | thepajamachef.com

OH! And one other thing. I know there’s some debate in the cookie world about how to do the butter. Melted? Softened? Throw it straight in from the fridge? [I know some people actually do that, and if you cream it well enough it actually sorta works.] The original recipe calls for melted butter, but I prefer using softened, so I just did that and it worked out fine. Click on over to the original if you prefer melted [or need to hurry up the process]. One thing I wouldn’t hurry up is the chilling! Chilling the dough is essential. It deepens the flavor [tried the dough before + after and found a definite difference!] and it firms up the dough so it doesn’t spread as much. The thicker the cookie, the better imo. Hope you try these fabulous orange chocolate treats. They’re a fun twist on a classic cookie. Enjoy!

a year ago… Brown Sugar Squash Muffins
two years ago… The Best Panini Ever
three years ago… Creamy Lemon Squares

Chocolate Chip Orange Cookies [slightly altered from Crazy for Crust via Chef in Training]
click to print

Ingredients:

  • 1 cup butter, softened
  • 3/4 cup white sugar
  • 1 cup brown sugar
  • 2 large eggs
  • 2 teaspoons vanilla extract
  • 2 teaspoons orange juice
  • 1 tablespoon orange zest [from 1 large orange]
  • 3 1/4 cups all-purpose flour
  • 2 teaspoon baking soda
  • 2 cups semi-sweet chocolate chips

Directions:

Cream together butter and sugars until soft and fluffy, about 2 minutes. Add eggs one at a time, mixing on low in between. Then add vanilla, orange juice, and orange zest, and beat on low for 1 minute until combined.

Gradually beat in flour and baking soda, then fold in chocolate chips. Do not overmix.

Chill dough, covered, in the refrigerator for at least 30 minutes–but an hour + is best.

Preheat oven to 350 degrees while you form the dough into balls. Line baking sheets with parchment or a silpat, then scoop dough into 1.5 to 2 tablespoon balls and place on prepared baking sheets. Bake for 10-11 minutes or until golden brown around the edges but still slightly soft in the middle. Cool on the baking sheet for 5 minutes before removing to cooling rack to cool completely.

Time: 30 minutes, plus time to chill.

Yield: 3-4 dozen depending on how size.

Linked up with: Foodie Friday, Weekend Potluck.

Main Dishes, Pasta, Recipes

Creamy Shells and Yogurt

A few years ago, I made Avocado Soup. It was a cold, gazpacho-esque soup made with yogurt, avocados, and seasonings. Hardly any liquid and served cold, it has gone down in history as one of the most disgusting things I’ve ever served for dinner. Nowadays I would have revamped it as a dip or a sauce, but four years ago it just went in the trash. And with it, my desire to use yogurt as anything more than something to eat with granola or occasionally in baking.

Creamy Shells and Yogurt | thepajamachef.com

With that history of yogurt as a dinner ingredient, it came as a surprise to me when I saw this Creamy Shells and Yogurt recipe online and decided to make it. I know warm yogurt sounds weird, but hear me out. This is totally not what you think. Here, Greek yogurt makes a surprisingly delicious rich pasta sauce when combined with eggs and cheese.

Creamy Shells and Yogurt | thepajamachef.com

As the sauce comes together, it is almost reminiscent of a rich macaroni and cheese. It is truly one of those dishes that you just have to taste to truly understand.

Creamy Shells and Yogurt | thepajamachef.com

The eggs, cheese, and yogurt come together to make a tangy sauce that tastes rich while being actually pretty light, but the true star of the sauce are fresh herbs and lots of lemon zest. I used lemon thyme and mint for my herbs, but you could use whatever you have on hand. I think parsley, basil, oregano, or any of the usual suspects would work perfectly–but do try the minty lemon combo if you can. It is divine! For a little extra something-something I added some kale to the mix. You know how I love my kale!

Creamy Shells and Yogurt | thepajamachef.com

Everything about this dish screams summer, and even though I only made this pasta a couple weeks ago, I’m craving it so badly now and am wondering if I can justify dirtying up the {clean} kitchen at 10:30 pm just for a small bedtime snack. Of yogurt pasta. And this after making Pumpkin Soup for dinner and telling Ben how I just cannot WAIT for apple picking, apple cider, pumpkin chocolate chip mini muffins, and all the joys of fall [which do NOT include football, thankyouverymuch. That’s Ben’s department.]. I am so seasonally confused. I want it all, summer and fall. But most of all, I want a big bowl of Creamy Shells and Yogurt. It is totally a bright and cheery summer comfort food. I am sooo glad to have tried this pasta–hope you will too!

a year ago… Oatmeal Buttermilk Bread
two years ago… Chorizo and Potato Tacos
three years ago… Taco Casserole

Creamy Shells and Yogurt [adapted from Big Girls Small Kitchen]
click to print

Ingredients:

  • 12 ounces shell pasta
  • 8 ounces plain Greek yogurt [whole or 2%]
  • 3 eggs, beaten
  • 1/4 cup mint, chopped + more for garnish
  • 1 teaspoon lemon thyme, chopped
  • 3 green onions
  • zest of 1 small lemon
  • 1 ounce Mozzarella, shredded or cubed + more for serving
  • 1 large handful kale [~1.5 cups]
  • freshly ground black pepper
  • crushed red pepper
  • salt

Directions:

Bring a large pot of water to boil, then add shells and cook to al dente.

Meanwhile, whisk together yogurt, eggs, mint, lemon thyme, green onions, lemon zest, and Mozzarella. Wash kale, remove thick stems, and tear into small pieces.

When pasta is ready, drain and reserve ~ 1/2 cup cooking water. Return pasta to pot and stir in kale. Then add 6 tablespoons water to yogurt sauce and whisk well to temper egg. Pour yogurt sauce over pasta and kale and stir vigorously to coat. Keep stirring until Mozzarella melts, then season to taste with peppers and salt as desired. Serve with additional mint and cheese as desired.

Time: 20 minutes.

Yield: 3-4 servings.

Linked up with: What’s Cookin’ Wednesday.

Beans, Main Dishes, Recipes, Sauces

Quinoa Black Bean Burritos with Southwest Sauce

We eat a lot of black beans around here–as a simple side with tacos, on salads, with rice. For some reason though, it’s rare that the black beans themselves are the star of the meal. And why not? They are so good and so filling! These Quinoa Black Bean Burritos with Southwest Sauce are the perfect example of that.

Quinoa Black Bean Burritos with Southwest Sauce | thepajamachef.com

I honestly wasn’t expecting much of this meal, but it was so phenomenal that I just had to share. Quinoa and black beans are a natural combination, and when flavored with garlic and taco seasoning, are pretty amazing. I also added some cheese because duh. Cheese. It’s all melty and wonderful. You could certainly add the cheese separately to the burrito, but I kinda liked the gooey factor when it was stirred in with everything else.

Quinoa Black Bean Burritos with Southwest Sauce | thepajamachef.com

As good as the burrito filling is, adding some guacamole and a quick Southwest Sauce makes this burrito. For sure. The sauce’s intriguing ingredients–salsa, mayo, lime juice, maple syrup, and spices–sound a bit off, but trust me. It totally works! This sauce is tangy, sweet, and has a tiny kick–but no real heat. You could spice this up if you wanted though! These Quinoa Black Bean Burritos make a wonderfully easy vegetarian weeknight dinner, and the leftovers last for days. Serve it with a side salad and chips and salsa for a complete meal. My kind of recipe! You can bet this will be part of our regular rotation from now on. Enjoy!

a year ago… Summery Squash & Chicken Lasagna
two years ago… Watermelon Coolers
three years ago… OTT: Brown Sugar Bacon Twists 

Quinoa Black Bean Burritos with Southwest Sauce

  • Servings: 6-8
  • Print

adapted from Food.com

Ingredients:

  • 1 cup quinoa, rinsed [I used 1/2 cup each red and white quinoa]
  • 2 cups vegetable or chicken broth
  • 1 1/2 cups black beans [or a 15 ounce can], drained and rinsed
  • 2 cloves garlic, minced
  • 1/2 cup shredded cheddar cheese
  • 2 teaspoons taco seasoning
  • flour tortillas
  • chopped avocados or guacamole [I made a simple guac–1 mashed avocado, lemon juice, cilantro, salt, pepper]

for Southwest Sauce

  • 1/2 cup salsa
  • 1 tablespoon mayonnaise [I think sour cream or plain yogurt could be substituted too]
  • 1 teaspoon maple syrup
  • 1 teaspoon cumin
  • 1/2 teaspoon lime juice
  • 1/4 teaspoon chili powder

Directions:

Place quinoa and broth in a large saucepan and bring to a boil. Cover, reduce heat to low, and cook at a simmer until all liquid has been absorbed–about 12 to 15 minutes. Then, add black beans, garlic, cheese, and taco seasoning and stir until cheese has melted. Simmer for 4 to 5 minutes or until heated through.

Meanwhile, prepare Southwest Sauce. Whisk together salsa, mayonnaise, maple syrup, cumin, lime juice, and chili powder. Taste and adjust seasonings as desired. If salsa is chunky, you may want to smooth sauce by pureeing in a blender or food processor.

Serve by spooning quinoa black bean mixture in a large flour tortilla. Top with avocados or guacamole, then roll shut. Drizzle Southwest Sauce on top immediately before serving.

Linked up with Foodie Friday and Weekend Potluck.

Bars, Cheesecakes, Desserts, Recipes

SRC: Churro Cheesecake Bars

I absolutely love being in the Secret Recipe Club! Getting to peruse another blogger’s favorite recipes and then pick one to make secretly is just so fun… and delicious! This month I was assigned to Lesa who writes the blog Edesia’s Notebook. Lesa has been blogging since 2007 and has literally hundreds of recipes to choose from on her site. It was kind of overwhelming… in the best way possible, of course! Lesa is a mom of two adorable little girls, and a variety of recipes that kids and adults will love, both sweet and savory. Perfect!

Churro Cheesecake Bars | thepajamachef.com

This month, I left the final decision to Ben. He had his choice of cookies, pancakes, and cheesecake bars. Apparently it was no contest. Cheesecake bars it was! But not just any cheesecake bars–Churro Cheesecake Bars! A layer of creamy vanilla cheesecake is sandwiched between a cinnamon sugar crust reminiscent of everyone’s favorite Mexican pastry. These bars are so utterly amazing that I could hardly believe how quick and easy they were to make!

Churro Cheesecake Bars | thepajamachef.com

The shortcut to these fabulous bars is using a seamless crescent roll dough sheet. You could totally make your own dough, but I certainly took advantage of this easy option. 🙂 And don’t worry if you accidentally rip your sheet trying to get it out of the tube… it’ll work juuust fine, even a little torn, haha. I swear, I almost always have issues with so called “convenience” foods. Does anyone else have this problem, or is it just me? These Churro Cheesecake Bars are sweet and rich. They come together in a snap and are great for a party because a little goes a long way. We loved them and hope you will too! Thanks, Lesa, for a great recipe!

Churro Cheesecake Bars [from Edesia’s Notebook]
click to print

Ingredients:

  • 1 cup sugar, divided
  • 1 tablespoon cinnamon
  • 2 [8 ounce] cans refrigerated seamless crescent dough sheet
  • 2 [8 ounce] packages cream cheese
  • 1 teaspoon vanilla
  • 1 egg

Directions:

Preheat oven to 350 degrees and spray a 9×13 pan with cooking spray.

Combine 1/2 cup sugar and cinnamon in a small bowl. Stir and sprinkle half evenly in the bottom of the prepared pan. Unroll one of the crescent dough sheets and lay it over the cinnamon sugar.

With a mixer, beat together the remaining 1/2 cup sugar, cream cheese, vanilla, and egg until smooth [about 2-3 minutes]. Pour filling over dough, smoothing with a spatula if necessary. Unroll the other dough sheet and gently place over filling. Top with remaining cinnamon sugar.

Bake for 30-35 minutes or until golden brown. Cool before cutting, then store in the refrigerator.

Time: 45 minutes.

Yield: 24 servings.

Notes: If your dough sheet tears, even the top one, it’s not really a big deal. Patch it together as best you can and the cinnamon sugar will help cover up the mess. 🙂 These bars can be served warm or cold, but we liked them best warm.

Be sure to check out other recipes from other SRC members here today too! 🙂