Recipes, Rice, Sides

Mexican Rice

Oh my goodness. This RICE! Normally, rice is Ben’s obsession, but this time, it’s mine. This Mexican Rice is seriously amazing. It’s the closest restaurant-style replica recipe that I have ever successfully made. Ben agreed, and thought this was better than something you could get at a restaurant. And for a guy who likes to eat out, that’s saying something!! So many recipes online or in cookbooks claim to be restaurant-worthy, but most of the time, they’re lying. Well this one? Not so much. It’s just like the rice you’d get at your favorite local hole in the wall Mexican place.

Mexican Rice | The Pajama Chef

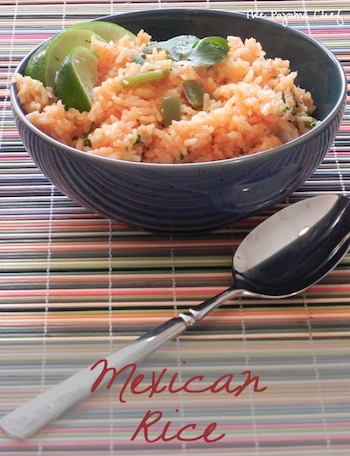
When I first saw that the recipe called for three jalapenos, I have to admit that I was a little nervous [even considering my recent love of spice]. But really, I needn’t have been afraid–this rice had the perfect amount of kick. Not too spicy, not too bland. Stirring in cilantro at the end and adding a squeeze of lime juice to each serving definitely balanced out the flavors and gave the rice a little something special.

Mexican Rice | The Pajama Chef

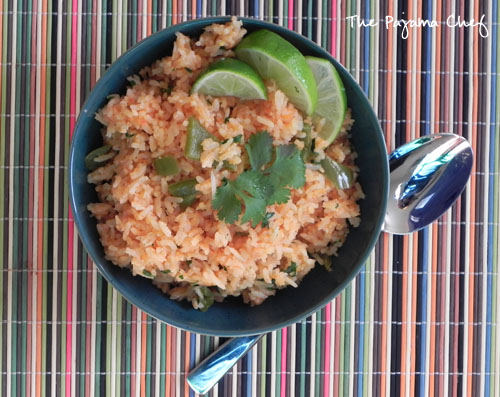
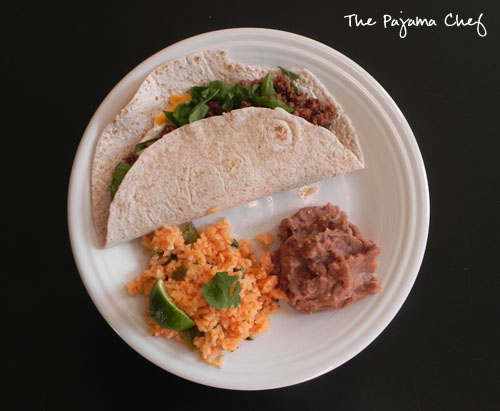
At first glance, this Mexican Rice recipe might look a bit intimidating. Even if it has good flavor, isn’t it a bit overkill to go through all these steps of rinsing and sautéing the rice, then cooking it on the stove and in the oven? NO! Not at all. Don’t skip a step–each is necessary to make this light and fluffy without a bit of gloopy, gloppiness that can all too easily happen when a bunch of stuff is added to rice. The texture isn’t sticky or mushy. It’s just perfect. And when paired with homemade tacos and refried beans, well, it’s just like eating at a restaurant  But at home, for a fraction of the cost… and with all the leftovers you could want. 🙂 I know I’ll be making this rice over and over again for many tacos nights in our future, and I hope you will too. Enjoy!

Mexican Rice | The Pajama Chef

Mexican Rice [from Food.com]
click to print

Ingredients:

  • 1 can diced tomatoes [15 ounces]
  • 1 medium onion [yellow or white]
  • 2 cups long grain white rice
  • 1/4 cup canola oil
  • 3 medium jalapenos, minced and divided [deseed as desired–I deseeded two]
  • 4 cloves garlic, minced
  • 2 cups chicken broth
  • 1/2 cup cilantro, minced
  • freshly ground black pepper
  • 1 lime, wedged

Directions:

Preheat oven to 350 degrees.

In a food processor or blender, combine tomatoes and onion. Puree until smooth, then pour into a measuring cup and reserve 2 cups. Discard excess [or save for something else, like salsa, or eat with a spoon…].

Add oil to a large [10-12 inch] straight-sided sauté pan or Dutch oven [with a tight fitting lid] and set over medium-high heat. While oil is heating up, place rice in a fine mesh strainer and rinse under cold running water for about 2 minutes or until water runs clear. This is similar to rinsing quinoa–it removes the starch from the rice to make it nice and fluffy. Do not omit this step! Shake rice to remove excess water.

Next, drop a few grains of rice in the oil. If they sizzle it is ready. Add rice to oil and cook for 6-8 minutes, constantly stirring, until rice is lightly golden and translucent. Reduce heat a little if the oil starts to splatter, and add up to another 2 tablespoons of oil if it seems too dry.

Reduce heat to medium, then add 2 jalapenos and garlic and cook for 1 minute until fragrant.

Stir in pureed tomatoes and onions and chicken broth and bring to a boil.

Remove from heat, cover, and transfer to oven. Cook for 15 minutes, then remove and stir well.  Return to oven for another 15-20 minutes, or until rice is tender and liquid is absorbed. Remove from oven and stir in remaining jalapeno and cilantro. Season to taste with freshly ground black pepper.

Serve with a wedge of lime to squeeze on each serving before enjoying.

Time: 55 minutes [20 minutes active].

Yield: 8-10 servings.

Notes: You can use 12 ounces fresh ripe tomatoes but since I made this before tomato season, I opted for canned. If you use fresh tomatoes, the recipe recommends supplementing with salsa if you need to get up to 2 cups AND to add 1 tablespoon tomato paste to the mix as well.

Linked up with: Weekend Potluck.

Main Dishes, Pizza, Recipes

Taco Pizza

Some people are pizza purists, and some people are me. I like trying the most ridiculous and random types of pizza ever. My most recent favorite at a local pizza place? Pecans, sweet onion marmalade, gorgonzola and fresh rosemary. So, so good. That is definitely a combo I will be ordering again and maybe even recreating at home! And I am sure it’ll be nothing but good. But for now, this Taco Pizza I made from Budget Bytes is my favoritest homemade pizza of all time. A high honor, and for good reason.

Taco Pizza | The Pajama Chef

Tacos and pizza are amazing on their own, and together in one dish is a party you don’t want to miss! Each bite has layers of hot and cold ingredients and is just so flavorful!

Taco Pizza | The Pajama Chef

When thinking about this pizza, it’s hard to tell what the best part is–the refried bean/salsa sauce? The crunchy corn? The cheese? [oooh cause you can’t have pizza without cheese!] Or the fresh, cold pico, cilantro, and sour cream on top of it all? I’m not sure, but you pretty much can’t go wrong with this idea because it’s so versatile. Any taco filling would be fabulous on this pizza. I think next time I might add some shredded chicken and sauteed peppers and onions for a fajita-type pizza. Oooh! And chunks of avocado and a drizzle of guacamole salsa. That’s what I’m talking about!!

Taco Pizza | The Pajama Chef

Even without meat though, this veggie pizza is super filling, and your family will be fighting over the leftovers. Ben and I sure were! Haha. Just kidding. I think.

It’s a good thing I didn’t make this yesterday on our fourth anniversary! 🙂 Instead, we spent the day picnicking at a local winery and enjoying each other’s company. Better than squabbling over a delicious pizza, methinks. Teeheehee. Hope you all have a great Memorial Day weekend!

Taco Pizza

  • Servings: 4-5
  • Print

from Budget Bytes
Ingredients:

  • 1 batch pizza dough
  • 2 roma tomatoes, diced
  • 1/2 vidalia onion, chopped
  • 1/2 cup cilantro, minced + more for sprinkling
  • freshly ground black pepper
  • 1 tablespoon canola oil
  • 2 cloves garlic, minced
  • 1 [15 ounce] can refried beans
  • 1 cup salsa
  • 1 tablespoon taco seasoning
  • 1 1/4 cups sharp cheddar cheese, shredded
  • 1/2 cup corn
  • 1/4 cup sour cream

Directions:

Preheat oven to 425 degrees. In a small bowl, mix together tomatoes, onion, and cilantro for pico de gallo. Add black pepper to taste, set aside.

Add oil to a small saucepan over medium heat, add garlic and cook until soft, about 2 minutes.  Then stir in beans, salsa, and taco seasoning and cook until heated and smooth. Remove from heat.

Roll out pizza dough on pizza pan, par-baking crust if desired for 5-7 minutes [I usually skip this step!]. Then remove from oven and top with bean mixture, cheese, and corn. Bake for another 10-12 minutes or until crust is golden brown.

Top with pico de gallo, cilantro, and a drizzle of sour cream [spoon into ziploc bag, cut off the corner, and squeeze over pizza]. You can also add a dash of hot sauce if that’s your thing. Enjoy!

P.S. SHAMELESS PLUG! Please check out and like my new blog Facebook page… thanks!

Main Dishes, Recipes, Sandwiches and Wraps

Jalapeño Popper Grilled Cheese

So, any other Call the Midwife fans out there? The season finale was last night–and oh my goodness!!! If you haven’t seen that show, you are missing out. It’s my newest love this spring–right up there with jalapeños, both of which are QUITE surprising because I never have liked medical-type shows and I certainly have NEVER been a spice kind of person. But now I crave it. Spice and midwifes. Mhmm.

Jalapeño Popper Grilled Cheese | The Pajama Chef

The inspiration behind this incredibly cheesy, gooey grilled cheese with a kick is one of my absolute favorite restaurants, Scotty’s Brewhouse. Scotty’s is an Indiana chain and if we ever move from Indiana college towns I will be so super sad because pretty much everything there is great. From their waffle fries to their burgers to their salads, I’m just in love. We ate there at the end of April for my birthday and I randomly ordered this Jalapeño Popper Grilled Cheese. Why? I have no clue–it just sounded good. And it was good. So good in fact that I craved it for days on end, and was disappointed that this, of all times, was a date where Ben agreed to SHARE our entrees. He never wants to do that, but this time… man, what timing! Last week, I finally took it upon myself to recreate it at home. Allow me to introduce you to this masterpiece….!

Jalapeño Popper Grilled Cheese | The Pajama Chef

It is basically grilled cheese to the max. EEEEK! I can’t even describe it any further except to say it’s just awesome and you need to try it, like now. Cheesy, spicy, gooey. What more do you need to know? It has four kinds of cheese–sharp cheddar, Monterrey Jack, cream cheese, AND a pub cheese spread, and it also is amped up with sweet sauteed onions, crisp bacon, and spicy jalapeños! I mean COME ON! I apologize for the excessive use of capitalization and exclamation, but what can you do when something is this amazing?! Have you ever had anything like this before? This isn’t a healthy grilled cheese at all… but you can indulge a little on a Monday. In my case, I’ll be needing it to drown my sorrows about the end of this season of Call the Midwife… but in Ben’s case, he’ll be drowning his sorrows about the fact that the show has been renewed for season three. YAY! [Oh boys and their squeamishness.] Enjoy!

P.S. SHAMELESS PLUG! Please check out and like my new blog Facebook page… pretty please with a cherry on top? And sprinkles? And jalapeños? I started the page back in 2011 but just started using it over the weekend. Ha! Thanks! 🙂

Jalapeño Popper Grilled Cheese [a TPC original, inspired by Scotty’s Brewhouse]
click to print

Ingredients:

  • 2 tablespoons extra virgin olive oil
  • 1/4 cup thinly sliced Vidalia onion
  • 2 jalapeños, thinly sliced [partially deseeded if desired]
  • 4 slices whole wheat bread [or something that’s good for grilled cheese]
  • 2 tablespoons softened butter [divided]
  • 3-4 tablespoons cream cheese, softened [divided]
  • 2 ounces Monterrey Jack cheese, thinly sliced [divided]
  • 2 ounces sharp cheddar cheese, thinly sliced [divided]
  • 3-4 tablespoons cheddar cheese spread [I used Trader Joe’s pub cheese with jalapeños, but I think something like this recipe would work too]  [divided]
  • 3 slices of bacon, crisply cooked and chopped  [divided]

Directions:

In a small skillet, heat the olive oil over medium-high heat. When shimmering, add onion and jalapeños, and cook for 4-5 minutes until soft. Stir constantly, and if they start to burn, reduce heat slightly. Remove from heat and set aside.

Next, preheat grill pan or panini press–I used a panini press set on medium.

Butter one side of each piece of bread. Then assemble by spreading a layer of cream cheese on the non-buttered side of one piece of bread, topping with Monterrey Jack cheese, sharp cheddar cheese, bacon, and half of the onion/jalapeño mixture. Spread the cheddar cheese spread on the non-buttered side of another piece of bread, then place cheese spread on the onion/jalapeño mixture. This leaves the buttered sides on the outside. Repeat with remaining ingredients.

Place on grill pan/panini press for about 5-6 minutes so cheese melts and outside gets crispy. Enjoy!

Time: 20 minutes.

Yield: 2 sandwiches.

Linked up with: Weekend Potluck.

Chicken, Main Dishes, Recipes

Apple Cream Chicken

So, you know those amazing chicken dinners that look complicated and time consuming and fancy and are definitely worthy of a special occasion? Like your husband’s birthday [two months ago]? Well, this is one of them. Except… this can be made in under 30 minutes and really isn’t that complicated at all! Score! Less time on dinner equals more time watching episode after episode of 24, more time making birthday pie for the birthday boy, and more time writing my thesis. Except wait!!! My thesis is turned in, done, submitted online, and accepted. And I am graduated! You can now call me Sarah the Pajama Chef, MLS, MA. Woohoo!

Apple Cream Chicken | The Pajama Chef

To celebrate from afar, you should totally make this chicken. It’s creamy and sweet and just so good! It comes together in a snap, and let’s face it–apple cream sauce is a much better way to serve boring ‘ole chicken. When sliced sauteed apples are added to the mix as well, it’s even better!

Apple Cream Chicken | The Pajama Chef

If you’re not a fan of sweet main dishes, then I wouldn’t recommend this recipe. But if you are… waste no time in enjoying it! I’ve made it several times over the past few years and we pretty much never have leftovers. It is that good! Enjoy! 🙂

Apple Cream Chicken [adapted from The Taste of Home Cookbook]
click to print

Ingredients:

  • 4 boneless skinless chicken breast halves, thinly sliced
  • 1 tablespoon olive oil
  • 1 cup apple juice
  • 1 teaspoon lemon juice
  • 1 teaspoon dried rosemary, crushed
  • 1/2 teaspoon freshly ground black pepper
  • 2 small apples, thinly sliced [I used a Golden Delicious and a Gala]
  • 1 tablespoon cornstarch
  • 1/2 cup fat free half and half
  • 1 1/2 teaspoons dried parsley
  • hot cooked rice

Directions:

Heat oil in a large skillet over medium-high heat, then brown chicken for 4 minutes on each side. Meanwhile, whisk together apple juice, lemon juice, rosemary, and pepper. Pour over chicken, then add apple slices to skillet.

Reduce heat to medium-low, then cover and cook for 10 minutes or until chicken is cooked through. Remove chicken and cover to keep warm.

Stir together cornstarch and half and half, then add to liquid and apples in skillet. Bring to a boil, then cook and stir for 2 minutes or until thickened. Add dried parsley, then return chicken to skillet and heat through.

Serve over hot cooked rice.

Time: 30 minutes.

Yield: 4 servings.

Linked up with Weekend Potluck.

Breakfast, Granola, Recipes

Granola Tips

So… I’ve been making granola a lot. Like, every other week. This recipe, to be exact. Cinnamon Applesauce Granola is the best stuff ever. I know I said this before, but it’s pretty low in sugar AND it’s very flavorful. Perfect for eating by the handful or in yogurt. But guess what? I’ve found a way to make it even crunchier AND chunkier. Because chunks of granola are the best thing ever!!!

My new secret granola weapon is… don’t stir it! The original recipe says to stir it once or twice while baking, but I’ve found lately that not stirring it at all (or just stirring it once halfway through the cooking time) is key for granola success. Not stirring makes almost a granola-bar like consistency of granola that you can then break apart on your own after it cools. Whoa! Duh. Why didn’t I realize this sooner? When you do this, you do have to let the granola cool completely on the baking sheet, otherwise it can be a little soft inside the chunks [from the applesauce]. 🙂

Chunky granola makes me so happy! [I know that sounds weird. Sorry.]

Granola Tips | The Pajama Chef

And now, for my second granola tip… you might be wondering why there are little jars of granola in front of my big tin of granola. [Some people keep a cookie jar on their counter… I keep a tin of granola.] Those, my friends, are thoroughly washed glass spice jars. Like the kind from my friend and yours, Mr. Trader Joe. These jars specifically are 2 ounces, which I have found is the perfect amount of granola for the 6 ounce cups of yogurt I buy every week at the grocery store.

If you take your breakfast or lunch with you to work or school, or just need a snack for the day, putting your granola in small glass spice jars keeps it fresh and smash-free. Sometimes when I was putting it in little plastic baggies, my granola–even the larger chunks–would get crushed by the rest of my lunch before I had the chance to eat it. This solves the problem, plus is a bit more environmentally friendly! I have quite the collection of these spice jars amassed so at the beginning of the week, I’ve started dishing up the granola for lunches for the week, ready to grab and go every night at lunch-making time. Works for me! If you don’t have a collection of glass spice jars ready now, then you can probably buy something similar at an organizing store, or just wait a few weeks until you finish a spice.

Granola Tips | The Pajama Chef

What are your granola-making tips? Recipes? I’d love to hear them below in the comments. 🙂 Have a good Monday!