30 Before 30, Cookies, Desserts, Recipes

Dulce de Leche Peanut Butter Sandwich Cookies

Guys, I gotta get going on my 30 before 30 list! My 20s are creeping away and this list isn’t getting any shorter. Yikes! But I must admit that it makes me feel pretty good when people who don’t know me at my university think I’m a student even though I’m a faculty librarian, and that one of my coworkers thought I was about 25 until I told her I was 29. Woohoo! But anyways. 30 before 30. Cookies. Let’s get to the point here. 🙂

Dulce de Leche Peanut Butter Sandwich Cookies | thepajamachef.com

I put sandwich cookies as one of my 30 before 30 goals because I can sometimes be a lazy baker. I love baking, don’t get me wrong. But it’s the extra steps in recipes that I often avoid. [The steps sometimes and the entire recipe itself at other times. Just depends!] Chilling the dough, making a glaze, making brown butter, etc. Sometimes those steps just seem a bit nonsensical especially when they’re coming from food bloggers who come across as a little too authoritative and bossy. [Yup, I said it. I hope I don’t sound that way to any of you!] There’s nothing that irks me more than extra steps that aren’t always necessary. I know that sometimes they are, but do you know what I mean? Let’s discuss, and I’ll try not to rant. I often skip glazes for muffins/quick breads because they really aren’t necessary and because we can’t eat the recipe fast enough so the glaze gets a bit yucky. And it seems like every single cookie recipe nowadays in the blog world asks you to chill the dough for 2 hours or overnight. Who has time for that? Not me! A quick 30 minute trip to the fridge works, but if you aren’t at home baking all day most people don’t have time for that on a weeknight when you just want some cookies!! And brown butter. Don’t get me started. Like salted desserts, it’s just a trend. A trend that I hate. Ehhh, maybe it takes the taste of butter up a notch but I’m not a big fan. For me, in the blog world, these steps amplify my annoyance when bloggers rail against the lazy [hello!] who want to skip the steps and thus [to the blogger] will ruin the recipe. Not true, my friends! The cookies may not be as soft, the bread may not be as sweet, the butter flavor may not be as nutty. But what you make will still be good. </endrant>

Dulce de Leche Peanut Butter Sandwich Cookies | thepajamachef.com

But whatev. People are entitled to their passions. Some things about the “professional” food bloggers just tick me off! [And I can go on, but I’ll stop now. I’m sure they’re nice people in real life!] Sandwich cookies. I’m getting a bit ADD today, obviously. Sandwich cookies sound good in theory but I’m often too lazy to make them. When I put them on my list, I envisioned making homemade Oreos or some kind of chocolate peanut butter goodness. When I saw these Dulce de Leche Peanut Butter Sandwich Cookies, I knew I had to try them. And I’m so glad I did, even if they were a ton of work.

Dulce de Leche Peanut Butter Sandwich Cookies | thepajamachef.com

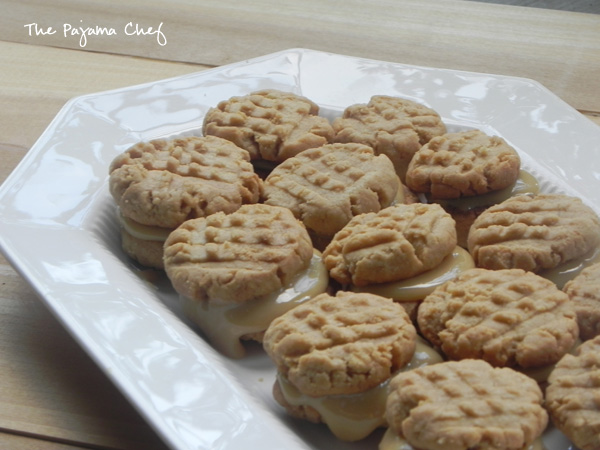
Go back and reread that paragraph about my complaints against baking and bloggers who say you have to do xyz or your recipe will be ruined!!! Oh so dramatic. This recipe, ironically, is finicky. The peanut butter cookies aren’t your traditional easy recipe. They’re crumbly and have almost a shortbread texture. But they are super peanut buttery which totally makes up for the crumbly mess of dough you’ll have, and the fact that you have to bake them one sheet at a time because putting them on the bottom rack of the oven will burn them faster than you can say peanut butter. Ha. It’s true! If you want, you can skip this peanut butter cookie recipe and use your favorite. Just make them smaller than usual because mini sandwich cookies are so cute and pop-able.

Dulce de Leche Peanut Butter Sandwich Cookies | thepajamachef.com

Those shortbread-y peanut butter cookies are filled with a divine homemade dulce de leche!! Alas, it is a bit finicky too, but just time-wise. All you have to do is cook sweetened condensed milk in a double boiler [mine is homemade], stirring occasionally for an hour to two hours. It’s easy enough to do when you’re home reading or watching tv or doing whatever else, so long as you can head to the kitchen every 15 minutes or so to stir it up. I know there are lots of ways to make dulce de leche [here’s a summary] but this is the only one I’ve tried. Making it in the can scares me. No matter how you make it, the resulting sweet, syrupy, caramely filling is the perfect center for crunchy peanut butter cookies. They look impressive and taste amazing. I’m sure they’ll be a bit at your next party!

three years ago: Chorizo and Potato Tacos
four years ago: Mango Chicken Curry

Dulce de Leche Peanut Butter Sandwich Cookies

  • Servings: 30 cookie sandwiches
  • Print

from Jun-blog

Ingredients:

  • 1 1/2 cups all-purpose flour
  • 1/2 teaspoon baking soda
  • 1/3 cup unsalted butter, softened
  • 1/2 cup sugar
  • 1/2 cup brown sugar, packed
  • 1 large egg
  • 1 cup peanut butter
  • 1/2 teaspoon vanilla extract
  • 1 can sweetened condensed milk [14 ounce can]

Directions:

Preheat the oven to 375 degrees F. In a small bowl, whisk together flour and baking soda.

In a large bowl, beat the butter and sugars together with a wooden spoon. A mixer can also be used. Then add egg, peanut butter, and vanilla and vigorously mix together until well combined. Add the flour mixture in 1/4 cup increments until combined. Dough will be crumbly and should just hold together.

Roll dough into 1 inch balls and place on a ungreased and cool cookie sheet. Flatten each ball with a fork: first in one direction, then the perpendicular direction to form a crisscross pattern.

Bake one cookie sheet at a time for 10-12 minutes or until just golden brown. Allow to cool for 5 minutes on the cookie sheet before removing to a wire rack to cool. Allow the cookie sheet to cool to the touch before adding more cookie dough to it. Keep dough refrigerated between batches. Dough should yield approximately 60 small one inch cookies.

While cookies are baking, prepare dulce de leche. Pour sweetened condensed milk into the bowl of a double boiler. I used a homemade one. Basically, you’ll need a large metal or glass bowl that can sit on top of a pot of simmering water without touching the water. This bowl should seal the pot so no steam escapes, because the steam is what causes the cooking effect. For more details, see this tutorial. After sweetened condensed milk is in the bowl, heat double boiler to a simmer and cook for 1-2 hours, stirring every 15 minutes or so. The longer the milk cooks, the thicker it gets as it caramelizes. The milk turns to dulce de leche as it gets to be a darker, golden brown color. The original recipe says to only cook for an hour but mine was nowhere near done by then. It took a good two hours. Cover and refrigerate dulce de leche until completely cooled–I just refrigerated this overnight. A good test for telling when dulce de leche is done is to stick a small plate in the freezer after about an hour of cooking. Remove plate from freezer. Carefully spoon a teaspoon of dulce de leche onto the cold plate and then return to freezer. In five minutes, check the consistency of the dulce de leche. If it’s what you like, great! If not, keep cookin’.

When cookies and dulce de leche are completely cooled, match cookies up by size. Spoon just under a tablespoon of dulce de leche on the flat part of one cookie, then cover with another cookie. Place on a single layer on a serving plate or cookie sheet and refrigerate until set. Keep refrigerated until ready to serve.

Breakfast, Recipes, Waffles

Ultimate Chocolate Chip Buttermilk Waffles with Caramelized Bananas

Sweet and fluffy buttermilk waffles are topped with plenty of my favorite things…including caramelized bananas… to make my ultimate waffles!

Ultimate Chocolate Chip Waffles with Caramelized Bananas | thepajamachef.com

How about a yummy breakfast for Monday morning? These waffles are my ULTIMATE breakfast, you guys. Seriously. They’re light and fluffy and full of my favorite flavors: chocolate and coconut. But they don’t stop there. No, they’re topped with sweet brown sugar caramelized bananas, peanut butter, maple syrup, more chocolate chips, and creamy vanilla yogurt [though if you’re a whipped cream fan, that would probably suit you better]. See? Yum!

Ultimate Chocolate Chip Waffles with Caramelized Bananas | thepajamachef.com

Before making these waffles, I had never caramelized bananas before, but now that I know how to do it, I probably will never stop. It’s crazy how something so easy can totally transform something I love into something I love even more! And it was super fast to do, too. I realize by saying that it means I probably didn’t use the right technique, but they tasted good… so, oh well! 🙂 Breakfast of champions, right here! Enjoy your day. 🙂

one year ago: Creamy Shells and Yogurt
two years ago: Strawberry Muffins
three years ago: Watermelon Coolers
four years ago: Brown Sugar Bacon Twists

Ultimate Chocolate Chip Buttermilk Waffles with Caramelized Bananas

  • Servings: 2-3
  • Print

Ingredients:

for waffles [adapted from allrecipes.com]

  • 1 cup all-purpose flour
  • 1/2 cup whole wheat flour [can use white whole wheat or more all-purpose flour]
  • 1 tablespoon sugar
  • 1 1/4 teaspoons baking powder
  • 1/2 teaspoon baking soda
  • 1 cup buttermilk [can use 1 tablespoon lemon juice/vinegar + enough milk to fill 1 cup]
  • 1/4 cup milk [can use half and half or heavy cream]
  • 3 tablespoons butter, melted
  • 2 eggs
  • 1/2 teaspoon coconut extract [can use vanilla or almond extract]
  • mini chocolate chips
  • peanut butter, vanilla yogurt, maple syrup, additional mini chocolate chips

for bananas [from Food.com]

  • 2 teaspoons butter or oil
  • 2-3 tablespoons sugar
  • 2 bananas, sliced into coins [bananas shouldn’t be too soft/ripe to begin with]
  • cinnamon

Directions:

Preheat waffle iron.

In a large bowl, stir together flours, sugar, baking powder, and baking soda. In a smaller bowl, whisk together milks, butter, eggs, and coconut extract. Pour the liquid ingredients into the dry ingredients gradually, carefully whisking together.

Spoon batter into hot waffle iron. About 1/3 cup is right for my waffle iron. Top batter with about a tablespoon of mini chocolate chips, then cook until steam isn’t coming out of the waffle iron and the waffle is golden brown.

Continue cooking until batter is gone; this should be about 6 waffles.

While waffles are cooking, prepare bananas. Heat butter in a small skillet set over medium heat. Sprinkle sugar on a small plate or bowl and roll bananas in sugar until coated. Place bananas in hot skillet and sprinkle with cinnamon. Cook for a minute or so until golden brown. Flip and sprinkle other side with cinnamon, then cook for another minute and remove from heat.

Top waffles with peanut butter, vanilla yogurt, bananas, and mini chocolate chips or other toppings as desired.

Appetizers, Recipes

Layered Asian Dip

This layered dip is chock full of crunchy vegetables and chicken drenched in a yummy Asian-inspired sauce. The creamy peanut butter base adds a fun twist! Enjoy with crackers at your next party! 

Layered Asian Dip | thepajamachef.com

There’s nothing like a good appetizer to get the party started, right? I have a confession to make: I am terrible at appetizers. Most seem so finicky. If I’m hosting, I can totally make some hot little bites in the oven. But as things have it, in this stage of life, I rarely host [even though I’d love to]. We’re usually tasked with bringing x, y, or z to a gathering…and it’s just a pain to try to transport a hot dish, and sometimes those cute little bites just get gross if they sit for awhile. So cold dips are my go-to appetizers. Hummus, guacamole, salsa, I love them all. But they aren’t very fancy.

Layered Asian Dip | thepajamachef.com

This Layered Asian Dip takes a normal dip up a notch! It’s a play off of Mexican Seven Layer Dip, even though it’s only a three layer dip. But it’s three layers of awesome: a creamy base of peanut butter and cream cheese; a wonderful medley of chicken, carrots, peanuts, cilantro, scallions, and aromatics like ginger and garlic; and last but not least–a slightly sweet, slightly spicy Asian dressing on top. This dressing is really what makes the dip, imo. Sure, chicken and peanut butter are staples of my diet, but the sauce brings everything together in a nice package. It’s tangy and delicious!

Layered Asian Dip | thepajamachef.com

This dip is perfect for a party because you can make all the components ahead of time and chill them in the fridge, then go get ready, and then assemble at the last minute. I love it when things work out that way so I don’t have to worry about the dish losing its beauty while we’re waiting for things to get started. This dip is best enjoyed the day it is made, but the leftovers are still tasty the next day. By the way, you’ll have some extra sauce leftover–it’s perfect for tossing with some plain white rice and cooked veggies [I love those bags of frozen Asian vegetables] for a quick side dish during the week. Enjoy!

one year ago: Grandma’s Banana Nut Bread
two years ago: Jamaican Jerk Chicken & Pineapple Black Bean Rice
four years ago: Butterscotch and Chocolate Yellow Cake

Layered Asian Dip

  • Servings: 8
  • Print

from The Sweets Life

Ingredients:

for sauce

  • 1/4 cup brown sugar, packed
  • 2 teaspoons cornstarch
  • 1 cup water
  • 1/4 cup ketchup
  • 2 tablespoons rice wine or white vinegar
  • 1 tablespoon Worcestershire sauce
  • 3 drops hot sauce [like Sriracha]

for topping

  • 3/4 cup cooked chicken, shredded
  • 1/2 cup shredded carrot
  • 1/4 cup chopped unsalted peanuts
  • 2-3 sliced scallions
  • 1/4 cup chopped fresh cilantro
  • 1 tablespoon grated fresh ginger
  • 1 clove garlic, minced

for base

  • 8 ounces softened cream cheese
  • 2-4 ounces creamy peanut butter [depending on how strong of a peanut butter flavor you like]
  • 2-3 tablespoons milk
  • crackers for serving

Directions:

First, prepare sauce. Whisk brown sugar and cornstarch together in a small saucepan set over medium heat. Pour in water, ketchup, vinegar, Worcestershire, and hot sauce. Cook for 5 minutes or until mixture thickens. Transfer to a small bowl to cool. When cool, cover and refrigerate to further thicken for 30 minutes or up to 24 hours in advance.

Next, stir together all topping ingredients in a bowl. Cover and refrigerate for 2-4 hours.

Just before serving, beat together cream cheese, peanut butter, and just enough milk to make mixture smooth. Spread on the bottom of a 10 inch pie pan or serving dish. Sprinkle topping over cream cheese mixture, then drizzle 1/2 cup sauce [there will be leftovers] on top.

Serve with crackers immediately.

Linked up with: Weekend Potluck.

Bars, Desserts, Recipes

Dark Chocolate Chunk Peanut Butter Blondies

These blondies have all of your favorite flavors: chocolate, peanut butter, and honey… and are healthy too! They’re a great gluten free and/or vegan dessert. 🙂

Dark Chocolate Chunk Peanut Butter Blondies - Gluten Free, Vegan Option | thepajamachef

Growing up, my little sister Kathleen would always copy me. Drove me nuts! Whatever I had, she wanted. Clothes, friends, privileges, etc. Man. We’re five years apart, so in my world, this was totally awful. I considered her quite the little pest for many years… but she did too, so I guess we’re even. And let’s not even get into bathroom wars. Can any other sisters relate?! 🙂

Thankfully, today Kathleen and I aren’t antagonistic towards each other anymore, and Ben and I love to hang out with Kathleen and her husband Grant. Too bad we live five hours apart! Kathleen copied me a year or so ago and made her own food blog, Two Happy Bellies. For pretty much the first time ever [in older sister speak], this copying benefited me as I could finally see all her yummy recipes in one place! Before, she’d just email/Facebook/instagram/pin them to me. Now it’s my turn to copy her with these delicious blondies!

Dark Chocolate Chunk Peanut Butter Blondies - Gluten Free, Vegan Option | thepajamachef

These blondies are the closest thing to a healthy dessert  you can have without it being fruit or something else super natural [read: WEIRD]. There’s no flour, white sugar, oil, or butter in them… they’re gluten free, and can be made vegan in a snap. The chickpea base may weird some people out, but if you don’t tell ’em, they probably won’t even know. #totallyserious These blondies are completely delicious though, and are so simple to make that they’re sure to become part of your regular rotation. Enjoy y’all!

Dark Chocolate Chunk Peanut Butter Blondies - Gluten Free, Vegan Option | thepajamachef
P.S. I just realized that my sister is the ultimate copycat… she copies me, and her nickname is Kat. Get it?!?? CopyKat! Lol I crack myself up. I should go now. 🙂 Love ya booboo!

one year ago: Eggplant Potato Frittata 
two years ago: Baked Flounder
three years ago: Brown Sugar Fruit Dip

Dark Chocolate Chunk Peanut Butter Blondies - Gluten Free, Vegan Option

  • Servings: 16
  • Print

from Two Happy Bellies

Ingredients:
  • 1 can [15 oz] garbanzo beans, rinsed and drained
  • 1/2 cup peanut butter [or other nut butter]
  • 1/3 cup honey [or pure maple syrup or agave nectar for vegan option]
  • 2 teaspoons vanilla extract
  • 1/8 tsp salt
  • 1/4 teaspoon baking powder
  • 1/4 teaspoon baking soda
  • 3.5 oz dark chocolate bar, chopped or broken into chunks OR 1/3 cup plus 2 tbsp chocolate chips [regular or vegan]
Directions:
Preheat oven to 350 degrees F.  Grease an 8×8 inch pan with cooking spray or shortening and line with parchment paper.
Using a food processor or blender, combine all ingredients except chocolate and blend until smooth. Spread batter evenly in prepared pan then top with chocolate, pressing in to incorporate.
Bake for 15-25 minutes or until toothpick comes out clean AND edges are just beginning to brown. My sister took hers out at 18 minutes and I did at about 20. They might look underdone but they will firm up as they cool.
Cool in pan for at least 20 minutes before slicing. Keep refrigerated.
Linked up with: Weekend Potluck.
Main Dishes, Pasta, Pasta, Recipes, Sides

Spicy Peanut Noodles with Kale and Edamame

Spicy peanut sauce, noodles, kale, and edamame meet in an addictive, easy pseudo-takeout meal that can be enjoyed hot or cold–what’s not to love?!

Spicy Peanut Noodles with Kale and Edamame | thepajamachef.com

This spring/summer Ben and I have been eating sesame or peanut noodles all. the. time. [Side note: is there an actual difference between them? I’m sure there is. The librarian part of me is itching to google this up and see what I find out, but I’ll restrain myself.] They have replaced our easy mac & cheese from a box dinners. I have a hard time telling you what recipe I’ve used because a) I have many pinned on Pinterest and b) don’t really measure ingredients for sauces like this because I’ve never taken the time to take a few pictures to share the recipe here! But this time I did. Measure and photograph. 🙂 And this time I didn’t use any recipe except what sounded/looked/tasted good to me. It’s a good thing I did, because my noodles were utterly amazing.

Inspired by the lovely Amy of fearless homemaker and HER spicy peanut & sesame noodles, I added mix-ins to my noodles for the first time ever. What a good choice! Adding some kale and edamame made the textures of everything just pop and look pretty. Dontcha just love all that green?! 🙂

Spicy Peanut Noodles with Kale and Edamame | thepajamachef.com

Ben walked in the door just as I was mixing everything together and was like, “what in the world is that fabulous smell?! You must be the best wife ever for cooking such an incredible dinner.” Okay, maybe his words didn’t come out exactly like that, but the sentiment was there. I know it. But seriously–these noodles DO smell fabulous. The sauce is the perfect balance of spicy, sweet, and fresh flavors. I used ground ginger in the sauce but if I had had fresh ginger… oh man. Use that if you can.

Spicy Peanut Noodles with Kale and Edamame | thepajamachef.com

Though I served these noodles as a vegetarian main course, this is a great base recipe to add some meat. I think grilled chicken or thinly sliced steak would be great. Or even shrimp or tofu. This could even be a side dish if you like. We loved every last one of these yummy noodles, and like all good Asian-ish recipes…you can enjoy them hot or cold. They’re great both ways. In the recipe below I included notes about how to prepare them to be more picnic friendly, but no matter how you make them, I’m sure you’ll love ’em! Enjoy!

one year ago: Ginger Banana Waffles
two years ago: Minty Asian Slaw
three years ago: Lemon Crinkle Cookies

Spicy Peanut Noodles with Kale and Edamame

  • Servings: 8
  • Print

Spicy Peanut Noodles with Kale and Edamame | thepajamachef.com

Ingredients:

  • 16 ounces thin spaghetti noodles [any sort of thin noodle would work–Asian of any type, linguini, etc.]
  • 3 cups kale, tightly packed & thinly sliced
  • 1 cup Thai basil, loosely packed & chopped
  • 1 cup edamame, shelled & room temperature
  • green onions, sliced, for garnish

for sauce

  • 1/4 cup natural peanut butter
  • 1/4 cup soy sauce
  • 1/4 cup rice vinegar
  • juice of half a lime [roughly 2 tablespoons]
  • 1 tablespoon toasted sesame oil
  • 1 tablespoon Sriracha
  • 1 tablespoon honey
  • 1/2 teaspoon fish sauce
  • 1/2 teaspoon ground ginger [use 1 inch grated fresh ginger if you have it]
  • 2 cloves garlic, finely minced
  • ~1/2 cup pasta water, to thin sauce

Directions:

Prepare noodles according to package directions. Be sure to reserve about half a cup of pasta’s cooking water to thin the sauce.

While noodles are cooking, whisk together all ingredients for sauce except for the pasta water.

When pasta is ready, drain, and return to pot [or a large bowl]. Add kale, basil, and edamame and toss. Thin dressing with 3 tablespoons of pasta water, whisk, and the pour over noodles and vegetables. Toss well to coat. If necessary, add additional pasta water to thin sauce further, up to a full half cup.

Serve noodles with green onions for garnish.

Note:

Can be enjoyed warm or cold, but the dressing does really absorb into the noodles after refrigeration [which doesn’t bother me but does affect presentation] so if you’re making these noodles for an event and want to serve them cold, be sure to rinse well after draining to get rid of starch, toss with a bit of sesame oil, and then refrigerate separately from the sauce and veggies. Toss together before serving. I haven’t tried this technique with this recipe, but I have done similar things for other dishes so I assume it’d work well! Using rice noodles [that you don’t boil to cook, thus, they stay cold] might be a good option too.