Desserts, Other, Recipes

SRC: Homemade Magic Shell

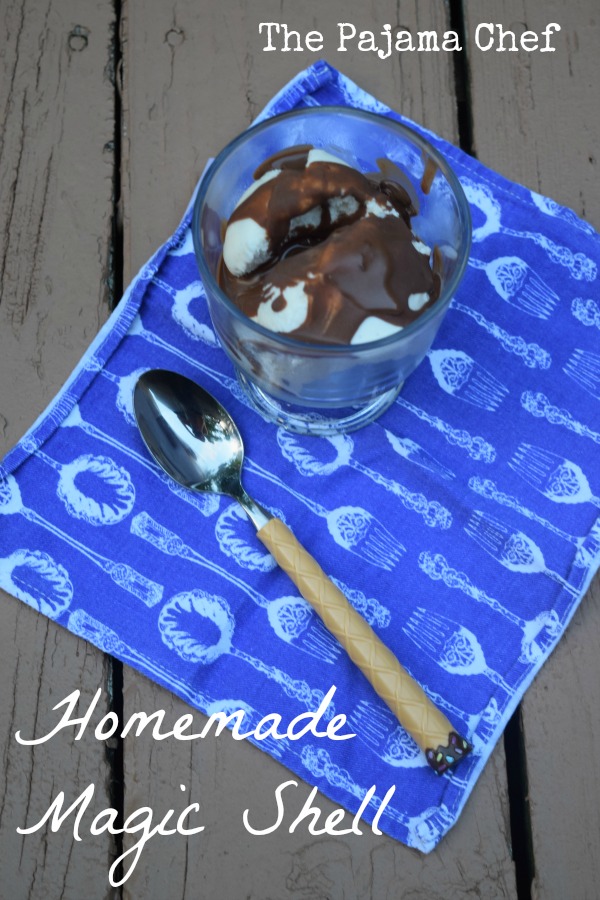
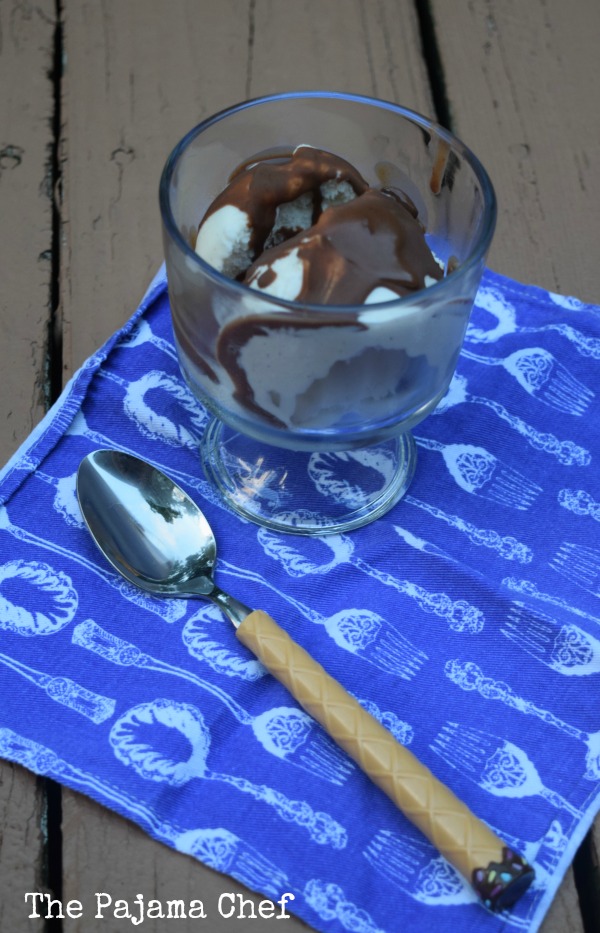
Just three ingredients and a few minutes til you have delicious, homemade magic shell… just looking for an ice cream home! 🙂

Just three ingredients and a few minutes til you have delicious, homemade magic shell... just looking for an ice cream home! :)

Hello and welcome to another edition of the Secret Recipe Club! I haven’t been around for a few months, but I’ve had a good excuse in the form of this sweet baby boy. This has been my longest–and only–hiatus from SRC since I joined… but this little guy has been well worth it. 🙂

https://www.instagram.com/p/BJA6HJmAmNS/?taken-by=thepajamachef

Isn’t he cute?!?? I may be a little biased but I think so… he was born in May and is doing great. 🙂 Anyways, I’m happy to be back blogging and back at it with SRC. This month I was assigned to Kirstin’s blog, Loving Life, which is filled to the brim with dozens of easy family recipes. Kirstin lives in the Pacific Northwest with her family, an area of the country that I’m not very familiar with but she did live in Ohio so we have that in common. Woo! It was so hard to choose what to make from the many delcious treats she shares on her blog. This fall I want to make these Pumpkin Chocolate Chip Bars and at Christmas, this Cranberry Apple Casserole will be sure to be on the menu. But for now, I had to go for a summer recipe… and what’s more summery than ice cream?!? Not a whole lot…

Just three ingredients and a few minutes til you have delicious, homemade magic shell... just looking for an ice cream home! :)

Ben and I have been going through half gallons of ice cream like nobody’s business this summer. Seriously. It’s been so hot and I haven’t had much time to bake, so ice cream is an easy and wonderful dessert option. Ben also has an ice cream pocket [a special space in his stomach to store ice cream, duh] and I am developing one, so we don’t mind a bit. Usually, we go for flavors like Peach, French Silk, Moose Tracks, Black Cherry, etc… you know, flavors that don’t really need toppings. But sometimes it’s fun to go for a classic vanilla bean and add toppings to suit your needs. Yes, I said needs. See ice cream pocket above. 🙂 I like adding chocolate chips and a little bit of melted peanut butter, while Ben prefers chocolate sauce or caramel sauce. One topping we almost never have at the house because it’s so dangerous is magic shell. That stuff is FUN to watch harden on your ice cream, isn’t it? I remember when my mom bought it for the first time. We were all in awe! So when I saw that Kirstin had a homemade magic shell recipe, I had to try it out. It just takes three ingredients and a few minutes to get to magic shell perfection. I wasn’t sure if it would really work like the store bought stuff, but it DOES! I was so impressed. I know this is a recipe I’ll be making over and over again, and I hope you will too. Thanks, Kirstin! Enjoy!

Just three ingredients and a few minutes til you have delicious, homemade magic shell... just looking for an ice cream home! :)

one year ago: Eggplant Caponata Sandwiches
two years ago: Baked Cauli-Tots
three years ago: Quinoa Black Bean Burritos with Southwest Sauce

four years ago: Summery Squash and Chicken Lasagna
five years ago: Kale Frittata
six years ago: Jambalaya

Homemade Magic Shell

from Loving Life

Ingredients:

  • 1 cup chocolate chips
  • 2 tablespoons coconut oil
  • 2 tablespoons peanut butter

Directions:

Combine all ingredients in a small saucepan set over medium-low heat. Stir constantly until melted, then allow to cool for a few minutes before spooning onto ice cream.

Be sure to check out other SRC recipes at the link below!

Beans, Main Dishes, Recipes

Baked Burritos with Pinto Beans + Kale

These fabulous savory bean and rice burritos are made even more delicious by the addition of hearty kale and gooey Monterey Jack cheese. You’ll be sure to love them–a great family meal!

These fabulous savory bean and rice burritos are made even more delicious by the addition of hearty kale and gooey Monterey Jack cheese. You'll be sure to love them--a great family meal!

Are you ready for a knock-your-socks off vegetarian burrito recipe? If so, you’ve come to the right place! And if not–or if vegetarian fare isn’t your thing–please stay, because I know you’ll enjoy it anyway! 🙂 Or you can just add some shredded chicken to the burrito filling. Don’t worry, I’ll be none the wiser. Haha. Now onto the good stuff! These burritos! Mmmm… they are your classic vegetarian burrito–rich and hearty beans and rice… but with a twist! This veggie burrito adds some flavorful and fresh kale to the mix, along with an awesome blend of savory seasonings [garlic, onion, tomato paste, oregano, and cumin] for a fabulous burrito like none other. You will simply be amazed by how good this burrito filling is! Divine! 🙂

These fabulous savory bean and rice burritos are made even more delicious by the addition of hearty kale and gooey Monterey Jack cheese. You'll be sure to love them--a great family meal!

Now, I won’t lie. There are quite a few ingredients and steps below for this recipe, and it takes about an hour from start to finish. Obviously I made this pre-baby. Gah. But, it’s still totally doable for a family meal because this is the sort of meal you can make in steps and keep in the fridge [or freezer] to eat all week long. Basically, you begin by making some rice–with garlic and broth instead of water for added yumminess. Then you saute up some onion, add your seasonings and kale, and let that cook down a bit. Then you mix everything together and add cheese and tortillas… bake, and voila! Dinner is served. Yum.

These fabulous savory bean and rice burritos are made even more delicious by the addition of hearty kale and gooey Monterey Jack cheese. You'll be sure to love them--a great family meal!

I mention this in the recipe notes below, but what I wanna emphasize is that this makes a TON of burrito filling, so YAY! Lots of work=lots of meals. Hooray. When I made this for us, we ate burritos a few times during the week, adding the filling to tortillas as desired. Then we froze the rest for another time. America’s Test Kitchen, the author of this recipe in their amazing vegetarian cookbook [go check it out! I borrowed it from my library but I want a copy for home now.] suggests that this serves six. Well, maybe our tortillas were wayyyy smaller, but we got at least 10 burritos, if not MORE out of the recipe as written below. Your mileage may vary, but that’s how it went for us. I definitely loved this dish and so did Ben. I think I’m going to make a batch before I go back to work after Labor Day [tear] for quick weeknight dinners in my new working mama life. Hope y’all enjoy!

one year ago: Zucchini Apple Walnut Muffins
two years ago: Baked Honey Chicken Nuggets with Homemade Chick-Fil-A Sauce
three years ago: Churro Cheesecake Bars
four years ago: Pesto Potato Salad
five years ago: Salmon with Lemon, Tarragon, and Garlic Sauce
six years ago: Summer Mexican Soup

Baked Burritos with Pinto Beans + Kale

  • Servings: 6+
  • Print

from The Complete Vegetarian Cookbook by America’s Test Kitchen

Ingredients:

  • 2 1/4 cups vegetable or chicken broth, low sodium
  • 3/4 cup long grain white rice
  • 6 cloves garlic, minced
  • salt + freshly ground black pepper
  • 1/4 cup fresh cilantro, minced + more for topping if desired
  • 1 tablespoon olive oil
  • 1 onion, finely diced
  • 3 tablespoons tomato paste
  • 1 teaspoon minced chipotle chile in adobo sauce
  • 1 tablespoon ground cumin
  • 1 teaspoon dried oregano
  • 1 bunch kale or swiss chard, stemmed and leaves chopped into thin ribbons
  • 1 – 15 ounce can pinto beans, rinsed and drained
  • 1 tablespoon lime juice
  • 6 burrito sized flour tortillas
  • 10 ounces grated Monterey Jack cheese
  • sour cream, salsa, etc. – for serving as desired

Directions:

In a medium saucepan set over medium-high heat, combine 1 1/4 cups broth, rice, half of the garlic, and some salt and pepper. Bring to a boil, then cover and reduce heat to low. Cook for about 20 minutes, until rice is tender and broth has been absorbed. Remove from heat and set aside, covered, for 10 minutes. Add cilantro and fluff with a fork.

Meanwhile, in a large skillet, heat oil over medium heat. Add onion and cook until softened, about 4-5 minutes. Add in tomato paste, chipotle chile pepper, cumin, oregano, remaining garlic, and salt and pepper. Stir everything together for a minute, then add kale and 1/2 cup broth. Cover and let simmer for 15 minutes, until kale has softened.

In a bowl, combine half of the beans and the remaining 1/2 cup broth. Mash with a potato masher until coarse, then fold into kale mixture along with remaining beans and lime juice. Cook, stirring continually, for a few minutes until liquid is mostly evaporated. Stir in rice.

Turn oven on to broil. Line a baking sheet with foil or parchment paper.

Next, assemble burritos. Warm tortillas in the microwave, then divide mixture between tortillas, adding a little cheese inside of each tortilla before rolling into burritos. Place seam-side down on prepared baking sheet, then sprinkle with a little more cheese. Broil until cheese melts and begins to brown, about 3-5 minutes.

Serve with sour cream, salsa, etc. as desired.

Notes:

The prepared burrito filling also freezes well, on its own or in pre-made burritos ready for the oven. To heat later, microwave defrosted burrito filling until hot then prepare burritos with cheese and broil as directed above. Pre-made and frozen burritos can be heated from frozen in the oven at 375 degrees for 20-30 minutes until hot.

The cookbook suggests this recipe serves 6. However, we got at least 10 burritos out of this amount of filling. Our tortillas may have been smaller and/or filled less, so your mileage may vary.


Main Dishes, Recipes, Salads

Awesome Kale Salad

This kale salad is truly awesome. I mean, adding fried eggs and fried potatoes to kale makes it awesome, even if it sounds a little weird at first. You need to try this!

This kale salad is truly awesome. I mean, adding fried eggs and fried potatoes to kale makes it awesome, even if it sounds a little weird at first. You need to try this!

I’ve been making this kale salad pretty much non-stop since last July. Well, non-stop if you count the break from September to March. See, I found out in September that I was pregnant with Baby Volde and so I decided to nix fried eggs until the baby was born. I didn’t obsess over dietary stuff during pregnancy but uncooked eggs [not in cookie dough, mind you] kinda freak me out. But they’re delicious so I push through it for the joy, haha. And when springtime started coming and mama needed a good salad, I decided to live on the wild side and hope fried eggs didn’t make me sick. They didn’t, whew! But I’m not a doctor so if you’re pregnant or otherwise immunocompromised, proceed at your own risk. #disclosureover

Anyway, I love this salad for three reasons: 1) kale; 2) eggs; 3) potatoes. And also for two more: healthy and fried. Total opposites, I know… but kale is healthy… so are eggs and potatoes too. But they’re a little more unhealthy if you fry them… but the kale part takes away the guilt! That, and the potatoes are just pan-fried so that is mucho better than deep frying, right? Soooo, this salad is the BEST combination of healthy and fried, guilt free and delicious. Does that make sense to you? It makes sense in my head so I hope so!

This kale salad is truly awesome. I mean, adding fried eggs and fried potatoes to kale makes it awesome, even if it sounds a little weird at first. You need to try this!

You have to experience this salad to understand its greatness. At first Ben was skeptical. I mean, fried eggs on a salad? Bizarre. And, the runny egg part of the fried egg serves as the salad dressing. Another notch on the weird scale, but it works. Plus, the egg gives a little more staying power to the salad. Usually I have to have meat on a salad to make it filling, but not here. Though you could add bacon for some extra deliciousness. 🙂 Anyway you make it, you’re sure to love it!

Oh and before I go, I have to mention my silverware. Isn’t it so cool? I received a fork and spoon handstamped from Tattooed Silver, a great small business located in Ohio. Tattooed Silver is the business of a fellow Wittenberg University alum, and I’m excited that we started a lil partnership. You can find them on Instagram, Facebook, and Etsy. Her products are all so unique and fun, and would make great gifts too. 🙂

Enjoy!

one year ago: Cheesy Veggie Pasta
two years ago: Chocolate Cream Filled Cupcakes
three years ago: Double Chocolate Banana Muffins
four years ago: Chocolate Zucchini Muffins
five years ago: Crock Pot Santa Fe Chicken
six years ago: Potato Soup

Awesome Kale Salad

  • Servings: 4
  • Print

Inspired by the best parts of these salads from Jenna’s Everything Blog and We Are Not Martha, with my own additions too 🙂

Ingredients:

  • 1 bunch kale
  • extra virgin olive oil
  • juice of 1 lemon
  • salt and freshly ground pepper
  • 1/2 tablespoon honey, if desired
  • 1 teaspoon whole grain dijon mustard, if desired
  • 4 medium potatoes – 1 per person
  • chili powder
  • dried oregano
  • garlic powder
  • 8 eggs – 2 per person
  • optional additions: diced avocado, crumbled feta, chopped bacon, etc.

Directions:

Wash and dry kale, then cut into thin strips taking care to remove the middle stems. Place in a large bowl and massage with several glugs of olive oil and the lemon juice until kale softens, then season with salt and pepper. If desired, drizzle honey and dijon mustard on top and toss/massage that in as well.

Meanwhile, dice potatoes into bite size pieces [1 per person]. Heat a large skillet over medium-high heat and add some olive oil to the pan. When hot, reduce heat to medium and add potatoes. Season with a little salt, a lot of pepper, and some chili powder, garlic powder, and oregano. Saute, stirring frequently, for about 10-12 minutes until potatoes are crispy and cooked through.

When potatoes are finished, remove to another dish and cover with foil to retain heat. Reduce heat to medium-low and fry eggs as desired [2 per person].

Serve kale in a big bowl or plate. Top with potatoes and fried eggs, along with other desired additions. Enjoy!

Beef, Main Dishes, Recipes

Oven Baked Tacos

You’ll love these crispy, melty baked tacos! The filling is made from both beef and beans, so it’s extra delicious! 🙂

You'll love these crispy, melty baked tacos! The filling is made from both beef and beans, so it's extra delicious! :)

What’s better than–and easier than–regular tacos? Oven tacos! I’m totally serious! These have been a thing for a few years now, so you may have already seen them before. But if you haven’t tried them yet, you should. ASAP. They’re a great way to make tacos for a crowd and in general, they’re just a great change up from regular taco night. Plus, it’s also fun to make homemade crispy taco shells! Though it involves being extra careful when you’re working with hot oven racks, I bet kids would LOVE to watch corn tortilla shells transform into crispy shells. 🙂 I mean… I do, so what kid wouldn’t? Haha.

You'll love these crispy, melty baked tacos! The filling is made from both beef and beans, so it's extra delicious! :)

I’ve made this recipe as written below a handful of times, but I’ve always thought about how I could switch up the filling but keep the concept the same. I haven’t ventured very far yet–just subbing black beans from refried beans, but that’s a tasty start! I think these tacos would be great with shredded chicken, carnita meat, fajita veggies, pinto beans, or any other filling your little taco-loving heart desires! No matter how you make it, this dish is a favorite. It’s hard to decide what the best part of these tacos are–the crisp homemade shells, the bubbly and melty cheese, or the flavorful beef and bean filling… but I do know that these tacos have been part of our regular taco rotation for a couple years now so I hope you try them! If you need any sides for taco night, why not try my Mexican RicePerfect Black Beans, or this yummy Guacomole Salsa? Enjoy!

You'll love these crispy, melty baked tacos! The filling is made from both beef and beans, so it's extra delicious! :)

one year ago: Turkey Sloppy Joes
two years ago: BBQ Baked Spaghetti
three years ago: Honey Lemon Thyme Iced Tea
four years ago: Chocolate Chip Banana Pancakes
five years ago: Spiced Waffles

Oven Baked Tacos

  • Servings: 8-10 tacos
  • Print

from Macaroni & Cheesecake

Ingredients:

  • 8 to 9 corn tortillas [or for an easier twist, premade hard taco shells]
  • 1 pound lean ground beef
  • 8 ounces refried beans [from half of a 15 ounce can]
  • 8 ounce can tomato sauce
  • 1 1/2 tablespoons taco seasoning  [about half of a store-bought packet]
  • 1 1/2 cups shredded cheese
  • taco toppings – chopped lettuce, avocado, tomatoes; sour cream; cilantro; etc.

Directions:

Begin by making the crispy taco shells. Preheat oven to 375 degrees. In batches, microwave tortillas in a damp dishtowel or paper towel, if you prefer, for about 20-30 seconds until tortillas are pliable. Coat on each side with cooking spray, then lay on a cutting board or plate. When all are ready, open oven and carefully pull out the top oven rack partially. Drape tortillas over rungs so they are hanging upside down and forming that hard taco shell shape. If you prefer, you can remove the rack before you preheat the oven so you can do this step with a cool oven rack and just slide it back in. I found it easier to do it this way personally though. Bake for about 6-8 minutes, until crispy, then carefully remove from the oven with tongs and allow to cool on a cooling rack.

Adjust oven temperature to 400 degrees, then spray a 9×13 inch baking dish with cooking spray.

Meanwhile, brown ground beef in a large skillet. Remove grease, then stir in tomato sauce, refried beans, and taco seasoning. Heat on medium-low for a few minutes to heat through.

Remove pan from heat and fill each cooled taco shell with the meat mixture. Stand each filled shell up in prepared pan. Sprinkle everything with cheese, then bake for 10-12 minutes, until cheese melts. Serve with desired toppings and enjoy!

Note:

To reheat and retain the crispy shell, heat leftovers at 350 degrees for about 10 minutes, checking carefully so nothing burns.

Cookies, Desserts, Recipes

Avalanche Cookies #bookclubcookbookCC

These addictive creamy peanut butter-based no bake cookies are full of fluffy marshmallows, decadent white chocolate, and crunchy Rice Krispies cereal. Believe the hype–these are fabulous!

These addictive creamy peanut butter-based no bake cookies are full of fluffy marshmallows, decadent white chocolate, and crunchy Rice Krispies cereal. Believe the hype--these are fabulous!

Have you ever had Avalanche Cookies before? Or the original Avalanche Bark from Rocky Mountain Chocolate Factory? If you haven’t, you are missing out! But good thing–these cookies are super simple to make and they are no bake, so perfect for the current heat wave of summer! It’s been about a zillion degrees in Nashville lately, so I haven’t wanted to turn my oven on to bake. And with a newborn, it’s not like I have much time anyways. 🙂 But what I DO have time for is super easy no bake treats like these… or these chocolate peanut butter granola bars. Mmmm!

These addictive creamy peanut butter-based no bake cookies are full of fluffy marshmallows, decadent white chocolate, and crunchy Rice Krispies cereal. Believe the hype--these are fabulous!

I really shouldn’t make these treats very often though, because they are so addictive. Whether you’re eating the “batter” or the cookies themselves, you will want to keep going back for more and more. They have such a rich, distinctive flavor–the perfect blend of caramel-y, butterscotch-y, chocolate-y goodness that arises when you mix together peanut butter and white chocolate. Originally I wasn’t going to share this recipe as my contribution to #BookClubCookbookCC for our June selection, Chocolat, because these treats don’t seem as sophisticated enough to be French… but then I decided, what the heck. They have chocolate in them and they are tasty treats. Who can say no to that? Certainly not the French, haha. I haven’t actually read the book Chocolat or seen the film [yikes] but I would like to, so I will request them from my local library soon. 🙂 Thanks for hosting this month and for pushing me to make something AND write a blog post this week, Sarah! If you would like to win a copy of The Book Club Cook Book, the cookbook that this event is based off of, scroll to the end of this post. This month we are giving away TWO copies so you have a great chance to win! 🙂

These addictive creamy peanut butter-based no bake cookies are full of fluffy marshmallows, decadent white chocolate, and crunchy Rice Krispies cereal. Believe the hype--these are fabulous!

There are many versions of these cookies online–even a few bar cookies variations–but what I did differently was to add additional cereal to the peanut butter/white chocolate mixture. This adds a little bit of extra crunch [and stretches the number of cookies you can make, which is always a plus in my book]. But if you want a richer treat, you can reduce the cereal down to 1 1/2 or 2 cups. We thought they were plenty rich though… and plenty delicious. I added mini chocolate chips to a few and boy was that great! I think sprinkles on top would be wonderful too, but certainly not necessary. No matter how you make these, everyone will love them. Enjoy!

one year ago: Strawberry Ginger Smoothie
two years ago: Tabbouleh 
three years ago: Italian Chicken & Veggie Couscous Bowls
four years ago: Banana Crumb Muffins
five years ago: Creamy Taco Mac

Avalanche Cookies

  • Servings: 4 dozen
  • Print

slightly adapted from Cookies & Cups

Ingredients:

  • 3 cups crispy rice cereal [like Rice Krispies]
  • 2 cups mini marshmallows
  • 16 ounces white chocolate [chips or candy coating]
  • 1 cup creamy peanut butter

Directions:

In a large bowl, stir together cereal and mini marshmallows. Line two baking sheets with silicone liners or wax/parchment paper.

Melt white chocolate and peanut butter together using your desired method. I used the white chocolate candy coating and melted that for 1 minute in the microwave, then added the peanut butter and melted everything together for about 20 seconds, but your results may vary. You can use a double boiler if you prefer.

Immediately pour white chocolate mixture over cereal mixture, then stir together. Scoop out onto prepared baking sheets in about 1 tablespoon rounded scoops. Refrigerate to for about 20 minutes or so to set, then enjoy!

These are pretty stable at room temperature but if it’s really hot or humid you may want to refrigerate until serving if possible.

Mix ins like mini chocolate chips or sprinkles are always good, but not necessary. 🙂


Giveaway
This month Sarah at Thing I Make (for Dinner), this month’s host, is giving away two copies of the book.* Enter to win a copy of the cookbook so you can join us in future months, if you wish!
TWO of our lucky readers – US and Canada only! – can enter to win a copy of The Book Club Cookbook, Revised Edition: Recipes and Food for Thought from Your Book Club’s Favorite Books and Authors by Judy Gelman and Vicki Levy Krupp, courtesy of Tarcher-Penguin. Giveaway runs from June 1st till June 30th at 6 o’clock PM, Pacific time. Please see terms and conditions in the rafflecopter widget below. Many thanks to Tarcher Books. You may find Tarcher: on the web, on Facebook, on Twitter, and on Pinterest.

a Rafflecopter giveaway
https://widget-prime.rafflecopter.com/launch.js

*Disclosure: Sarah received a complimentary copy of The Book Club Cookbook, Revised Edition: Recipes and Food for Thought from Your Book Club’s Favorite Books and Authors by Judy Gelman and Vicki Levy Krupp as an opportunity to give a copy away. Opinions are our own. We received no further compensation for our posts.