Chicken, Main Dishes, Recipes

Simple Sheet Pan Chicken Fajitas

Simple sheet pan chicken fajitas – I think you are going to want these in your mouth, like, last night for dinner. They bake ALL BY THEMSELVES in the oven but still have a bit of that smoky flair you love. A great weeknight dinner that the whole family will enjoy!

Simple sheet pan chicken fajitas - I think you are going to want these in your mouth, like, last night for dinner. They bake ALL BY THEMSELVES in the oven but still have a bit of that smoky flair you love. A great weeknight dinner that the whole family will enjoy!

Yup, hopping on the sheet pan meal train. I even have a whole Pinterest board dedicated to them. Because seriously… they are a #weeknightdinner savior.

My oven died a few weeks ago, and I was utterly devastated. Fortunately, it was just the heating element–a pretty inexpensive repair–but I did freak out quite just a bit, especially since this happened after I prepped English muffin bread dough AND lasagna so I couldn’t bake either. Bummer. But on the bright side (if there is a bright side to a non-functional oven), I salvaged the dough by making individual English muffins on the stovetop. Phew! But back to sheet pan dinners. They are the best cause they are eeeeeeeasy! I mean, seriously. Chop, cut, slice a few things, throw it on a pan with some seasonings… bake bake bake, and presto! Dinner. Kinda like a casserole, except without the weird cream ‘o soup sauce. And now I can make ALL THE sheet pan meals and casseroles I want ’cause my oven is back in action! Hooooray!

Simple sheet pan chicken fajitas - I think you are going to want these in your mouth, like, last night for dinner. They bake ALL BY THEMSELVES in the oven but still have a bit of that smoky flair you love. A great weeknight dinner that the whole family will enjoy!

My sister introduced me to this fabulous recipe over the summer, and I can’t tell you how many times I’ve made it. The fajita seasoning is absolutely mouthwatering and is full of simple seasonings you probably already have in your spice rack. The veggies come out perfectly crisp-tender, and the chicken is sizzling hot. I like to dress my fajitas with plenty of lime juice and cilantro, and not much else–maybe a little bit of sour cream or avocado if I’m feeling it. But like with most Tex-Mex recipes, everyone can customize their plate as desired. #WIN! This recipe makes great leftovers–enjoy it the first night in tortillas, the second day for lunch over Mexican rice or lettuce, and the third day in a quesadilla! Don’t be frightened by the one hour time mentioned in the recipe below. Most of it is cooking, promise! If I can make this after work with a baby in tow, so can you! 🙂

one year ago: White Bean Sriracha Dip
two years ago: Homemade Turkey Sausage Patties
three year ago: Flourless Peanut-Chocolate Cookies
four years ago: Buffalo Pretzels
five year ago: Chicken Noodle Soup
six years ago: Mediterranean Tuna Salad

Sheet Pan Fajitas

  • Servings: 8
  • Print

slightly adapted from Budget Bytes

Ingredients:

fajita seasoning

  • 2 tablespoons chili powder
  • 1 tablespoon paprika
  • 1 teaspoon onion powder
  • 1 teaspoon garlic powder
  • 1 teaspoon dried oregano
  • 1 teaspoon cumin
  • dash of cayenne powder – omit if you don’t want a lot of spice
  • freshly ground black pepper, to taste – I’m pretty liberal with black pepper 🙂
  • 1 tablespoon cornstarch

fajitas

  • 1 large onion – I like sweet onions or red onions
  • 4 bell peppers – I like to use a combination of colors
  • 1 1/2 pounds chicken breast
  • 3 tablespoons olive oil
  • juice of 1 lime
  • tortillas, rice, sour cream, avocado, cilantro, pico de gallo, etc. – for serving, as desired

Directions:

Preheat oven to 400 degrees F.

In a small bowl, stir together all ingredients for the fajita seasoning and set aside.

Slice the onion and bell peppers into 1/4-1/2 inch wide strips. Place on a large sheet pan [or divide between 2 9×13 baking dishes]. Cut the chicken breast into thin strips and add to sheet pan with the vegetables.

Sprinkle the seasoning over the chicken and vegetables, then drizzle the olive oil on top. Toss together [your hands are great for this!] and spread into an even layer.

Bake for 20 minutes, then stir everything and return to oven, baking for another 15-20 minutes. Sprinkle lime juice over fajitas, then serve in tortillas or over rice with sour cream, avocado, cilantro, and pico de gallo. Enjoy!

Pro Tip: Make your life easier by making this ahead! Make the seasoning, then cut chicken and veggies and put everything in a ziptop bag. Then pour the olive oil into the bag and shake. Let it marinate in the fridge up to 24 hours before baking. 
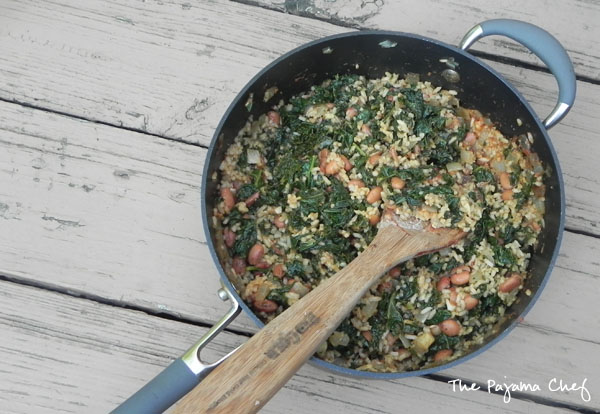
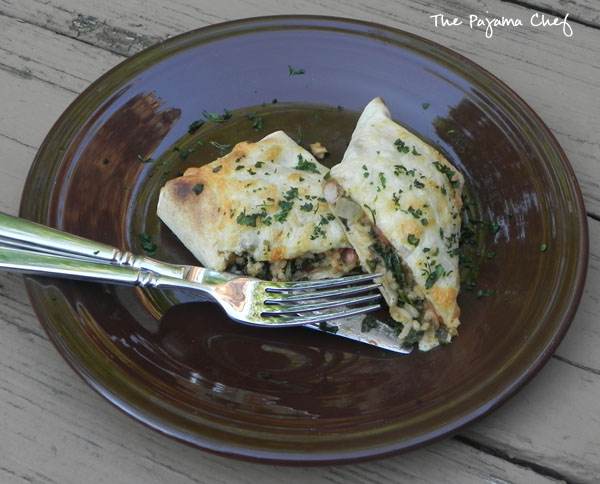
 

Advertisement
Breakfast, Recipes, Waffles

SRC: Loaded Cornbread Waffles

Cornbread waffles filled with cheese, peppers, and onions are loaded with sausage, tomatoes, a creamy avocado spread, and a fried egg for an impressive brunch like no other! This is a fantastic restaurant-worthy dish that’s easy to make at home. You’ll be sure to love it!

Cornbread waffles filled with cheese, peppers, and onions are loaded with sausage, tomatoes, a creamy avocado spread, and a fried egg for an impressive brunch like no other! This is a fantastic restaurant-worthy dish that's easy to make at home. You'll be sure to love it! #secretrecipeclub

I can’t believe I’m writing my LAST Secret Recipe Club post! So sad. But I’m glad the club is going out on a good note…it was a good run, guys! And this month, I had a GREAT SRC assignment. I was assigned to choose and make a recipe from April’s blog, Home Sweet Homestead. April lives in the great state of Indiana [YAY I still love Indiana even though I now live in Tennessee]. She always is making lots of delicious recipes that her carnivore husband loves while still accomodating her food allergies. I’m always impressed by her creativity and innovation in the kitchen. It was hard to narrow down the list, but I eventually decided to choose between the following: Swedish Meatballs, Fish & Chips, Peanut Butter Quinoa Protein Balls, Chicken Fried Chicken, Apple Pie Breakfast Quinoa, or Loaded Cornbread Waffles. I think by the title of this post you can figure out what recipe I chose, but MAN was it hard to decide. I guess I had frying things [even though I rarely do that] and quinoa on the brain when I browsed her blog… and I chose neither, ha.

Cornbread waffles filled with cheese, peppers, and onions are loaded with sausage, tomatoes, a creamy avocado spread, and a fried egg for an impressive brunch like no other! This is a fantastic restaurant-worthy dish that's easy to make at home. You'll be sure to love it! #secretrecipeclub

For those of you who know me, you know I’m a breakfast fiend so when I saw loaded waffles I said, “sign me up!” April’s original recipe is gluten and egg-free, but I just used my regular all-purpose flour and an egg because that’s what I had on hand. I’m sure the original recipe is wonderful too! It’s been a long time since I’ve made waffles so I was glad to dust off my waffle iron for this delectable meal! It is absolutely perfect for breakfast, brunch, lunch, or dinner. No matter when you serve it, everyone is bound to enjoy this savory take on waffles. [Unless you don’t let them, like poor #BabyVolde below.]

https://www.instagram.com/p/BM_3wzvAdMr/

There is so much good stuff in and on these cornbread waffles. Though loaded dishes are super popular at restaurants, I rarely order them because usually the base [fries, tortilla chips, potato soup, etc.] is soggy and/or bland and the dish itself isn’t very healthy. While I won’t say this is the healthiesbreakfast or brunch on the planet, it’s better than some–and these waffles are certainly NOT bland or soggy. 🙂

Cornbread waffles filled with cheese, peppers, and onions are loaded with sausage, tomatoes, a creamy avocado spread, and a fried egg for an impressive brunch like no other! This is a fantastic restaurant-worthy dish that's easy to make at home. You'll be sure to love it! #secretrecipeclub

The waffles are filled with peppers, onions, cheese, and garlic and are the crispiest, heartiest waffles I’ve ever made at home! That’s the cornmeal for you! They truly DO deserve that cornbread title. These aren’t cornmeal waffles; they are cornbread in waffle form. Yum. In terms of toppings, I took a slightly different route than April–I added some ground sausage and a fried egg to the mix. But don’t forget April’s fresh toppings! These waffles wouldn’t be the same without the creamy avocado spread, chopped tomatoes, shredded cheese, or sour cream. I suggest using all these toppings but feel free to use what your family will enjoy. 🙂 No matter how you make them, they are sure to be great!

Cornbread waffles filled with cheese, peppers, and onions are loaded with sausage, tomatoes, a creamy avocado spread, and a fried egg for an impressive brunch like no other! This is a fantastic restaurant-worthy dish that's easy to make at home. You'll be sure to love it! #secretrecipeclub

Thanks, April, for a great recipe. And thank you to everyone who has been a part of the Secret Recipe Club–it’s been fun and tasty, guys! 🙂 I’ll miss checking out posts every Monday but look forward to other blogging events in the future.

one year ago: Simple Teriyaki Chicken
two years ago: Chaider
three years ago: Pizza Frittata 
four years ago: Lemon Herb Eggs in Ciabatta 
five years ago: Honey Whole Wheat English Muffins
six years ago: Pumpkin Cinnamon Rolls

Loaded Cornbread Waffles

  • Servings: 3
  • Print

adapted from Home Sweet Homestead

Ingredients:

for avocado spread

  • 1 avocado
  • 2 teaspoons minced fresh cilantro
  • juice of 1/2 a lime
  • salt

for waffles and toppings

  • 1/3 to 1 pound ground sausage
  • 1/2 bell pepper – approximately 3/4 cup, finely diced
  • 1/4 onion – approximately 1/4 cup, finely diced
  • 2 cloves garlic, minced
  • 1/2 cup all-purpose flour
  • 1/2 cup cornmeal
  • 1 tablespoon baking powder
  • 1/2 cup milk
  • 1/3 cup shredded cheddar cheese
  • 1 egg
  • 2 tablespoons butter, melted and slightly cooled
  • freshly ground black pepper
  • chopped tomato, for topping
  • cilantro, for topping
  • sour cream, for topping
  • 1 egg per person, for topping
  • shredded cheddar cheese, for topping

Directions:

In a bowl, mash avocado. Mix in cilantro, lime juice, and a sprinkle of salt. Cover and refrigerate until ready to serve.

In a large skillet, brown ground sausage. You’ll only need about 1/3 pound for 3 servings, but you could make a whole pound and have leftovers–this is what I did!

When cooked through, remove sausage to a bowl and cover to keep warm.

In the same skillet, add peppers, onions, and garlic and cook for 4-5 minutes until softened.

Meanwhile, prepare waffle batter. In a medium bowl, stir togehter flour, cornmeal, and baking powder. In a measuring cup, whisk together milk, cheese, egg, and butter. Pour wet ingredients into the dry and stir gently to combine. Fold in softened vegetables and a healthy amount of freshly ground black pepper. Batter should be thick but still able to be poured, so add a little extra milk if its too thick. I ended up adding a bit TOO much milk so I had to add another tablespoon of cornmeal too.

Cook batter in your waffle iron according to manufacturer instructions, until crisp and golden brown. Batter should yield about 3 waffles.

While waffles are cooking, fry one egg per person using, you guessed it, the same skillet as before! Scrambled eggs would also be delicious–or no eggs too if that’s what you prefer.

Top each waffle with a smear of avocado spread, sausage, chopped tomatoes, chopped cilantro, cheese, a dollop of sour cream, and a fried egg. Enjoy!


Be sure to check out all the other SRC recipes linked up today below!

Cakes, Desserts, Recipes

Chocolate Covered Strawberry Cake

Fresh strawberry cake from scratch… no Jello, artificial flavorings, or anything fake! This cake is delicious and easier than you would think! Top it with a rich chocolate frosting and you have Chocolate Covered Strawberry Cake that everyone will want an extra slice…or two…or three of!

Fresh strawberry cake from scratch... no Jello, artificial flavorings, or anything fake! This cake is delicious and easier than you would think! Top it with a rich chocolate frosting and you have Chocolate Covered Strawberry Cake that everyone will want an extra slice...or two...or three of!

On Halloween, a Dairy Queen opened about five minutes from our house. Dangerous! Before that, we had to drive a decent distance to reach one. Some of the folks in our area were upset, saying the DQ would “ruin” the area with another fast food area. Ruin the area? Ummm, no! Ruin people’s diets, more likely! Haha. Is there anything more delicious than a Blizzard or a dipped cone? I don’t think so… unless it’s this Chocolate Covered Strawberry Cake!

Fresh strawberry cake from scratch... no Jello, artificial flavorings, or anything fake! This cake is delicious and easier than you would think! Top it with a rich chocolate frosting and you have Chocolate Covered Strawberry Cake that everyone will want an extra slice...or two...or three of!

Now I realize that Chocolate Covered Strawberry Cake and Dairy Queen don’t really relate to many of you. But for longterm DQ lovers like me, do you remember the Chocolate Covered Strawberry Blizzard? I used to get them all the time in college and then they took them off the menu. It was a very sad day. Some stores would make them, and others wouldn’t, which made NO sense to me because it’s just strawberries [that they already have from the sundaes!] and chocolate [like chips/shavings OR that dipped cone topping…yum!]. Yum and yum. It’s so basic, but so good, ya know?

Fresh strawberry cake from scratch... no Jello, artificial flavorings, or anything fake! This cake is delicious and easier than you would think! Top it with a rich chocolate frosting and you have Chocolate Covered Strawberry Cake that everyone will want an extra slice...or two...or three of!

Now, I haven’t been to my local DQ [I just got chills typing that, you guys…yay!] yet to see if they’ll make me my favorite Blizzard, but right now I have this cake and the world is a-okay. You can make this fresh strawberry cake with fresh or frozen strawberries, making it a great year-round treat. There’s absolutely nothing fake or artificial in this cake, just lots of pure strawberry goodness! If you want more of a pink/red color, you’ll have to use a little food coloring but I was happy with the color of my cake without that. The strawberry cake is light and fluffy, and when combined with the rich chocolate frosting is absolutely heavenly! I hope you enjoy this cake as much as I did!

one year ago: Pumpkin Cranberry Bread
two years ago: Cranberry and Cream Cheese Muffins
three years ago: Pumpkin Graham Muffins
four years ago: Pollo alla Poggia Alloro {A Family Farm in Tuscany}
five years ago: Homemade Maple & Brown Sugar Almond Butter
six years ago: Pumpkin Soup and Homemade Croutons

Chocolate Covered Strawberry Cake

  • Servings: 12
  • Print

for Fresh Strawberry Cake

for Chocolate Frosting

Ingredients:

for cake

  • 24 ounces very ripe strawberries, hulled – or frozen strawberries work too!
  • 1-2 teaspoons sugar, optional
  • 1/4 milk, at room temperature
  • 6 large egg whites, at room temperature
  • 2 teaspoons vanilla extract
  • 2 1/4 cup cake flour, sifted
  • 1 3/4 cup sugar
  • pinch of salt
  • 4 teaspoons baking powder
  • 12 tablespoons unsalted butter, at room temperature
  • red or pink food coloring, if desired

for frosting

  • 3 cups powdered sugar [plus up to an extra 1/2 cup as needed]
  • pinch of salt
  • 8 ounces cream cheese, softened
  • 12 tablespoons unsalted butter, at room temperature
  • 9 ounces bittersweet chocolate, melted
  • 6 ounces milk chocolate, melted
  • 8 ounces sour cream

Directions:

If using frozen strawberries [I did!], set in a fine strainer placed over a bowl. Let rest until thawed, tossing occasionally to remove excess juices. Reserve liquid for another use or discard as desired.

If using fresh strawberries, hull and toss with 1-2 teaspoons sugar. Let rest at room temperature for an hour or two, until juicy.

Place strawberries in a food processor and pulse. Reserve 3/4 cup puree for the cake. Use the rest for something else–I stirred mine into plain yogurt. Yum!

Preheat oven to 350 degrees F. Grease and flour two 8 or 9 inch round baking pans. Mine are 9 inches. If desired, you can also grease pan, line with parchment circles, then grease and flour again.

In a medium bowl, whisk together 3/4 cup strawberry puree, 1/4 cup milk, egg whites, and vanilla.

In the bowl of a stand mixer, combine flour, sugar, baking powder, and salt. While mixer is running on low, add butter. Mix until moist crumbs form.

Add strawberry puree mixture to bowl of stand mixer. Beat on medium speed for about a minute, then turn off mixture. Scrape sides and stir together by hand for about 30 seconds. Add a drop or two of food coloring if desired–original recipe said that batter won’t get pinker so add food coloring if you want more of a pink/red color!

Divide batter between prepared pans. Smooth tops with a rubber spatula, then bake for 22-25 minutes, or until a toothpick inserted in the center comes out clean. I usually start checking around 18 minutes and cover with foil if top is browning too much.

When finished, let cake rest in pan for 10-15 minutes before turning out onto wire rack to cool completely.

Meanwhile… make that frosting!

In a small bowl, mix 3 cups powdered sugar, cocoa, and salt. With an electric mixer, combine cream cheese and butter until smooth and fluffy.

Add cocoa mixture to cream cheese concoction in 1/3 cup increments, mixing until fully incorporated. Pour in the chocolate [it helps to melt it in a glass measuring cup with a spout] while mixer is running on low, then add sour cream and beat until combined, scraping the sides as necessary. If desired, add additional powdered sugar to reach desired consistency.

Frost the cake once cooled–first between the two layers, then on top and sides. Some people use the extra strawberry puree in between the layers but I didn’t do that. Check out original recipe for more details! Enjoy!

P.S. I stored the leftovers in the fridge due to the frosting. It’s great cold!

Beans, Main Dishes, Recipes

Baked Burritos with Pinto Beans + Kale

These fabulous savory bean and rice burritos are made even more delicious by the addition of hearty kale and gooey Monterey Jack cheese. You’ll be sure to love them–a great family meal!

These fabulous savory bean and rice burritos are made even more delicious by the addition of hearty kale and gooey Monterey Jack cheese. You'll be sure to love them--a great family meal!

Are you ready for a knock-your-socks off vegetarian burrito recipe? If so, you’ve come to the right place! And if not–or if vegetarian fare isn’t your thing–please stay, because I know you’ll enjoy it anyway! 🙂 Or you can just add some shredded chicken to the burrito filling. Don’t worry, I’ll be none the wiser. Haha. Now onto the good stuff! These burritos! Mmmm… they are your classic vegetarian burrito–rich and hearty beans and rice… but with a twist! This veggie burrito adds some flavorful and fresh kale to the mix, along with an awesome blend of savory seasonings [garlic, onion, tomato paste, oregano, and cumin] for a fabulous burrito like none other. You will simply be amazed by how good this burrito filling is! Divine! 🙂

These fabulous savory bean and rice burritos are made even more delicious by the addition of hearty kale and gooey Monterey Jack cheese. You'll be sure to love them--a great family meal!

Now, I won’t lie. There are quite a few ingredients and steps below for this recipe, and it takes about an hour from start to finish. Obviously I made this pre-baby. Gah. But, it’s still totally doable for a family meal because this is the sort of meal you can make in steps and keep in the fridge [or freezer] to eat all week long. Basically, you begin by making some rice–with garlic and broth instead of water for added yumminess. Then you saute up some onion, add your seasonings and kale, and let that cook down a bit. Then you mix everything together and add cheese and tortillas… bake, and voila! Dinner is served. Yum.

These fabulous savory bean and rice burritos are made even more delicious by the addition of hearty kale and gooey Monterey Jack cheese. You'll be sure to love them--a great family meal!

I mention this in the recipe notes below, but what I wanna emphasize is that this makes a TON of burrito filling, so YAY! Lots of work=lots of meals. Hooray. When I made this for us, we ate burritos a few times during the week, adding the filling to tortillas as desired. Then we froze the rest for another time. America’s Test Kitchen, the author of this recipe in their amazing vegetarian cookbook [go check it out! I borrowed it from my library but I want a copy for home now.] suggests that this serves six. Well, maybe our tortillas were wayyyy smaller, but we got at least 10 burritos, if not MORE out of the recipe as written below. Your mileage may vary, but that’s how it went for us. I definitely loved this dish and so did Ben. I think I’m going to make a batch before I go back to work after Labor Day [tear] for quick weeknight dinners in my new working mama life. Hope y’all enjoy!

one year ago: Zucchini Apple Walnut Muffins
two years ago: Baked Honey Chicken Nuggets with Homemade Chick-Fil-A Sauce
three years ago: Churro Cheesecake Bars
four years ago: Pesto Potato Salad
five years ago: Salmon with Lemon, Tarragon, and Garlic Sauce
six years ago: Summer Mexican Soup

Baked Burritos with Pinto Beans + Kale

  • Servings: 6+
  • Print

from The Complete Vegetarian Cookbook by America’s Test Kitchen

Ingredients:

  • 2 1/4 cups vegetable or chicken broth, low sodium
  • 3/4 cup long grain white rice
  • 6 cloves garlic, minced
  • salt + freshly ground black pepper
  • 1/4 cup fresh cilantro, minced + more for topping if desired
  • 1 tablespoon olive oil
  • 1 onion, finely diced
  • 3 tablespoons tomato paste
  • 1 teaspoon minced chipotle chile in adobo sauce
  • 1 tablespoon ground cumin
  • 1 teaspoon dried oregano
  • 1 bunch kale or swiss chard, stemmed and leaves chopped into thin ribbons
  • 1 – 15 ounce can pinto beans, rinsed and drained
  • 1 tablespoon lime juice
  • 6 burrito sized flour tortillas
  • 10 ounces grated Monterey Jack cheese
  • sour cream, salsa, etc. – for serving as desired

Directions:

In a medium saucepan set over medium-high heat, combine 1 1/4 cups broth, rice, half of the garlic, and some salt and pepper. Bring to a boil, then cover and reduce heat to low. Cook for about 20 minutes, until rice is tender and broth has been absorbed. Remove from heat and set aside, covered, for 10 minutes. Add cilantro and fluff with a fork.

Meanwhile, in a large skillet, heat oil over medium heat. Add onion and cook until softened, about 4-5 minutes. Add in tomato paste, chipotle chile pepper, cumin, oregano, remaining garlic, and salt and pepper. Stir everything together for a minute, then add kale and 1/2 cup broth. Cover and let simmer for 15 minutes, until kale has softened.

In a bowl, combine half of the beans and the remaining 1/2 cup broth. Mash with a potato masher until coarse, then fold into kale mixture along with remaining beans and lime juice. Cook, stirring continually, for a few minutes until liquid is mostly evaporated. Stir in rice.

Turn oven on to broil. Line a baking sheet with foil or parchment paper.

Next, assemble burritos. Warm tortillas in the microwave, then divide mixture between tortillas, adding a little cheese inside of each tortilla before rolling into burritos. Place seam-side down on prepared baking sheet, then sprinkle with a little more cheese. Broil until cheese melts and begins to brown, about 3-5 minutes.

Serve with sour cream, salsa, etc. as desired.

Notes:

The prepared burrito filling also freezes well, on its own or in pre-made burritos ready for the oven. To heat later, microwave defrosted burrito filling until hot then prepare burritos with cheese and broil as directed above. Pre-made and frozen burritos can be heated from frozen in the oven at 375 degrees for 20-30 minutes until hot.

The cookbook suggests this recipe serves 6. However, we got at least 10 burritos out of this amount of filling. Our tortillas may have been smaller and/or filled less, so your mileage may vary.


Chicken, Main Dishes, Recipes

Spicy Ranch Chicken Rice Skillet

In 30 minutes you can have a deliciously wonderful dinner on the table! Take your go to easy dinner components–rice, chicken, and veggies–then toss them in a [slightly spicy] ranch sauce… and sit back and enjoy! 

Spicy Ranch Chicken Rice Skillet: In 30 minutes you can have a deliciously wonderful dinner on the table! Take your go to easy dinner components--rice, chicken, and veggies--then toss them in a [slightly spicy] ranch sauce... and sit back and enjoy!

If healthier skillet meals and casseroles are my favorite things ever now [minimal dishes, no real need for a side dish cause you have the protein + veggies + starch all in one happy mix], I can only imagine how valuable they’ll be once Baby Volde arrives in May! 🙂 I’m planning on doing some freezer cooking before his arrival, but those meals will eventually be depleted and when I go back to work having these sort of tasty yet healthy meals on hand will be key to my happiness. I’m sure of it! So I’m making certain I find some good recipes now so I’m ready then. If this Spicy Ranch Chicken Rice Skillet doesn’t fit the bill for easy, yummy, and delicious while still being healthy, then I don’t know what would!

Spicy Ranch Chicken Rice Skillet: In 30 minutes you can have a deliciously wonderful dinner on the table! Take your go to easy dinner components--rice, chicken, and veggies--then toss them in a [slightly spicy] ranch sauce... and sit back and enjoy!

This meal is SO good, you guys. If you’ve ever looked around my blog or know me in real life, you know that I’m a Mexican/Southwestern/Tex Mex food addict. I could go for tacos, black bean and rice bowls, carnitas, enchiladas, or quesadillas just about any day. It’s not any one thing about that kind of cuisine–the spices, or the cheese, or the toppings, but all of that at once. And this dish, though it’s not “Mexican” at all, it reminds me of a Mexican/Southwestern/Tex Mex-influenced meal thanks to the combo of chicken, black beans, rice, and tomatoes, plus all the yummy toppings! Cheese! Sour cream! Cilantro! Scallions! Yum!

Spicy Ranch Chicken Rice Skillet: In 30 minutes you can have a deliciously wonderful dinner on the table! Take your go to easy dinner components--rice, chicken, and veggies--then toss them in a [slightly spicy] ranch sauce... and sit back and enjoy!

Seriously, this stuff is ahhhmazingly good! Plus it has veggies, so that makes it good for you! Ha. 🙂 But it does, right?!? Don’t be put off by the “spicy” label on this recipe. It’s really only lightly spicy… the cheese and ranch combo cools things down, and if your family doesn’t do spice, then omit the crushed red pepper and cayenne and use regular diced tomatoes instead of fire-roasted. No matter how you make it, everyone will certainly love it! Though I’m a fan of making this dish with leftover roasted chicken, you can certainly make it with other proteins like ground turkey, chorizo, or even leftover shredded pulled pork for a new flavor profile. Now I have a new dinner idea for later this week because I just so happen to have a bunch of leftover pulled pork in the freezer! Score! 🙂 Enjoy!

one year ago: Chocolate Coffee Bundt Cake
two years ago: Strawberry Yogurt
three years ago: Cumin-Scented Cabbage Salad
four years ago: Extraordinary Grilled Cheese
five years ago: The Best Egg Salad

Spicy Ranch Chicken Rice Skillet

  • Servings: 6
  • Print

adapted from Well Plated

Ingredients:

  • 1 1/2 cups white rice
  • 3 cups low sodium chicken broth
  • 2 teaspoons extra virgin olive oil
  • 1/2 cup yellow onion, minced
  • 2 cups bell pepper, chopped [I used a mix of red, yellow, and orange]
  • 3 cloves garlic, minced
  • 1 – 15 ounce can black beans, drained and rinsed
  • 1 can no-salt fire-roasted tomatoes or petite diced tomatoes [depending on your preferred level of spice]
  • 2 cups cooked and shredded chicken
  • 2-3 tablespoons homemade ranch seasoning [or one small package from the grocery store]
  • crushed red pepper, to taste
  • cayenne pepper, to taste
  • freshly ground black pepper, to taste
  • 1/2 cup water or additional chicken broth, if necessary
  • shredded cheddar cheese, for serving
  • cilantro, for serving
  • chopped scallions, for serving
  • sour cream, for serving

Directions:

In a saucepan, combine rice and chicken broth. Bring to a boil, then reduce heat to low. Cook until rice is tender.

Meanwhile, in a large skillet, heat olive oil over medium heat. When hot, add onion and bell pepper and cook for about 5 minutes, until soft. Add garlic and saute for 30 seconds until fragarent. Reduce heat to low and stir in black beans, tomatoes, and chicken. Sprinkle with 2 tablespoons of ranch seasoning. Stir to combine, then add red pepper, cayenne, and black pepper to taste. Add additional ranch seasoning to taste. Cover and let simmer for 5 minutes or until hot.

When rice is cooked, stir into veggie and chicken mixture. Add up to 1/2 cup additional chicken broth/water if it is too thick to stir. Serve with cheddar cheese, cilantro, and scallions. For a creamy treat, stir in a bit of sour cream. Enjoy!